There’s something about the smell of toasted coconut that instantly transports me back to summer evenings at my grandma’s house. She’d bake these cookies, and the air would fill with a warm, caramel-y coconut aroma that made the whole neighborhood seem cozy and lively. Baking them now, I try to capture that same magic, knowing the smell alone can bring a little sunshine to any day.
Coconut cookies aren’t just a treat — they’re a sensory memory. I love how the toasted edges get that perfect little crunch, while the inside stays soft and chewy. It’s a simple pleasure, really, but the aroma of coconut roasting brings me back every time, making each batch feel like a small celebration of lazy afternoons and childhood nostalgia.
Focusing on how the aroma of toasted coconut transforms these cookies into a nostalgic, sensory experience that evokes summer evenings and childhood treats.
The inspiration behind these cookies
- This recipe was born out of a lazy Sunday afternoon. I had a bag of shredded coconut and a sudden craving for something sweet, crunchy, and a little tropical. I remembered how my grandma used to toast coconut in her skillet, filling the house with that irresistible nutty aroma, and thought, why not try that with a cookie? The first batch was a bit messy, but the smell alone kept me coming back to the oven.
- Over time, I tweaked the recipe, aiming for a cookie that’s chewy inside with just enough toasted edges. It’s become my go-to when I want a quick bake that smells like summer and feels like a small, edible hug. It’s funny how a simple ingredient like coconut can turn into a nostalgic ritual, especially on days when I need a little reminder of slow weekends and childhood treats.
- heading
- story_type
Key ingredients and tips
- Shredded coconut: I love the toasty, slightly chewy texture it develops when browned—try lightly toasting it first for extra flavor.
- Unsalted butter: It adds a rich, mellow base that balances the sweetness—salted butter can work, but reduce the added salt a bit.
- Granulated sugar: I prefer a mix of white and brown sugar for depth—feel free to swap all brown for a richer, caramel note.
- Eggs: They bind everything together and add moisture—be sure they’re at room temperature for a smoother mix.
- Vanilla extract: It brightens the coconut flavor—use high-quality vanilla for a more vivid aroma.
- Flour: All-purpose works best—if you want a softer cookie, try a touch of cornstarch in the mix.
- Baking soda: Just enough to give these cookies a little lift—be precise, or they might turn flat or spread too much.
Spotlight on key ingredients
Coconut:
- Shredded coconut: I love the toasty, slightly chewy texture it develops when browned—try lightly toasting it first for extra flavor.
- Unsalted butter: It adds a rich, mellow base that balances the sweetness—salted butter can work, but reduce the added salt a bit.
Sugar and Eggs:
- Granulated sugar: I prefer a mix of white and brown sugar for depth—feel free to swap all brown for a richer, caramel note.
- Eggs: They bind everything together and add moisture—be sure they’re at room temperature for a smoother mix.
Notes for ingredient swaps
- Dairy-Free: Swap butter for coconut oil or vegan butter. The flavor shifts slightly, but it keeps the cookies rich and moist.
- Sweetener: Use honey or maple syrup instead of sugar. Expect a softer, chewier texture with a hint of floral or caramel notes.
- Coconut Type: Try dried, sweetened shredded coconut or unsweetened. Toasted is best for flavor, but unsweetened works fine if you prefer less sweetness.
- Flour: Almond flour can replace all-purpose for a nuttier, denser cookie—adjust baking time slightly.
- Add-ins: Mix in chopped macadamia nuts or white chocolate chips for extra decadence. Watch the bake time as they can cause uneven browning.
- Extracts: Add a splash of almond or coconut extract to enhance flavor complexity—use sparingly to avoid overpowering.
- Toppings: Sprinkle sea salt or drizzle caramel on top after baking for contrast—adds a salty-sweet dimension.
Equipment & Tools
- Oven: Bake the cookies evenly.
- Baking sheet lined with parchment: Prevent sticking and easy cleanup.
- Skillet: Toast coconut evenly.
- Mixing bowls: Combine ingredients.
- Spatula or spoon: Mix and portion dough.
- Measuring cups/spoons: Ensure accurate ingredient amounts.
- Wire rack: Cool cookies evenly.
Step-by-step guide to coconut cookies
- Preheat your oven to 175°C (350°F). Line a baking sheet with parchment paper. Gather your mixing bowls, spatula, and a measuring cup.
- In a skillet over medium heat (about 160°C/320°F), toast 1 cup shredded coconut until golden and fragrant, about 3-4 minutes. Stir constantly to prevent burning. Set aside to cool.
- In a large bowl, cream together 1/2 cup unsalted butter (softened) and 1/2 cup granulated sugar until pale and fluffy, about 2-3 minutes. Use a hand mixer if available.
- Add 1 large egg and 1 teaspoon vanilla extract to the butter mixture. Mix until well combined. The mixture should be smooth and slightly glossy.
- In a separate bowl, whisk together 1 cup all-purpose flour, 1/4 teaspoon baking soda, and a pinch of salt. Gradually add dry ingredients to wet, mixing just until combined. Do not overmix.
- Fold in the toasted coconut (reserve a small amount for topping if desired). The dough will be thick and slightly sticky. If too stiff, add a teaspoon of milk; if too sticky, add a bit more flour.
- Using a tablespoon or cookie scoop, portion out dough onto the prepared baking sheet, spacing about 2 inches apart. Flatten each cookie slightly with the back of a spoon.
- Bake for 10-12 minutes, or until edges are golden brown and center looks set but still soft. Keep an eye on the first batch to adjust time if your oven runs hot.
- Remove from oven and let cookies rest on the baking sheet for 5 minutes. They will firm up as they cool. Transfer to a wire rack to cool completely, about 10 minutes.
- Once cooled, sprinkle remaining toasted coconut on top or drizzle with melted chocolate for extra flair. Serve when just warm or at room temperature.
Let the cookies rest on the baking sheet for 5 minutes, then transfer to a wire rack to cool completely. Optionally, sprinkle with extra toasted coconut or drizzle with chocolate. Serve once cooled for optimal texture.
How to Know It’s Done
- Edges are golden brown and slightly crisp.
- Cookies feel firm but still soft when pressed.
- Aromatic toasted coconut scent fills the room.
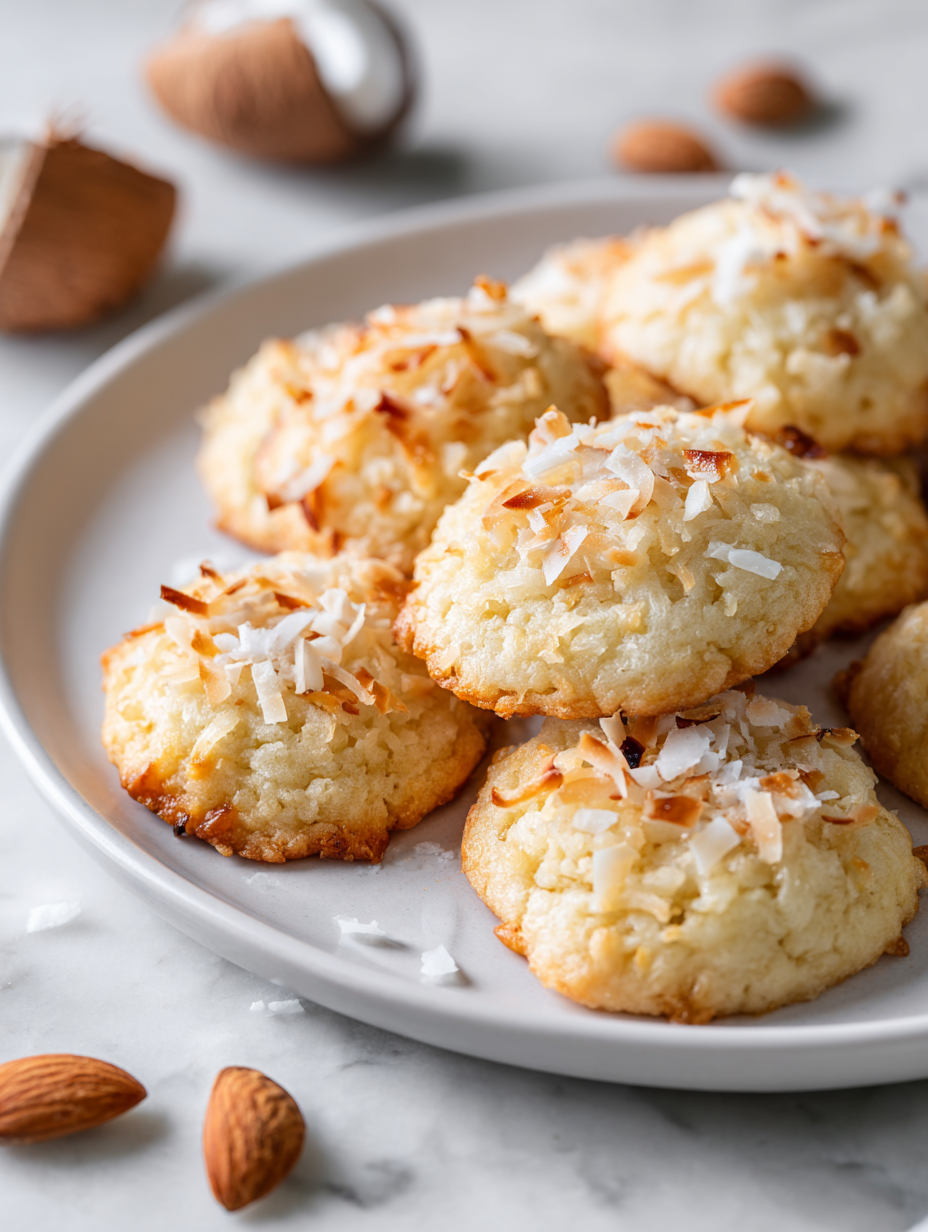
Toasted Coconut Cookies
Ingredients
Equipment
Method
- Preheat your oven to 175°C (350°F) and line a baking sheet with parchment paper. Gather your skillet, mixing bowls, and measuring spoons.
- In a dry skillet over medium heat, toast the shredded coconut, stirring constantly, until golden and fragrant, about 3-4 minutes. This releases a warm aroma and gives the coconut a richer flavor. Transfer to a plate to cool.
- In a large bowl, cream together softened butter and granulated sugar using a spatula or hand mixer until the mixture is pale, fluffy, and slightly increased in volume, about 2-3 minutes. This creates a smooth base for the cookies.
- Add the egg and vanilla extract to the butter mixture, mixing until well combined and smooth. The mixture should feel glossy and uniform.
- In a separate bowl, whisk together the all-purpose flour and baking soda. Gradually add these dry ingredients to the wet mixture, folding gently until just combined. Be careful not to overmix, as this can affect the cookies’ tenderness.
- Gently fold the toasted coconut into the dough, ensuring even distribution. The dough will be thick and slightly sticky; if it feels too stiff, add a teaspoon of milk, or if too sticky, sprinkle in a little more flour.
- Using a tablespoon or cookie scoop, portion out the dough onto the prepared baking sheet, spacing each cookie about 2 inches apart. Lightly flatten each cookie with the back of a spoon to help them spread evenly.
- Bake in the preheated oven for 10-12 minutes, or until the edges are golden brown and the centers look just set but still soft to the touch. The aroma of toasted coconut will fill your kitchen.
- Remove the cookies from the oven and let them rest on the baking sheet for about 5 minutes. This allows them to firm up slightly. Then, transfer them to a wire rack to cool completely, about 10 minutes.
- Once cooled, sprinkle some additional toasted coconut on top or drizzle with melted chocolate for an extra touch of indulgence. Serve the cookies at room temperature and enjoy their chewy interior and crispy, fragrant edges.
Pro Tips for Perfect Cookies
- Bolded Mini-Head: Toast coconut until golden and fragrant, about 3-4 minutes, for deeper flavor.
- Bolded Mini-Head: Chill the dough for at least 30 minutes; it firms up, making dough easier to scoop and shape.
- Bolded Mini-Head: Use a light hand when flattening cookies before baking; it helps prevent spreading too much.
- Bolded Mini-Head: Keep an eye on edges during baking; they turn quickly from perfect to overdone, around 10-12 minutes.
- Bolded Mini-Head: For extra chewiness, add a tablespoon of milk if dough feels too stiff or crumbly before baking.
- Bolded Mini-Head: Sprinkle a pinch of coarse sea salt on top right before baking; it enhances the toasted coconut aroma.
- Bolded Mini-Head: Resist opening the oven door frequently; sudden temperature drops can cause cookies to crack or spread.
Common mistakes and how to fix them
- FORGOT to watch coconut; it burns quickly—lower heat if needed.
- DUMPED in all ingredients at once; mix gradually to avoid overworking dough.
- OVER-TORCHED coconut; stir constantly and remove promptly once golden.
- SCOOPED cookies unevenly; use a scoop for uniform size and even baking.
Quick fixes and pantry swaps
- If cookies spread too much, chill dough for 30 minutes before baking.
- When coconut burns, quickly remove from heat and add to batter for extra flavor.
- Splash a few drops of water on a cookie sheet to soften hardened cookies.
- Patch over cracks with a tiny dab of melted chocolate or coconut oil.
- Shield delicate edges from over-torching by tenting with foil for the last few minutes.
Prep, store, and reheat tips
- Prepare the toasted coconut ahead by browning it in a skillet; keep in an airtight container for up to 3 days, releasing a warm, nutty aroma when reopened.
- Dough can be made a day in advance, wrapped tightly in plastic and refrigerated; it firms up, making it easier to scoop later.
- Cookies stay freshest in an airtight container at room temperature for up to 3 days, with a faintly caramelized coconut scent lingering.
- Reheat cookies briefly in a 150°C (300°F) oven for 3-5 minutes until warm and fragrant, restoring some of their initial crunch and aroma.
Top questions about coconut cookies
1. How do I toast coconut without burning it?
To get that toasted coconut aroma, toast it in a dry skillet over medium heat until golden and fragrant, about 3-4 minutes. Keep stirring to prevent burning.
2. Can I use sweetened shredded coconut?
Use fresh, shredded coconut for the best texture and flavor. Dried, sweetened coconut can be used, but adjust sugar if needed.
3. Why does my dough need chilling?
Chill the dough for at least 30 minutes before baking. This firms it up, making cookies easier to shape and less likely to spread too much.
4. How do I know when the cookies are done?
Bake at 175°C (350°F) for 10-12 minutes. Keep an eye on the edges; they should be golden and slightly crisp, with the centers still soft.
5. My cookies spread too much, how can I fix that?
If your cookies spread too thin or flatten excessively, refrigerate the dough for a bit before baking or reduce oven temperature slightly.
6. How should I store leftover cookies?
Store cookies in an airtight container at room temperature for up to 3 days, or freeze for longer storage. Reheat briefly in a warm oven to restore crunch.
7. Can I make these dairy-free?
Replacing butter with coconut oil can work, but expect a slightly different, less creamy texture and aroma. Use same amount as butter.
8. Can I add other flavors or extracts?
Adding a teaspoon of vanilla enhances coconut flavor, but you can also try almond or coconut extract for a different aroma punch.
9. How do I prevent cookies from overbaking?
Overbaking can turn cookies hard. Remove them when edges are golden, and centers still look slightly soft—they’ll firm up as they cool.
10. How can I make the cookies more interesting?
For extra crunch, sprinkle a pinch of sea salt on top before baking or drizzle with melted chocolate once cooled.
Baking these coconut cookies feels like a small act of memory, a way to hold onto summer evenings and simple joys. The aroma of toasted coconut is surprisingly evocative—almost like a gentle reminder of childhood treats and slow weekends. Each bite brings a warm, chewy, crunchy contrast that makes the effort feel worth it.
In the end, it’s not just about the recipe but the quiet moments of nostalgia and the sensory pleasure of coconut’s rich, nutty scent. Whether shared with friends or enjoyed alone, these cookies offer a brief escape to a sunnier, simpler place—one that’s always worth revisiting.

Hi, I’m Charlotte Hayes, the creator and storyteller behind Lost in the Aroma. If you’ve ever closed your eyes while something simmered on the stove just to take in the scent, then you already understand what this space is about. For me, aroma is memory. It is emotion. It is the first sign that something beautiful is about to be shared. Lost in the Aroma is where I bring together recipes, sensory storytelling, and my lifelong love for food. I am so glad you’re here.


Leave a Reply