Brownies seem simple, right? But I’ve found that the type of chocolate you use can flip the whole thing—making them fudgy and rich or more cake-like and tender. It’s a little dance of balancing cocoa intensity with creaminess, and honestly, it’s kind of addictive to get right.
I’ve spent years tinkering with different chocolates—dark, milk, even a splash of white—to see how each one impacts the final bite. What I love about this recipe is how adaptable it is to what you’ve got in your pantry. Plus, there’s something satisfying about knowing that the subtle choices you make can turn a humble brownie into a personal masterpiece.
Focusing on how the type of chocolate affects the final texture and flavor, this recipe explores the subtle art of balancing cocoa intensity with creaminess, turning a simple brownie into a personalized experience.
The story behind this recipe
- This brownie recipe actually started as a way to use up a forgotten bar of dark chocolate that was lurking in the back of my pantry. I remember the smell of melting chocolate filling the kitchen, making everything feel a little more special even on a rushed weekday. It’s funny how something so simple can turn into a little moment of comfort.
- Over the years, I’ve tweaked this recipe based on what I crave—sometimes more gooey, sometimes with a crackly top. It’s become a bit of a messy experiment in my kitchen, where I trust my instincts and taste as I go. Every batch feels like a small victory, especially when the edges are just slightly crisp and the center still soft and fudgy.
- heading: The story behind this recipe
Ingredient breakdown
- Unsweetened cocoa powder: I love the deep, rich scent it adds—go for a natural, unsweetened kind for that intense chocolate punch, but Dutch-process works if you want a smoother, less acidic flavor.
- Good-quality dark chocolate: Using a bar with at least 70% cocoa makes a noticeable difference—melts into a silky, oozy texture that’s just addictive. If you only have chips, add a little butter to help them melt smoothly.
- Butter: I prefer unsalted, so I can control the salt level—makes the brownies taste full-bodied and slightly nutty. If you’re out, a neutral oil can work, but it’s not quite the same.
- Granulated sugar: I stick to white sugar here—it creates that classic shiny crackly top. Brown sugar adds moisture and a hint of caramel, if you’re feeling a bit more relaxed.
- Eggs: They give structure and richness—don’t skimp on room temperature eggs, it helps everything blend smoothly and creates a tender crumb. For a vegan version, try aquafaba, but results differ.
- All-purpose flour: I keep it simple—just plain flour. Too much can toughen the brownies, so measure carefully. For a slightly fudgier bite, a touch less flour works.
- Vanilla extract: Just a splash brightens everything, adding a subtle warmth. Skip it if you’re after a more intense chocolate focus, but I think it makes a difference.
Spotlight on key ingredients
Dark Chocolate:
- Good-quality dark chocolate: I love the deep, rich scent it adds—go for a natural, unsweetened kind for that intense chocolate punch, but Dutch-process works if you want a smoother, less acidic flavor.
- Melty and oozy: It melts into a silky, gooey texture that’s just addictive, especially if you chop it finely and melt gently. If you only have chips, add a bit of butter to help them melt smoothly.
Cocoa Powder:
- Unsweetened cocoa powder: I love the deep, rich scent it adds—go for a natural, unsweetened kind for that intense chocolate punch, but Dutch-process works if you want a smoother, less acidic flavor.
- Vivid scent and rich color: It intensifies the chocolate flavor and gives the brownies that classic, dark hue. Sift it well to avoid lumps and ensure even mixing.
Notes for ingredient swaps
- Dairy-Free: Swap butter for coconut oil or vegan butter. It won’t be quite as rich but still tender.
- Sugar Alternatives: Use honey or maple syrup, but cut back a bit—liquid sweeteners can make batter runnier.
- Gluten-Free: Replace all-purpose flour with a 1:1 gluten-free blend. Expect a slightly denser crumb.
- Vegan Chocolate: Opt for dairy-free dark chocolate or cacao nibs for that deep chocolate flavor without dairy.
- Nutty Additions: Incorporate chopped nuts or seeds for crunch—just toast them beforehand for extra flavor.
- Extra Oomph: Add a pinch of sea salt or espresso powder to intensify the chocolate’s richness.
- Flavor Boost: Stir in orange zest or cinnamon for a subtle, aromatic twist that complements the cocoa.
Equipment & Tools
- Oven: To bake the brownies evenly at the right temperature.
- 8-inch square baking pan: Holds the batter during baking and shapes the brownies.
- Parchment paper: Prevents sticking and makes removal easier.
- Small saucepan: Melts chocolate and butter smoothly.
- Whisk: Blends eggs and sugar thoroughly.
- Spatula: Folds dry ingredients into wet without overmixing.
Step-by-step guide to brownies
- Preheat your oven to 175°C (350°F). Line an 8-inch square baking pan with parchment paper, leaving an overhang for easy removal. Gather your ingredients and tools.
- Equipment & Tools: Mixing bowls for combining ingredients, a whisk for blending, a spatula for folding, a small saucepan for melting chocolate and butter, and a baking pan with parchment for baking.
- Melt chocolate and butter together in a small saucepan over low heat, stirring constantly until smooth. Remove from heat and let cool slightly—just warm, not hot.
- In a large bowl, whisk together sugar and eggs until well combined and slightly frothy, about 2 minutes. Add vanilla extract and whisk again.
- Pour the melted chocolate mixture into the egg mixture. Stir gently with a spatula until fully incorporated and glossy.
- Sift in the cocoa powder and flour directly into the wet ingredients. Fold gently just until no streaks remain—don’t overmix, or the brownies will be dense.
- Pour batter into prepared pan, spreading evenly. Give the pan a gentle tap on the counter to settle the batter and remove air bubbles.
- Bake for 20-25 minutes. Check for doneness by gently jiggling the pan—center should be just set but still fudgy. The edges will pull away slightly from the pan.
- Remove from oven and let cool in the pan on a wire rack for at least 15 minutes. For cleaner slices, refrigerate for 30 minutes before cutting.
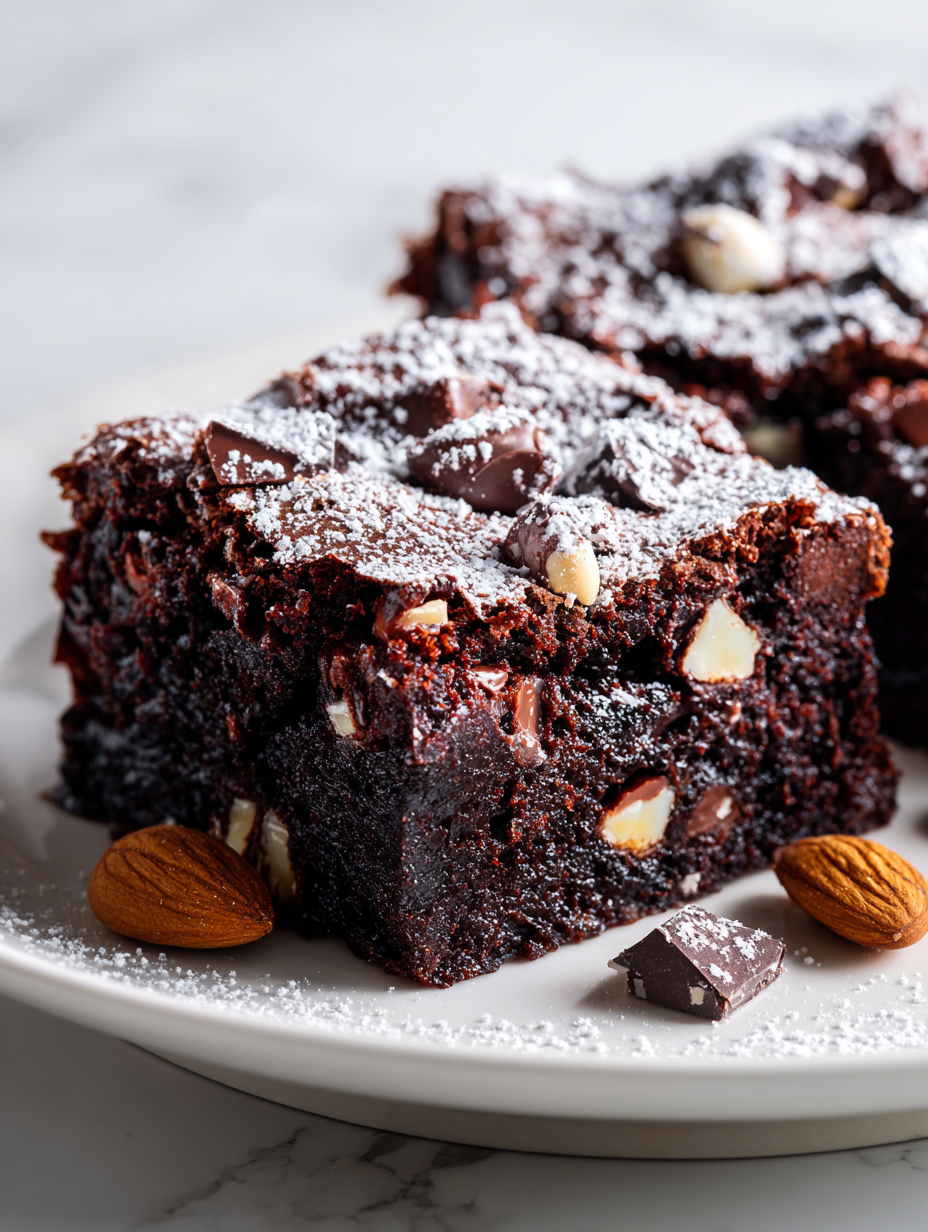
- Slice into squares with a sharp knife. Serve slightly warm or at room temperature, with a dusting of powdered sugar or a dollop of cream if desired.
Let the brownies cool in the pan for 15 minutes, then transfer to a wire rack. For cleaner cuts, refrigerate for 30 minutes. Slice with a sharp knife and serve directly from the fridge or at room temp, adjusting to your preference.
How to Know It’s Done
- Center is just set, jiggles slightly when shaken.
- Edges are slightly pulled away from the pan, golden and firm.
- A toothpick inserted in the center comes out with moist crumbs, not batter.
Chocolate Brownies with Varied Chocolate Types
Ingredients
Equipment
Method
- Preheat your oven to 175°C (350°F). Line your baking pan with parchment paper, leaving a slight overhang for easy removal. Gather all your ingredients and tools.
- Place the chopped dark chocolate and butter into a small saucepan. Melt them together over low heat, stirring constantly until the mixture is smooth and glossy. Remove from heat and let cool slightly.
- In a large bowl, whisk the sugar and eggs until the mixture becomes slightly frothy and well combined, about 2 minutes.
- Pour the slightly cooled chocolate mixture into the egg mixture. Gently fold with a spatula until fully combined and shiny.
- Sift the cocoa powder directly into the bowl and fold it in carefully. Then, add the flour and vanilla extract, folding just until no streaks remain. Be gentle to keep the brownies tender.
- Pour the batter into the prepared pan, spreading it evenly with a spatula. Give the pan a gentle tap on the counter to settle the batter and release any air bubbles.
- Bake for 20 to 25 minutes, until the edges are just golden and the top has a shiny, crackly surface. Check doneness by inserting a toothpick—moist crumbs should cling but not wet batter.
- Remove the pan from the oven and allow the brownies to cool in the pan for at least 15 minutes. For cleaner slices, refrigerate for an additional 30 minutes.
- Use the parchment overhang to lift the brownies out of the pan. Slice into squares with a sharp knife, wiping it clean between cuts for neat edges.
- Serve the brownies slightly warm or at room temperature, perhaps with a dusting of powdered sugar or a dollop of whipped cream. Enjoy the rich, fudgy texture with a complex chocolate flavor.
Pro tips for perfect brownies
- Bolded Mini-Head: Use high-quality chocolate → It melts into a silky, oozy texture that’s pure indulgence.
- Bolded Mini-Head: Don’t overmix after adding flour → Fold gently to keep the brownies tender and fudgy.
- Bolded Mini-Head: Tap the pan before baking → Removes air bubbles and evens out the batter for uniform baking.
- Bolded Mini-Head: Keep an eye on the edges → They should be just golden and slightly pulled away from the pan.
- Bolded Mini-Head: Use room temperature eggs → They blend smoothly, avoiding streaks and ensuring even rise.
- Bolded Mini-Head: Cool in the pan first → Rest 15 minutes, then refrigerate 30 to get clean, sharp slices.
- Bolded Mini-Head: For extra richness, add a pinch of sea salt → Enhances the chocolate flavor and balances sweetness.
Common mistakes and how to fix them
- FORGOT to adjust baking time → Check brownies at 20 minutes for doneness.
- DUMPED in too much flour → Measure flour carefully to avoid dense brownies.
- OVER-TORCHED the edges → Cover with foil if edges brown too quickly.
- UNDER-mixed the batter → Fold ingredients gently to keep the texture tender.
Quick fixes and pantry swaps
- If brownies are underbaked → Splash a little hot water on top, then microwave 5 seconds to revive moisture.
- When brownies are too dry → Patch with a drizzle of warm chocolate ganache or a smear of softened butter.
- If edges scorch → Shield edges with foil during baking for a softer, more even bake.
- When batter is too thick to pour → Open pantry and swap in a splash of milk or coffee for looseness.
- Splash melted chocolate on the countertop → Rescue with a quick swirl of warm butter or coconut oil for gloss and softness.
Make-Ahead and Storage Tips
- Prepare the brownie batter up to a day in advance, then cover and refrigerate. The flavors meld and intensify overnight, creating a richer taste.
- Baked brownies can be stored in an airtight container at room temperature for 2-3 days; for longer freshness, refrigerate up to 1 week. The texture becomes firmer, with a slightly less fudgy bite.
- Reheat individual slices in the microwave for about 15 seconds until warm and gooey—listen for that gentle crackle, signaling perfect temp.
- For best flavor, serve brownies at room temperature; refrigerate leftovers to preserve freshness and avoid spoilage, especially in warm weather.
- Frozen brownies keep well for up to 3 months. Wrap tightly in plastic wrap, then foil. Thaw at room temp and reheat briefly for that just-baked feel.
Top questions about brownies
1. How do I know when brownies are perfectly baked?
Look for a shiny, crackly top and a toothpick inserted in the center coming out with moist crumbs. It shouldn’t be wet or batter-like.
2. Why are my brownies dense or tough?
If they are too dense, don’t overmix the batter after adding flour. For fudgier brownies, slightly reduce the flour amount.
3. Can I use chocolate chips instead of bars?
Use good-quality dark chocolate for a rich, silky texture. Melting it slowly prevents graininess and enhances flavor.
4. Can I substitute chocolate chips for baking chocolate?
Yes, but chop them finely and add a little butter to help them melt and incorporate smoothly into the batter.
5. How long do brownies stay fresh?
Refrigerate leftovers in an airtight container for up to a week. Let them come to room temperature before serving for best texture.
6. Can I freeze brownies?
Yes, you can freeze baked brownies for up to 3 months. Wrap tightly, then thaw at room temperature. Reheat briefly for a gooey finish.
7. Should eggs be cold or at room temperature?
Use room temperature eggs to ensure they blend smoothly into the batter, preventing streaks and helping the brownies rise evenly.
8. How can I enhance the chocolate flavor?
Add a pinch of sea salt or espresso powder to deepen the chocolate flavor and add a subtle contrast.
9. How do I make my brownies more fudgy?
For a fudgier brownie, slightly reduce the flour or bake for a minute less. Keep an eye on the edges for doneness.
10. What if my edges over-brown?
If edges brown too quickly, tent the pan with foil during baking to protect the surface while the center finishes cooking.
Baking these brownies is a small act of rebellion against the chaos of everyday life. The smell of melting chocolate and the first bite—rich, fudgy, slightly crackly—reminds me why I keep coming back to this simple pleasure.
They’re a reminder that sometimes, the best moments come from honest, unpolished efforts in the kitchen. Whether shared with friends or enjoyed alone, these brownies capture a little bit of joy in every slice.

Hi, I’m Charlotte Hayes, the creator and storyteller behind Lost in the Aroma. If you’ve ever closed your eyes while something simmered on the stove just to take in the scent, then you already understand what this space is about. For me, aroma is memory. It is emotion. It is the first sign that something beautiful is about to be shared. Lost in the Aroma is where I bring together recipes, sensory storytelling, and my lifelong love for food. I am so glad you’re here.


Leave a Reply