Growing up, I always thought brownies were just about that rich, chocolatey taste. But it’s the texture that really gets me—those crackly tops and that dense, fudgy middle. I’ve tried countless recipes, but I finally cracked the code when I realized the secret is in the balance of melted chocolate and just the right amount of flour.
This recipe isn’t about making perfect bakery-style brownies; it’s about capturing that nostalgic, slightly chaotic moment of biting into a brownie that’s both crispy on top and gooey inside. It’s a messy, satisfying process that rewards patience and a good eye for texture. When I bake these, I know I’ll be sneaking bites straight from the pan—hot, sticky, with that deep chocolate aroma filling the kitchen.
These brownies remind me of afternoons spent in my grandma’s kitchen, when she’d pull a tray out of the oven, and the smell of melted butter and cocoa would drift through the house. It’s a simple comfort—something I keep coming back to, especially now, when a little bit of fudgey happiness feels more important than ever.
Focusing on the secret to achieving perfectly fudgy brownies with a crispy top, like the ones I used to sneak from my grandma’s oven when I was a kid.
The story behind this recipe
- This recipe started as a quest to recreate the brownies my grandmother used to bake—those intensely fudgy, crackly-topped squares that made me feel like I was sneaking into a chocolate dream. I remember the smell of melting butter and cocoa filling her tiny kitchen, that warm, slightly chaotic energy of baking with her. It’s funny how a simple dessert can carry so much nostalgia and comfort.
- One afternoon, after messing up a dozen batches trying to get that perfect balance, I finally nailed it by emphasizing melted chocolate and a quick bake. That moment of pulling the tray out, crackling sounds and all, felt like a small victory. Since then, I’ve kept tweaking, always chasing that rich, fudge-hued, crispy-topped brownie I loved as a kid.
- story_type
Key ingredients and tips
- Unsweetened cocoa powder: I love the deep, smoky aroma it brings—try Dutch-processed for a richer flavor, or natural for a brighter punch.
- Dark chocolate: Melting good-quality dark chocolate makes these brownies oozy inside, but if you want a slightly less intense flavor, milk chocolate works too.
- Butter: I use unsalted butter for control, but if you only have salted, cut back a pinch—just watch the salt in the batter.
- Eggs: Fresh, room-temperature eggs help everything bind better and give a smoother batter—don’t skip this step.
- Sugar: Brown sugar adds a slight caramel note and moisture, but if you want a crisper top, swap part for white sugar.
- Flour: Just a touch keeps these fudgy and dense—too much, and they lose that gooey center; avoid overmixing once you add the flour.
- Vanilla extract: A splash enhances the chocolate richness—use good quality or a splash of vanilla paste for extra depth.
Spotlight on key ingredients
Dark chocolate:
- I love how it melts into a rich, velvety paste that clings to the tongue—try good quality for that intense, lingering cocoa flavor.
- Butter: It’s the backbone of fudginess—when melted, it creates that glossy, inviting sheen and helps develop that crispy top if heated just right.
Butter:
- Cocoa powder: The deep, smoky aroma it releases when heated signals the start of chocolate magic—Dutch-processed keeps it smooth and mellow, natural adds brightness.
- Eggs: They bring everything together—fresh, room-temp eggs give a silky batter and help the brownies set just enough without becoming cake-like.
Notes for ingredient swaps
- Dairy-Free: Swap butter for coconut oil or vegan butter. Expect a slightly different richness, but still luscious.
- Gluten-Free: Use almond flour or a gluten-free baking mix. The texture will be a bit more tender and less fudgy, but still satisfying.
- Sugar Options: Replace brown sugar with maple syrup or honey. This adds moisture and a hint of caramel, but may slightly alter bake time.
- Dark Chocolate: Use semi-sweet or milk chocolate if preferred. Milk chocolate makes the brownies sweeter and creamier inside.
- Cocoa Powder: Switch Dutch-processed for natural cocoa for a brighter, tangier flavor—your choice depends on your chocolate mood.
- Add-ins: Mix in nuts, dried fruit, or even a pinch of sea salt on top. They add crunch, saltiness, or a sweet contrast.
- Flour: Whole wheat flour can be substituted but may produce a denser, nuttier brownie—tweak the liquid slightly if needed.
Equipment & Tools
- 8×8-inch square pan: Holds the batter for baking
- Parchment paper: Prevents sticking and makes removal easy
- Double boiler or microwave: Gently melts chocolate and butter
- Mixing bowls: Combine ingredients separately
- Whisk and spatula: Mix and fold ingredients gently
- Cooling rack: Cool brownies evenly and prevent sogginess
Step-by-step guide to fudgy brownies
- Preheat your oven to 175°C (350°F). Line an 8×8-inch square pan with parchment paper, leaving overhang for easy removal.
- Melt 115g (4 oz) of dark chocolate with 115g (1/2 cup) unsalted butter in a double boiler or microwave in short bursts, stirring until smooth. Let cool slightly.
- In a large bowl, whisk together 2 large eggs and 150g (3/4 cup) brown sugar until well combined and slightly thickened, about 2 minutes.
- Stir the melted chocolate mixture into the egg-sugar blend until fully incorporated. Add 1 teaspoon vanilla extract and mix.
- Sift in 65g (1/2 cup) all-purpose flour, 30g (1/4 cup) unsweetened cocoa powder, and a pinch of salt. Fold gently just until no streaks remain—don’t overmix to keep it fudgy.
- Pour the batter into the prepared pan, spreading evenly. Tap the pan on the counter to settle the batter and remove air bubbles.
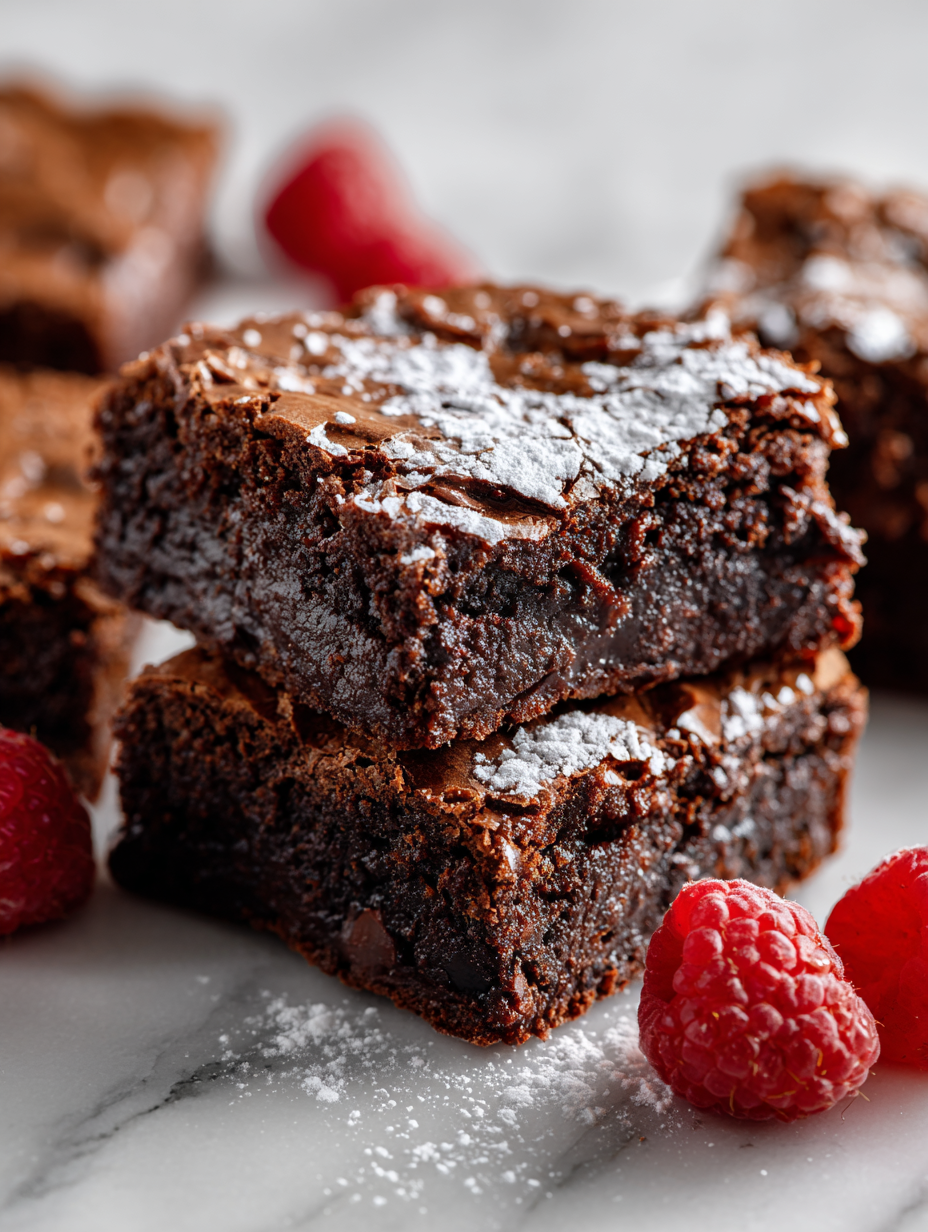
- Bake for 20-22 minutes. Check the edges are set but the center still jiggles slightly when shaken. The top should crackle and look matte.
- Remove from oven. Let the brownies rest in the pan for 15 minutes; they will continue to set as they cool.
- Transfer to a wire rack and cool completely before slicing to reveal that perfect fudgy texture with a crispy top.
Let brownies cool completely in the pan on a wire rack. Slice with a sharp knife, wiping between cuts for clean edges. Serve directly from the pan or plate neatly. The texture improves as they rest—richer, more cohesive.
How to Know It’s Done
- Edges are firm and slightly pulled away from pan, with a crackly top.
- Center jiggles just slightly when shaken—avoid overbaking.
- A toothpick inserted in the center comes out with moist crumbs, not wet batter.
Fudgy Chocolate Brownies
Ingredients
Equipment
Method
- Preheat your oven to 175°C (350°F) and line your 8×8-inch pan with parchment paper, leaving overhang for easy removal.
- Gently melt the dark chocolate and butter together using a double boiler or microwave in short bursts, stirring until the mixture is smooth and glossy. Let it cool slightly so it doesn’t cook the eggs.
- In a large bowl, whisk together the eggs and brown sugar until the mixture thickens slightly and becomes fragrant, about 2 minutes. This helps incorporate air and creates a tender crumb.
- Pour the melted chocolate and butter into the egg mixture, stirring gently until fully combined and smooth. Add the vanilla extract for depth of flavor.
- Sift in the flour, cocoa powder, and salt over the wet mixture. Gently fold the dry ingredients in with a spatula until just combined; avoid overmixing to keep the brownies fudgy and dense.
- Pour the batter into the prepared pan, spreading it evenly with a spatula. Tap the pan on the counter to settle the batter and remove any air bubbles.
- Bake in the preheated oven for about 20-22 minutes. The top should crackle and look matte, and the edges will be set. Check doneness by gently shaking the pan; the center should jiggle slightly.
- Remove the brownies from the oven and let them rest in the pan for 15 minutes; this allows the texture to set and the crackled top to become crisp.
- Transfer the brownies to a wire rack to cool completely. This helps prevent sogginess and makes slicing easier.
- Once cooled, use a sharp knife to cut into squares. Serve directly from the pan or plate, enjoying the rich, fudgy interior with a crackly, chocolatey crust.
Notes
Pro tips for fudgy brownies
- Use high-quality chocolate for a richer, more intense fudge flavor.
- Melt butter and chocolate together slowly to prevent burning and achieve a glossy mixture.
- Gently fold in flour to keep the batter dense and fudgy, avoiding overmixing.
- Check for doneness by a slight jiggle in the center; edges should be set and crackly.
- Cool brownies completely before slicing to prevent crumbling and reveal that perfect top.
- Use parchment overgrew for easy removal and clean edges, especially when cutting into squares.
- For extra fudginess, bake a minute or two less than the recommended time, keeping an eye on the crackled top.
Common mistakes and how to fix them
- FORGOT to check oven temperature → Use an oven thermometer for accuracy.
- DUMPED in too much flour → Measure carefully to keep brownies fudgy and moist.
- OVER-TORCHED the brownies → Remove from oven just as edges set and crackle.
- UNDER-baked batter → Bake a few minutes longer if center is too gooey.
Quick fixes and pantry swaps
- When batter is too thick, splash in a teaspoon of warm water to loosen it.
- If brownies are overbaked and dry, patch with a drizzle of warm chocolate sauce.
- Splash a bit of sea salt on top before baking for a crispy, salty contrast.
- Dumped in too much flour? Lightly brush the surface with cocoa powder before slicing.
- When top cracking prematurely, shield with foil and extend baking time by 2 minutes.
Prep, store, and reheat tips
- Prepare the batter in advance and store it covered in the fridge for up to 24 hours; it thickens slightly but bakes up just as fudgy.
- Brownies are best eaten within 3 days; store in an airtight container at room temperature, where they’ll stay moist and rich.
- Refrigerate for longer storage—up to a week—then bring to room temp or warm slightly for a gooey, fresh-out-of-the-oven feel.
- To reheat, warm in a low oven (around 150°C/300°F) for 10 minutes or microwave in short bursts, watching for that shiny, fudgy texture to reappear.
- Reheated brownies develop a more intense chocolate aroma and softer texture, but be careful not to dry them out—keep an eye on the clock.
Top questions about fudge brownies
1. How can I tell when brownies are done?
Look for a crackly, shiny top that’s firm to the touch—this shows the brownies are baked just right without overdone edges.
2. What’s the trick to a fudgy center?
The center should jiggle slightly when shaken, and a toothpick inserted should come out with moist crumbs, not wet batter.
3. Can I use milk chocolate instead?
Use high-quality dark chocolate and melt it gently with butter; the richness and velvety texture make all the difference.
4. Can I substitute milk chocolate for dark chocolate?
Yes, but it will be sweeter and less intense. Adjust the sugar slightly down if using milk chocolate.
5. Why do my brownies come out dry or crumbly?
Ensure the eggs are at room temperature before mixing—this helps the batter come together smoothly and prevents clumping.
6. What if my batter is too thick?
Avoid overmixing once you add the flour—fold gently to keep the batter dense and fudgy, not cakey.
7. How long should I bake these brownies?
Baking for about 20-22 minutes usually works, but start checking at 20 minutes to avoid overbaking and losing fudginess.
8. Can I cut the brownies hot?
Cool completely in the pan, then slice with a sharp knife for clean edges. Allowing them to rest helps the texture set fully.
9. How should I store leftover brownies?
Store in an airtight container at room temperature for up to 3 days, or refrigerate for longer shelf life.
10. How do I reheat brownies without ruining their texture?
Reheat briefly in the microwave or oven for a warm, gooey bite—watch for melting and a crackling top to reappear.
Baking these fudge brownies always takes me back to lazy weekends in my kitchen, where the smell of melting chocolate and butter fills the air. There’s something about that crackly top and gooey center that makes every bite feel like a small celebration. They’re simple, honest, and remind me that good things often come from just a few good ingredients.
No matter how many recipes I try, I keep coming back to this one—especially when I need a quick fix for a craving or a comforting treat to share. It’s not about perfection, but about those imperfect, messy moments of joy that baking can bring. And honestly, that’s what makes them special.

Hi, I’m Charlotte Hayes, the creator and storyteller behind Lost in the Aroma. If you’ve ever closed your eyes while something simmered on the stove just to take in the scent, then you already understand what this space is about. For me, aroma is memory. It is emotion. It is the first sign that something beautiful is about to be shared. Lost in the Aroma is where I bring together recipes, sensory storytelling, and my lifelong love for food. I am so glad you’re here.


Leave a Reply