Baking lemon bars from scratch isn’t just about sweet and tart; it’s a quiet act of mindfulness. The process of mixing the crust, feeling the dough come together under your fingertips, can be surprisingly calming amid a busy week. It’s a small ritual that grounds you, even if just for a moment, and turns baking into a form of gentle therapy.
There’s something restorative about creating something from simple ingredients—flour, butter, sugar, and fresh lemons—and transforming them into bright, tangy bars. It’s a way to slow down, focus on the task at hand, and find a little space of calm in the chaos. Plus, the smell of baking citrus and buttery crust filling your kitchen is an instant mood lifter.
Focusing on how making lemon bars from scratch, especially the crust, can be a therapeutic act in a hectic week, turning a simple baking task into a mindful ritual that soothes the mind and restores a sense of control.
The story behind this recipe
- Making these lemon bars always takes me back to my grandmother’s kitchen, where she’d pull out her battered recipe card and a jar of bright yellow lemons. The way she’d zest and squeeze, humming softly, made me realize how simple ingredients could become something special. Baking her lemon bars felt like a quiet act of connection, a way to carry her tradition into my own busy life.
- There’s a certain comfort in those moments—rolling out the crust, watching it turn golden, then pouring that glossy lemon filling over. It’s a recipe rooted in nostalgia, but also in the joy of creating something fresh and tangy that lifts the spirits. Every time I bake them, I feel a little closer to her, and a little more grounded in the present.
- story_type
Key ingredients and tips
- Lemon zest: I love how the bright, fragrant oils burst out as I zest—be careful not to go too deep into the bitter pith, though. You want that lively citrus aroma without the bitterness.
- Fresh lemons: Nothing beats the zing of freshly squeezed lemon juice—make sure to roll the lemons on the counter first to loosen the juice. The smell alone wakes up the senses.
- Butter: Using cold, high-quality butter gives the crust a tender, flaky texture. If you melt it, the crust might turn greasy—stick to cold for the best bite.
- Sugar: Granulated sugar for sweetness, but I sometimes toss in a little powdered sugar for extra melt-in-your-mouth smoothness. It’s subtle but makes a difference.
- Eggs: I prefer large, fresh eggs—they help everything set just right. Be sure to whisk them well so the filling isn’t lumpy, and watch for that luscious, glossy look.
- Flour: All-purpose flour works perfectly, but if you want a slightly nuttier flavor, almond flour can be a fun tweak—just use half to keep the crust tender.
- Powdered sugar (for dusting): A fine dusting of powdered sugar on top adds that final touch of sweetness and visual contrast. Use a sifted layer for a delicate finish.
Spotlight on key ingredients
Lemon:
- Lemon zest: I love how the bright, fragrant oils burst out as I zest—be careful not to go too deep into the bitter pith, though. You want that lively citrus aroma without the bitterness.
- Fresh lemons: Nothing beats the zing of freshly squeezed lemon juice—make sure to roll the lemons on the counter first to loosen the juice. The smell alone wakes up the senses.
Butter & Sugar:
- Butter: Using cold, high-quality butter gives the crust a tender, flaky texture. If you melt it, the crust might turn greasy—stick to cold for the best bite.
- Sugar: Granulated sugar for sweetness, but I sometimes toss in a little powdered sugar for extra melt-in-your-mouth smoothness. It’s subtle but makes a difference.
Notes for ingredient swaps
- Dairy-Free: Use coconut oil or vegan butter instead of regular butter. The crust will be slightly less flaky but still tender.
- Sugar Alternatives: Swap granulated sugar for honey or agave syrup. Expect a more floral, less granular sweetness, and slightly denser filling.
- Gluten-Free: Replace all-purpose flour with almond flour or a gluten-free baking mix. The crust might be a bit more fragile, but just as flavorful.
- Lemon Juice: If fresh lemons aren’t available, bottled lemon juice works fine. The flavor will be a touch less bright but still tangy.
- Lemon Zest: Skip zest if lemons are unwieldy; the bars will be a touch less aromatic but still deliciously citrusy.
- Eggs: For an egg-free version, try thickened applesauce or a commercial egg replacer. The filling will be softer and less firm but still tasty.
- Powdered Sugar: Use a sifted confectioner’s sugar or even a light dusting of icing sugar for finishing. The appearance might be less refined but still sweet and inviting.
Equipment & Tools
- 9×13 inch baking dish: Holds the crust and filling for baking.
- Parchment paper: Prevents sticking and makes removal easier.
- Mixing bowls: Combine ingredients separately for crust and filling.
- Pastry cutter or forks: Cut butter into dry ingredients for crust.
- Whisk: Blend eggs, sugar, and lemon juice smoothly.
- Lemon zester: Extract bright lemon zest.
- Measuring cups and spoons: Ensure accurate ingredient quantities.
- Wire cooling rack: Cool bars evenly without sogginess.
- Sharp knife: Slice clean, even squares.
Step-by-step guide to lemon bars
- Preheat your oven to 175°C (350°F). Gather a 9×13 inch baking dish and line it with parchment paper for easy removal.
- Make the crust: In a mixing bowl, combine 1 1/2 cups all-purpose flour, 1/2 cup powdered sugar, and a pinch of salt. Add 1 cup cold unsalted butter, cut into small pieces. Use a pastry cutter or your fingers to blend until the mixture resembles coarse crumbs. Press this evenly into the bottom of the prepared dish. Bake for 18-20 minutes until lightly golden, smell that warm butter and citrus aroma filling the kitchen.
- Prepare the filling: While the crust bakes, whisk together 4 large eggs, 1 1/2 cups granulated sugar, 1/4 cup all-purpose flour, and 1/4 teaspoon salt in a bowl. Add 3/4 cup freshly squeezed lemon juice and 2 tablespoons lemon zest. Mix until smooth and slightly frothy.
- Pour the lemon filling over the hot crust once it’s out of the oven. Return to the oven and bake for another 20-22 minutes. The filling should set around the edges but still jiggle slightly in the center; it will firm up as it cools. The top should turn a faint, pale yellow with a slight sheen.
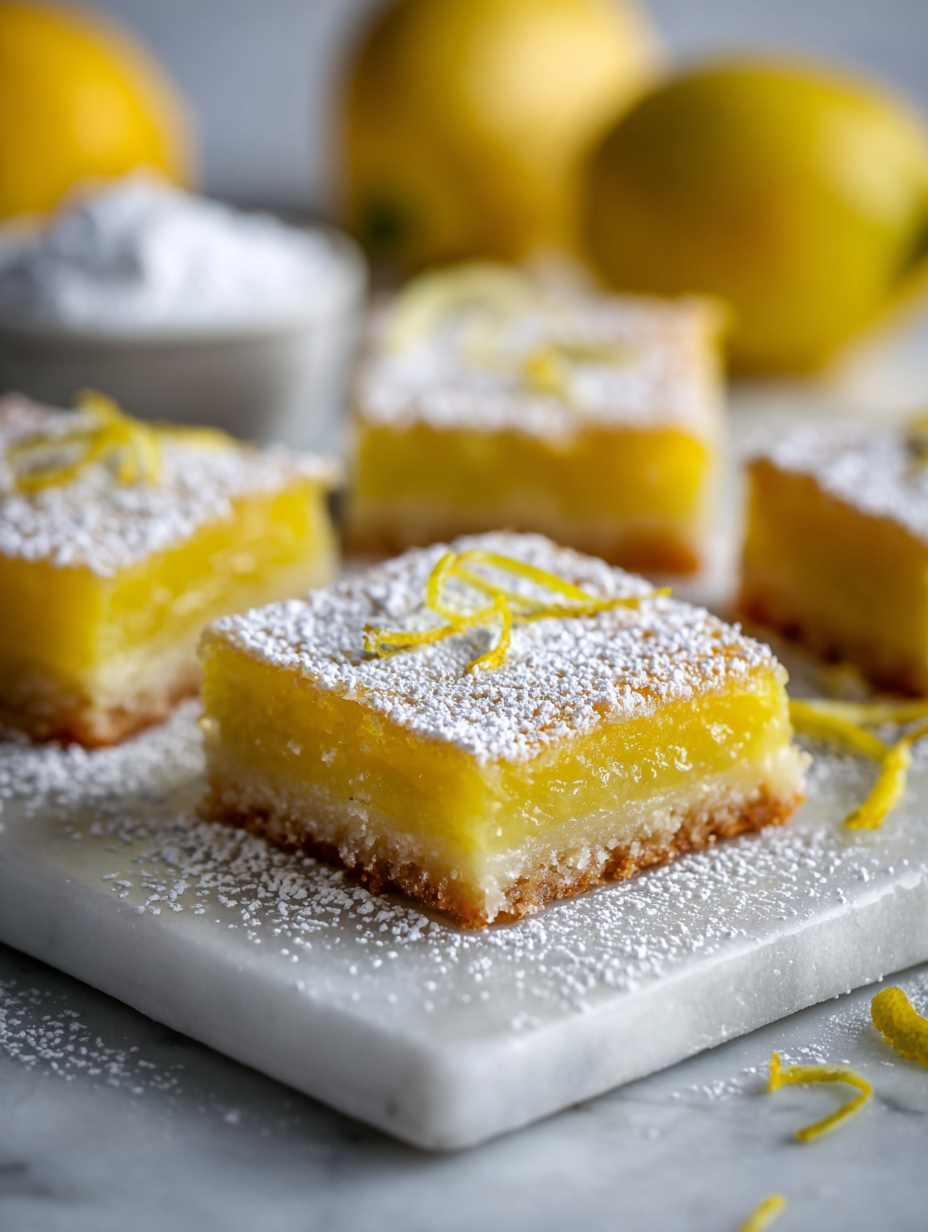
- Let the lemon bars cool completely in the pan on a wire rack, about 1-2 hours. Once cooled, dust generously with powdered sugar for a delicate finish. Slice into squares with a sharp knife, wiping the blade clean between cuts for clean edges.
- Serve at room temperature or chilled. The crust should be crisp and buttery, the filling bright and tangy, with a tender, glossy finish. The aroma of citrus and baked butter should be inviting, encouraging second slices.
Allow the lemon bars to cool completely before slicing. Dust with powdered sugar just before serving for a striking look. Serve at room temperature or chilled, depending on preference. For best texture, let the bars rest at least an hour after baking to set fully.
How to Know It’s Done
- Crust is golden and firm around edges.
- Filling is set but slightly jiggly in the center.
- Top is pale yellow with a glossy surface and powdered sugar dusting.
Homemade Lemon Bars
Ingredients
Equipment
Method
- Preheat your oven to 175°C (350°F). Line a 9×13 inch baking dish with parchment paper, leaving some overhang for easy removal.
- In a mixing bowl, combine the flour and powdered sugar. Add the cold butter, cut into small pieces, and use a pastry cutter or forks to blend until the mixture resembles coarse crumbs.
- Press this crumbly mixture evenly into the bottom of the prepared dish. Use the back of a spoon or your fingers to smooth it out. Bake for 18-20 minutes until lightly golden and fragrant.
- While the crust bakes, whisk together the eggs, granulated sugar, lemon juice, and lemon zest in a bowl until smooth. The mixture should be glossy and slightly frothy, with a bright yellow color.
- Once the crust is baked and golden, carefully pour the lemon filling over it, spreading evenly with a spatula or spoon.
- Return the dish to the oven and bake for another 20-22 minutes, until the filling is just set but still slightly jiggly in the center and the top is glossy.
- Remove from the oven and let the lemon bars cool completely in the pan on a wire rack, about 1-2 hours. They should develop a firm, glossy top and a tender crust.
- Once cooled, dust the top generously with sifted powdered sugar for a delicate finish. Use a sharp knife to cut into neat squares, wiping the blade clean between cuts.
- Serve the lemon bars at room temperature or chilled, enjoying the bright citrus flavor and tender, crumbly texture with each bite.
Tips for perfect lemon bars
- Chill the dough: Keep the crust dough cold before pressing into the pan to ensure a flaky, tender texture.
- Use fresh lemons: Bright, freshly squeezed juice and zest provide the most vibrant, zingy flavor—skip bottled options when possible.
- Watch the crust: Bake it just until golden; over-baking can lead to a dry crust that crumbles easily.
- Avoid overmixing: Mix the filling until just combined to keep it smooth and prevent air bubbles that cause cracks.
- Check for doneness: The filling should jiggle slightly in the center but set around the edges—use a toothpick to test for doneness.
- Cool completely: Let the bars cool fully before slicing; warm bars may fall apart or be overly sticky.
- Dust with powdered sugar: Sift powdered sugar lightly over the top after cooling for a polished, sweet finish.
Common mistakes and how to fix them
- FORGOT to preheat the oven → Always preheat before mixing ingredients.
- DUMPED too much lemon juice → Use accurate measuring to avoid tartness overpowering.
- OVER-TORCHED the crust → Keep an eye on baking time; crust turns golden not burnt.
- MISSED resting the bars → Chill fully for clean slices and better flavor absorption.
Quick fixes and pantry swaps
- If the crust cracks, patch with a bit of leftover dough and smooth gently.
- When the lemon filling is too runny, bake it 5 more minutes and check for a slight jiggle.
- Splash a teaspoon of lemon juice if the filling lacks brightness after baking.
- Patch a burnt crust by covering with foil and baking a few minutes longer — smell should turn sweet and citrusy.
- Shield the edges with foil if they brown too fast, keeping the center tender and vibrant.
Prep, store, and reheat tips
- Prep the crust dough ahead by mixing and chilling it in the fridge for at least 30 minutes. It firms up, making rolling easier and the crust crisper.
- The baked lemon bars can be stored covered in the refrigerator for up to 3 days. The citrus flavor deepens slightly, and the texture stays tender and bright.
- Freeze the fully cooled bars in an airtight container for up to 2 months. Thaw at room temperature, where the filling remains tangy and the crust retains a slight crisp.
- Reheat slices briefly in a 150°C (300°F) oven for about 10 minutes until just warm. The aroma of lemon and butter should re-emerge, and the texture will be delightfully tender.
Top questions about lemon bars
1. Can I use bottled lemon juice?
Use freshly squeezed lemon juice for the brightest, most vibrant flavor. Bottled juice works in a pinch but can be less zesty.
2. How do I know when the lemon bars are baked?
Bake the crust until it’s just golden around the edges, about 18-20 minutes. The filling is done when it jiggles slightly in the center.
3. Should I refrigerate the lemon bars before serving?
Chill the bars completely in the fridge for at least an hour before slicing. Use a sharp knife, wiping it clean between cuts for neat edges.
4. What if the filling isn’t setting properly?
If the filling is too runny, bake it a few extra minutes until it’s just set. If the crust browns too quickly, cover the edges with foil.
5. Should I dust the lemon bars with sugar before or after baking?
Dust with powdered sugar after the bars have cooled completely. It adds a delicate sweetness and nice visual contrast.
6. Can I use margarine instead of butter?
Use cold, high-quality butter for a tender, flaky crust. Melted butter can make the crust greasy and less crumbly.
7. Can I make lemon bars gluten-free?
Yes, you can substitute gluten-free flour or almond flour, but the texture may be slightly different. Expect a more delicate or crumbly crust.
8. Should I pre-bake the crust?
Bake the crust alone first to ensure it’s crisp and golden. The filling will be added later, so don’t overbake the crust.
9. How long will lemon bars last in the fridge?
Store leftovers in an airtight container in the fridge for up to 3 days. For longer storage, freeze and thaw at room temperature.

10. Can I reheat lemon bars?
Reheat slices in a low oven (around 150°C or 300°F) for about 10 minutes until warm and fragrant. They should smell citrusy and buttery again.
Baking these lemon bars isn’t just about the sweet-tart flavor; it’s about pausing, even briefly, in a hectic day to do something mindful. The smell of citrus and buttery crust filling your kitchen is a small reminder that simple acts can bring a quiet sense of control and comfort.
Every time I make them, I remember that baking isn’t just a task—it’s a way to connect with quiet joy, to slow down and savor a moment. These bars, with their bright flavor and tender crumb, feel like a small celebration of everyday calm amid chaos.

Hi, I’m Charlotte Hayes, the creator and storyteller behind Lost in the Aroma. If you’ve ever closed your eyes while something simmered on the stove just to take in the scent, then you already understand what this space is about. For me, aroma is memory. It is emotion. It is the first sign that something beautiful is about to be shared. Lost in the Aroma is where I bring together recipes, sensory storytelling, and my lifelong love for food. I am so glad you’re here.


Leave a Reply