There’s something endlessly comforting about a good date bar, especially when it’s homemade. The sticky, caramel-like dates paired with a buttery crust take me straight back to childhood afternoons in my grandma’s kitchen, where simple ingredients created moments of pure joy. Making these bars is like capturing that warmth and nostalgia, but with a touch of my own messy, honest touch in the process.
What I love about this recipe is how forgiving it is—no fancy ingredients, just a handful of pantry staples. The process is straightforward, but the payoff feels like a little celebration. It’s one of those recipes I turn to when I need a quick, honest sweet fix that tastes like it’s been cooked with a sprinkle of love and a dash of chaos.
Focusing on the nostalgic charm of homemade date bars, this recipe emphasizes the art of balancing sticky, sweet dates with a buttery, crumbly crust—bringing a sense of childhood comfort back into the kitchen.
The story behind this recipe
- This recipe came together one rainy afternoon when I was digging through my grandmother’s old recipe box, finding a tattered note about date-filled treats. I remembered how my mom would slice these bars thick and share them with a glass of cold milk during lazy Sunday afternoons. That nostalgic smell of caramelized dates and toasted oats still lingers in my kitchen, pulling me back to simpler days.
- I started experimenting, wanting to make a version that’s honest and unpretentious—something that feels like a hug in every bite. These date bars are a patchwork of memories, chaos, and small victories, all wrapped in a buttery crust and sticky, sweet filling. They remind me that sometimes, the best recipes are the ones you tweak with love and a little mess.
- story_type
Key ingredients and tips
- Medjool dates: They’re the star—soft, caramel-sweet, and almost oozy when chopped. If yours are dry, soak them briefly to revive that sticky texture.
- Butter: I use unsalted, because I like control over the salt. For a richer flavor, opt for European-style butter—more cream, more depth.
- Oats: Rolled oats give a nice chew; quick oats get lost in the mix. Toast them lightly before mixing for a nuttier, smoky aroma.
- Flour: All-purpose is reliable, but if you want a slightly tender crust, swap in half whole wheat or almond flour—adds a subtle nutty note.
- Sweetener: Brown sugar or honey—both bring a warm, molassy scent during baking. Adjust to taste if you prefer a less sweet bar.
- Nuts (optional): Chopped almonds or pecans add crunch and contrast. Toast them first for peak flavor and that toasty, fragrant aroma.
- Vanilla extract: A splash enriches the filling with a cozy, aromatic sweetness. Skip if you want a more straightforward date flavor, but I think it’s worth it.
Spotlight on key ingredients
Dates:
- Medjool dates: They’re the star—soft, caramel-sweet, and almost oozy when chopped. If yours are dry, soak them briefly to revive that sticky texture.
- Butter: I use unsalted, because I like control over the salt. For a richer flavor, opt for European-style butter—more cream, more depth.
Oats & Flour:
- Oats: Rolled oats give a nice chew; quick oats get lost in the mix. Toast them lightly before mixing for a nuttier, smoky aroma.
- Flour: All-purpose is reliable, but if you want a slightly tender crust, swap in half whole wheat or almond flour—adds a subtle nutty note.
Notes for ingredient swaps
- Sweetener: Maple syrup or agave nectar can replace brown sugar for a different depth of flavor, but may make the filling slightly less caramelized.
- Butter: Coconut oil or vegan margarine can be used for a dairy-free crust, which might alter the richness but keep the buttery feel.
- Flour: Whole wheat or spelt flour adds more nuttiness and fiber. For a gluten-free version, try almond flour—note it makes the crust more tender.
- Dates: Prunes or dried apricots, chopped finely, provide a different fruity sweetness but lack the oozy, caramel-like quality of dates.
- Oats: Quinoa flakes or crushed graham crackers can add crunch or a different texture, but won’t have the same toasted oat aroma.
- Vanilla: Almond or orange extract can be used for a different aromatic note—use sparingly, as they’re more potent.
- Nuts: Chopped pecans or walnuts add crunch and flavor; toast them first to enhance their aroma before adding.
Equipment & Tools
- Baking pan: Holds the bars during baking and helps shape the crust and filling.
- Mixing bowl: Combines dry ingredients and mixes the crust.
- Saucepan: Cooks the date filling until soft and thick.
- Spatula: Stirs the filling and spreads ingredients evenly.
- Knife: Cuts the cooled bars into neat squares.
- Parchment paper: Prevents sticking and makes removal easier.
Step-by-step guide to date bars
- Equipment & Tools: Line a 9×9 inch baking pan with parchment paper, and have a mixing bowl, a saucepan, a spatula, and a knife ready.
- Preheat your oven to 180°C (350°F). In a small bowl, toast the oats lightly for 5 minutes until fragrant, then set aside.
- Make the crust: In a mixing bowl, combine 1 1/2 cups flour, 1/2 cup brown sugar, a pinch of salt, and 1 cup cold butter diced. Mix with fingers or a pastry cutter until crumbly. Press evenly into the lined pan. Bake for 15 minutes until just golden.
- Prepare the date filling: While crust bakes, pit and chop 1 1/2 cups Medjool dates. In a saucepan over medium heat, melt 2 tablespoons butter, add dates, 1/4 cup water, and a splash of vanilla. Cook, stirring, until dates are soft and mixture is thick, about 10 minutes. Let cool slightly.
- Assemble: Spread the warm date filling evenly over the baked crust. Crumble remaining oat mixture over the top for a textured finish.
- Bake again: Return to oven and bake for 20 minutes, until the topping is golden and the filling is bubbling.
- Cooling & Cutting: Remove from oven. Let cool in the pan for at least 30 minutes. For clean slices, lift out using the parchment paper and cut into squares with a sharp knife.
- Finishing: Serve slightly warm or at room temperature. These bars taste best when the date filling is gooey and the crust is lightly crisp.
Allow the bars to cool completely in the pan before slicing. Use a sharp knife for clean cuts. Serve directly from the pan or transfer to a platter. Store in an airtight container at room temperature for up to 3 days, or freeze for longer storage.
How to Know It’s Done
- Filling is thick and caramel-colored, not runny.
- Crust edges are golden and firm.
- Topping is toasted and crunchy, with a smoky aroma.
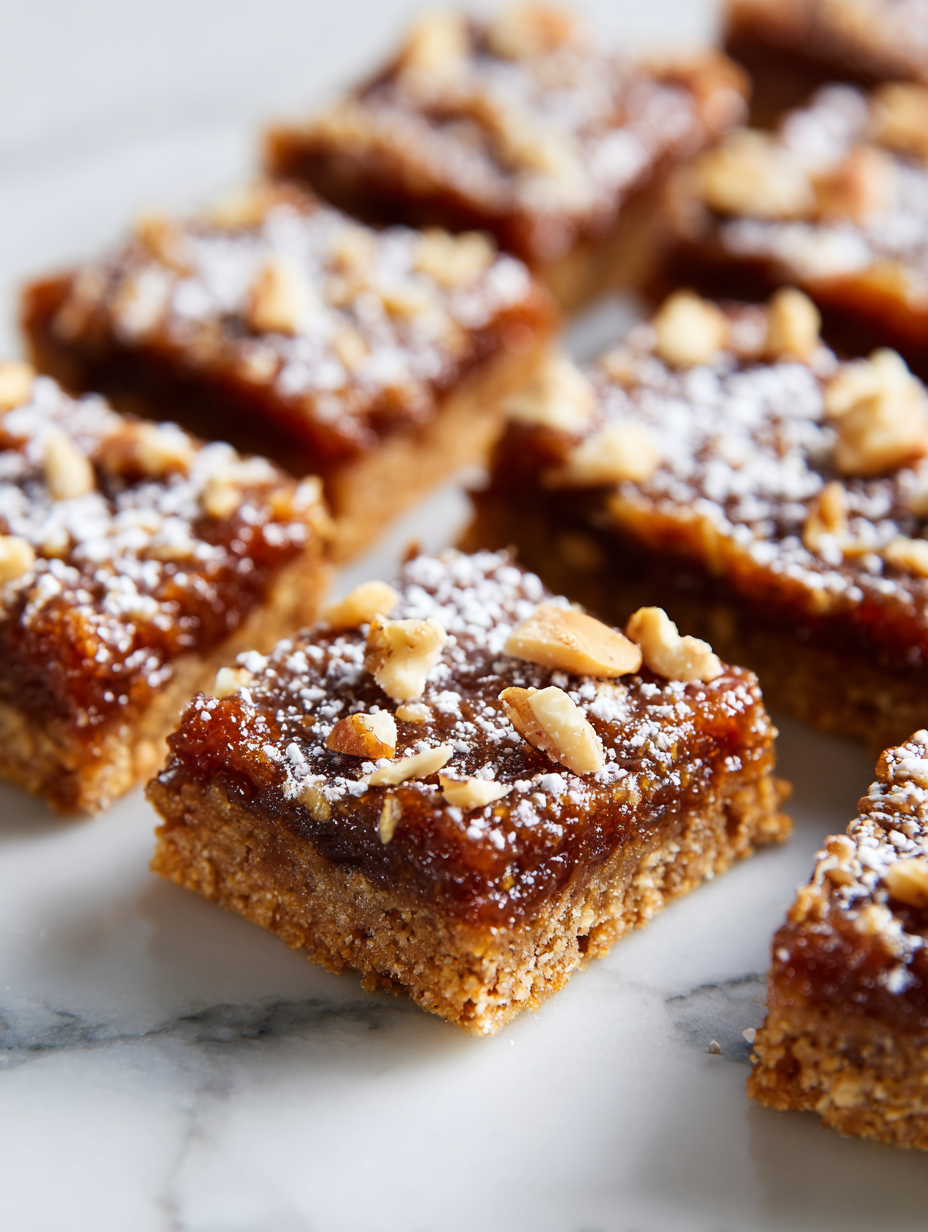
Homemade Date Bars
Ingredients
Equipment
Method
- Preheat your oven to 180°C (350°F). Line a 9×9 inch baking pan with parchment paper for easy removal.
- Spread the rolled oats on a baking sheet and toast them lightly in the oven for about 5 minutes until fragrant and golden. Set aside to cool.1/2 cup brown sugar
- In a mixing bowl, combine the flour and brown sugar. Add the cold, diced butter and use your fingers or a pastry cutter to mix until the mixture resembles coarse crumbs. Press this mixture evenly into the prepared pan to form the crust.1/2 cup brown sugar
- Bake the crust in the preheated oven for about 15 minutes until just golden around the edges. Remove from oven and set aside.
- While the crust bakes, prepare the date filling: pit and chop the dates. In a saucepan, melt 2 tablespoons of butter over medium heat, then add the chopped dates, water, and vanilla extract.1/2 cup brown sugar
- Cook the mixture, stirring frequently, until the dates soften and the mixture thickens, about 10 minutes. Remove from heat and let it cool slightly.
- Spread the warm date filling evenly over the partially baked crust, smoothing the top with a spatula.
- Sprinkle the toasted oats over the top of the date layer for a crunchy finish.1/2 cup brown sugar
- Return the pan to the oven and bake for an additional 20 minutes until the topping is golden and bubbling at the edges.
- Remove from oven and let the bars cool completely in the pan. Once cooled, lift out using the parchment paper and cut into squares.
- Serve these bars at room temperature or slightly warmed, enjoying the gooey date filling with the crispy topping. Store leftovers in an airtight container for up to 3 days, or freeze for longer storage.
Pro tips for perfect date bars
- Bold crust edges: Press the crust mixture firmly into the pan for an even, compact base that holds together well.
- Chewy date filling: Warm the dates gently before mixing to enhance their sticky, caramel-like texture and flavor.
- Toasting oats: Lightly toast oats before adding to the crust for a nutty aroma and deeper flavor contrast.
- Cooling is key: Let the bars cool completely before cutting to prevent crumbling and ensure clean slices.
- Watch for over-torching: Keep an eye on the crust during baking; cover loosely with foil if it darkens too quickly.
- Use parchment: Line your pan with parchment paper for easy removal and tidy slices without sticking.
- Adjust sweetness: Taste the date mixture before spreading; add a touch more vanilla or water if it’s too thick or dull.
Common mistakes and how to fix them
- FORGOT to adjust oven temperature → Use a thermometer, ensure even baking.
- DUMPED ingredients in without measuring → Measure precisely for consistent results.
- OVER-TORCHED crust → Cover with foil sooner, reduce oven heat slightly.
- MISSED cooling time → Let bars cool completely to avoid crumbles.
Quick Fixes and Pantry Swaps
- When the filling is too runny, splash a little more water and cook briefly to thicken.
- If the crust crumbles, patch with a dab of melted butter and press firmly again.
- DUMPED ingredients without measuring? Always measure precisely for consistency.
- Over-torched edges? Shield with foil early in baking, then lower the heat slightly.
- Splash a pinch of salt if filling tastes dull or flat during cooking.
Prep, store, and reheat tips
- You can prepare the date filling and crust mixture a day ahead; keep them refrigerated in airtight containers, which helps meld flavors and makes assembly quicker.
- Store baked bars at room temperature in an airtight container for up to 3 days; the aroma of caramelized dates will intensify, but texture may soften slightly.
- For longer storage, freeze the bars wrapped tightly in plastic wrap and then in foil for up to 1 month. Thaw at room temperature for 15–20 minutes before serving.
- Reheat bars gently in a low oven (about 150°C / 300°F) for 5–7 minutes, until just warmed and fragrant. The edges might crisp up a little, adding to their appeal.
- Refrigerating after reheating can help restore firmness if they’ve softened too much, but they’re best served slightly warm or at room temperature for full flavor.
Top questions about date bars
1. Can I use dried dates that are a bit dry?
Yes, soaking the dates for 10 minutes in warm water helps make the filling smoother and easier to spread.
2. Can I replace brown sugar with honey or syrup?
Absolutely. You can substitute honey or maple syrup for brown sugar, but expect a slightly different caramel note.
3. Should I use rolled oats or quick oats in the crust?
Using rolled oats gives a chewier texture and nuttier flavor, while quick oats make the crust softer and less toasted.
4. How long can I store date bars in the freezer?
You can freeze these bars for up to a month. Wrap tightly, and reheat gently to bring back that sticky warmth.
5. Why are my slices crumbling when I cut them?
To prevent crumbling, let the bars cool completely, then slice with a sharp knife and serve at room temperature.
6. Can I omit nuts or substitute them with seeds?
Yes, you can swap out nuts for seeds like sunflower or pumpkin seeds for crunch and flavor variation.
7. How do I avoid over-baking the crust?
Keep an eye on the crust during baking—cover loosely with foil if it darkens too quickly, around the 15-minute mark.
8. Is vanilla necessary in the date filling?
Adding a teaspoon of vanilla extract to the filling boosts aroma and depth, making the flavor richer and more inviting.
9. Can I make the crust more golden and crispy?
Yes, brushing the crust with a little milk or egg wash before baking can help it turn a golden, crisp color.
10. How do I know when the date bars are done baking?
When the filling is bubbling and the topping is golden brown, the bars are ready to come out of the oven.
These date bars carry a quiet charm that’s hard to find in store-bought treats. Each bite offers a sticky, caramel-like sweetness balanced by the buttery crust, a reminder of simpler times and small kitchen victories. They’re a cozy, honest dessert that’s perfect for sharing—or keeping all to yourself on a lazy afternoon.
Making these bars feels like a small act of nostalgia, a chance to reconnect with childhood comfort or just enjoy a straightforward, no-fuss treat. They’re forgiving, adaptable, and honestly, pretty addictive. Once you start, it’s hard to stop at just one.

Hi, I’m Charlotte Hayes, the creator and storyteller behind Lost in the Aroma. If you’ve ever closed your eyes while something simmered on the stove just to take in the scent, then you already understand what this space is about. For me, aroma is memory. It is emotion. It is the first sign that something beautiful is about to be shared. Lost in the Aroma is where I bring together recipes, sensory storytelling, and my lifelong love for food. I am so glad you’re here.


Leave a Reply