There’s something about making brownie bars that feels like capturing a bit of childhood chaos. The messy batter, the crackle of chocolate as it bakes, and that first cut into a gooey, fudgy square — it’s a small celebration of simple pleasures. No fancy equipment, just a trusty pan and a spoon, and you’re halfway to a nostalgic treat that’s perfect for sharing or sneaking a piece when no one’s looking.
This recipe is all about embracing the imperfect charm of homemade desserts. It’s not about perfection — it’s about the crispy edges that crackle with caramelized sugar and the soft, molten center that melts on your tongue. It’s a little messy, a little chaotic, but that’s what makes it feel honest and real. It’s a reminder that sometimes, the best things come from just throwing ingredients together and letting them do their magic.
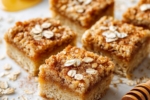
Focusing on the nostalgic charm of childhood, this recipe emphasizes the messy joy of homemade brownie bars with a crispy edge and gooey center, perfect for sharing or sneaking a bite when no one’s looking.
The story behind this recipe
- This recipe came from a messy afternoon in my kitchen, where I just wanted something sweet and satisfying in a hurry. I remember tearing into a store-bought brownie and thinking I could do better, more homemade, more honest. The idea was to make something that feels like a big, chewy hug, but with a bit of that crackly, caramelized top edge I love.
- Plus, I was tired of the usual tray of brownies — I wanted something portable, cut into bars that could travel easily for picnics or lazy weekend mornings. The first batch was a happy accident, with gooey centers and crispy edges that made everyone ask for seconds. It’s really just about capturing that imperfect, cozy moment with ingredients you probably already have in the pantry.
- heading:
Ingredient breakdown: key components
- Unsweetened cocoa powder: I love that deep, slightly bitter aroma that wakes up the whole batter, but you can swap in Dutch-processed for a smoother, less tangy flavor if you prefer.
- Dark chocolate: The gooey richness really makes these bars stand out; try a 70% bar for a balanced bitterness, or milk chocolate if you want a sweeter, creamier bite.
- Butter: It gives that tender crumb and shiny top — but if you’re out, margarine works, though it’ll be a tad less flavorful and slightly softer.
- Granulated sugar: It’s the backbone of that crackly crust — if you want less sweetness, cut back a tablespoon or two, but don’t skip it entirely, or the texture shifts.
- Eggs: They bind everything together and add richness — room temp eggs blend better, and if you’re out, a tablespoon of applesauce can help mimic the moisture.
- All-purpose flour: Keeps the bars sturdy but tender — if you need gluten-free, almond flour adds a nutty flavor, just expect a slightly denser texture.
- Vanilla extract: It’s that subtle warm note that balances the chocolate — use a good-quality vanilla for best flavor, or a splash of bourbon for a smoky twist.
Spotlight on key ingredients
Unsweetened cocoa powder:
- I love that deep, slightly bitter aroma that wakes up the whole batter, but you can swap in Dutch-processed for a smoother, less tangy flavor if you prefer.
- Dark chocolate: The gooey richness really makes these bars stand out; try a 70% bar for a balanced bitterness, or milk chocolate if you want a sweeter, creamier bite.
- Butter: It gives that tender crumb and shiny top — but if you’re out, margarine works, though it’ll be a tad less flavorful and slightly softer.
Dark chocolate:
- The gooey richness really makes these bars stand out; try a 70% bar for a balanced bitterness, or milk chocolate if you want a sweeter, creamier bite.
- Butter: It gives that tender crumb and shiny top — but if you’re out, margarine works, though it’ll be a tad less flavorful and slightly softer.
Notes for ingredient swaps
- Dairy-Free: Swap butter for coconut oil or vegan margarine. Expect a slightly different richness and a hint of coconut aroma.
- Sugar Alternatives: Use honey, maple syrup, or agave syrup instead of granulated sugar. Be aware of added moisture and adjust baking time if needed.
- Chocolate Variations: Replace dark chocolate with milk chocolate or white chocolate chips. This will alter the depth of flavor and sweetness.
- Flour Options: Almond or oat flour can replace all-purpose flour for gluten-free or nutty variations, but expect a denser, slightly crumbly texture.
- Cocoa Powder: Dutch-processed cocoa offers a smoother, less tangy flavor, while natural cocoa provides a brighter, more bitter punch.
- Add-ins: Nuts or dried fruits can be mixed in; toast nuts beforehand for extra crunch and flavor contrast.
- Eggs: For an egg-free version, try applesauce or flaxseed meal, but the structure and moisture will shift noticeably.
Equipment & Tools
- Oven: Bake the brownie bars evenly
- 9×13 inch baking pan: Contain the batter and shape the bars
- Parchment paper: Prevent sticking and easy removal
- Mixing bowls: Combine ingredients
- Whisk and spatula: Mix and spread batter
- Cooling rack: Cool the bars evenly
- Sharp knife: Slice into bars
Step-by-step guide to baking
- Preheat your oven to 180°C (350°F). Grease a 9×13 inch baking pan and line it with parchment paper, leaving an overhang for easy removal.
- In a microwave-safe bowl, melt 1 cup (226g) of butter on medium power in 30-second bursts, stirring each time until smooth and shiny. Let it cool slightly.
- In a large mixing bowl, whisk together 1 cup (85g) of unsweetened cocoa powder, 1 1/2 cups (300g) of granulated sugar, and 1/2 teaspoon salt. Add the cooled melted butter and stir until combined.
- Crack in 3 large eggs, one at a time, mixing well after each addition. The batter will look glossy and thick. Stir in 1 teaspoon vanilla extract.
- Sift in 1 1/4 cups (150g) of all-purpose flour and fold gently until just incorporated. Do not overmix; a few streaks are fine.
- Chop 1 cup (170g) of dark chocolate or chocolate chips and fold into the batter for extra gooey pockets. Spread the batter evenly in the prepared pan with a spatula.
- Bake on the middle rack for 25-30 minutes. The edges should be set and slightly crackly, while the center remains moist. A toothpick inserted in the center should come out with moist crumbs, not wet batter.
- Remove from oven and let cool in the pan for at least 20 minutes. Transfer to a wire rack using the parchment overhang and let it cool completely before slicing.
- Cut into bars with a sharp knife. For clean edges, wipe the blade between cuts. Serve slightly warm or at room temperature.
Allow the bars to cool completely before slicing. Store in an airtight container at room temperature for up to 3 days or in the fridge for a week. For best texture, reheat slightly in the microwave before serving, until warm and gooey.
How to Know It’s Done
- Edges are crackly and set, with a slightly shiny top.
- Center feels slightly soft but not wet when gently pressed.
- Toothpick test: moist crumbs, not wet batter, when inserted in the center.

Homemade Brownie Bars
Ingredients
Equipment
Method
- Preheat your oven to 180°C (350°F). Grease your 9×13 inch baking pan and line it with parchment paper, leaving some overhang for easy removal.
- Melt the butter in a microwave-safe bowl in short bursts, stirring until smooth and shiny, then let it cool slightly to avoid cooking the eggs.
- In a large bowl, whisk together the cocoa powder, sugar, and salt until evenly combined. Pour in the cooled melted butter and stir until the mixture is dark, glossy, and fragrant.
- Add the eggs one at a time, whisking well after each addition until the batter becomes thick and shiny. Stir in the vanilla extract for a warm aroma.
- Sift the flour into the batter and gently fold it in with a spatula, just until no streaks remain. Be careful not to overmix to keep the bars tender.
- Chop the dark chocolate or chocolate chips and fold them into the batter, distributing pockets of gooey chocolate throughout.
- Pour the batter into your prepared pan and spread it evenly with a spatula, smoothing the top for a level bake.
- Bake in the oven for 25-30 minutes, until the edges are crackly and set, and a toothpick inserted in the center comes out with moist crumbs.
- Remove the pan from the oven and let the bars cool in the pan for about 20 minutes. Then, lift them out using the parchment overhang and transfer to a wire rack to cool completely.
- Once cooled, use a sharp knife to cut into bars, wiping the blade between slices for clean edges. Serve slightly warm or at room temperature for maximum gooeyness.
Pro tips for perfect brownie bars
- Bolded mini-head: Use room temperature eggs for smoother incorporation and a silkier batter.
- Bolded mini-head: Mix the cocoa powder into the melted butter to intensify that rich, chocolatey aroma.
- Bolded mini-head: Tap the pan on the counter before baking to settle the batter and remove air bubbles.
- Bolded mini-head: Keep an eye on the edges; they should crackle and turn a deep, shiny caramel color.
- Bolded mini-head: For extra fudginess, slightly underbake by 2 minutes, then let cool completely to set.
Common mistakes and how to fix them
- FORGOT to check oven temperature → Use an oven thermometer for accuracy.
- DUMPED in all ingredients at once → Mix ingredients gradually for even batter.
- OVER-TORCHED the edges → Cover with foil if edges brown too fast.
- MISSED cooling time → Cool thoroughly to set bars properly before slicing.
Quick fixes and pantry swaps
- When batter is too thick, splash in a teaspoon of milk to loosen it quickly.
- If edges burn, shield with foil and lower oven temperature by 10°C (50°F).
- DUMPED in cold butter instead of melted? Warm it slightly or melt again for better mixing.
- When bars stick to pan, PATCH with a damp cloth over the edges before slicing.
- Splash a pinch of salt on top if the chocolate seems flat, enhancing flavor and shimmer.
Prep, store, and reheat tips
- Prepare the batter up to a day in advance; keep it covered in the fridge to maintain freshness and prevent skin formation.
- Bake the brownie bars and let them cool completely before storing; this prevents condensation and sogginess.
- Store the fully cooled bars in an airtight container at room temperature for up to 3 days; for longer storage, refrigerate for up to a week, but expect a firmer texture.
- Reheat slices briefly in the microwave (10-15 seconds) until warm and gooey, watching for melted chocolate and a fragrant aroma.
- For best flavor and texture, serve slightly warmed, allowing the chocolate to soften and release rich, cocoa aroma.
Top questions about brownie bars
1. How do I know when the brownie bars are done?
Look for a shiny, crackly top and moist crumbs on a toothpick test. The center should feel slightly soft but not wet.
2. What if the edges burn before the center is cooked?
If they look overly shiny and wet on top, they need more baking. If edges are burnt, cover with foil and lower the oven temp.
3. Should I cool the bars before cutting?
Let the bars cool in the pan for at least 20 minutes, then transfer to a wire rack to cool completely before slicing.
4. How should I store leftover brownie bars?
Store in an airtight container at room temp for up to 3 days, or refrigerate for a week. Reheat briefly for gooeyness.
5. Can I use cold eggs?
Use room temperature eggs for smoother batter, which helps avoid lumps and ensures even mixing.
6. Can I make these dairy-free?
Yes, you can swap butter with coconut oil or vegan margarine. Expect a slightly different flavor and texture, but it still works.
7. Can I add other ingredients like nuts?
Adding chopped nuts or dried fruits can give extra texture and flavor. Toast nuts beforehand for more crunch.
8. What if the batter is lumpy?
Undermixing can cause uneven texture. Mix just until ingredients are combined to keep the bars tender and moist.
9. How do I get clean slices?
Use a sharp knife wiped with a damp cloth for clean cuts. Wipe between slices to prevent sticking.
10. My batter is too thick, what do I do?
If the batter is too thick, splash in a teaspoon of milk. For a thinner batter, add a little more melted butter.
These brownie bars aren’t just about the chocolate—they’re about the messy, imperfect joy of baking something that feels like a small rebellion. Each crackly edge, gooey center, and rich aroma reminds me that sometimes, the best moments are the simplest ones we make ourselves.
Whenever I bake these, I think about how a little chaos in the kitchen can turn into something sweet and memorable. It’s a treat that’s perfect for sharing, or for keeping all to yourself when you need a quick dose of comfort. No matter what, they always bring a little bit of that homemade magic.

Hi, I’m Charlotte Hayes, the creator and storyteller behind Lost in the Aroma. If you’ve ever closed your eyes while something simmered on the stove just to take in the scent, then you already understand what this space is about. For me, aroma is memory. It is emotion. It is the first sign that something beautiful is about to be shared. Lost in the Aroma is where I bring together recipes, sensory storytelling, and my lifelong love for food. I am so glad you’re here.


Leave a Reply