These cinnamon oat bars are more than just a snack; they’re a little piece of my childhood, wrapped up in a portable, chewy form. I grew up sneaking bites of my mom’s homemade bars on lazy weekend mornings, the warm cinnamon filling the air and the oats giving that hearty, comforting bite. Now, I keep that feeling alive, tweaking the recipe here and there, adding a dash of nutmeg or swapping honey for maple, just to keep things interesting.
There’s something about the simplicity of oats and cinnamon that feels like a hug, especially when you’re rushing out the door or craving something sweet but wholesome. I love how forgiving this recipe is, letting me experiment with nuts, dried fruit, or even a drizzle of chocolate if I want to indulge. It’s a quick bake, but each bite brings back those slow, cozy mornings no matter what time I make them.
This recipe is a good reminder that comfort food doesn’t have to be complicated or indulgent all the time. Sometimes, it’s just about those familiar flavors—cinnamon’s warm aroma, the chewy oats—and how they can turn an ordinary snack into a moment of calm, even on the busiest days.
Focusing on how these cinnamon oat bars can be a nostalgic comfort, reminding us of lazy weekend mornings or cozy afternoons, yet they’re surprisingly adaptable for quick energy boosts or unexpected guest treats. I love tweaking the spices or adding nuts, making each batch a little different, a sort of edible journal of my mood.
The story behind this recipe
- This recipe comes from a lazy weekend morning in my childhood kitchen, where the smell of cinnamon and oats would fill the air just as I’d sneak a piece before anyone else woke up. It’s simple, honest comfort food that’s stuck with me over the years. Every time I make these bars, I remember those quiet, cozy mornings and the way they made everything feel a little bit slower and sweeter.
- I started tweaking my mom’s recipe to make it more adaptable for busy days—adding more spice, tossing in some chopped nuts, or swapping honey for maple syrup. It’s become my go-to when I want something familiar but with a little personal twist. These bars remind me that sometimes, the best recipes are the ones that let you improvise and still come out perfect.
- heading: ‘The story behind this recipe’
Key Ingredients and Tips
- Old-fashioned rolled oats: I love the chewy texture they give, but you can swap in quick oats for a softer bite—just expect a different mouthfeel.
- Cinnamon: It’s the soul of these bars, filling the air with warmth. Use freshly ground if you can; pre-ground tends to be dull and musty.
- Honey or maple syrup: Adds natural sweetness and moisture. Honey’s richer flavor gives a deeper caramel note, while maple is brighter and more floral—pick what suits your mood.
- Butter: I prefer unsalted for control over salt, but salted butter works fine—just cut back on added salt. The butter melts into the oats, creating that tender crumb.
- Dried fruit (like raisins or cranberries): I toss in a handful for bursts of sweetness. If you’re using sticky dried fruit, soak briefly in warm water first to avoid clumping.
- Nuts (optional): Chopped almonds or pecans add crunch. Toast them lightly beforehand for a richer, nuttier flavor that really stands out in each bite.
- Salt: Just a pinch enhances all the spices and sweetness. Don’t skip it; it’s the secret to making everything pop.
Spotlight on key ingredients
Cinnamon and oats:
- Cinnamon: I love the way freshly ground cinnamon releases a rich, warm aroma that fills the kitchen, making every batch feel like a cozy hug. It’s the backbone of these bars, giving that unmistakable spicy sweetness.
- Rolled oats: They lend a hearty chew and a slightly nutty flavor. During baking, they soften but keep their structure—if you swap in quick oats, expect a more delicate texture that melts faster in your mouth.
Notes for ingredient swaps
- Dairy-Free: Swap butter for coconut oil or vegan butter—expect a slightly different richness and a hint of coconut aroma.
- Sweetener Alternatives: Use agave syrup or brown rice syrup instead of honey or maple—these will alter the sweetness intensity and moisture.
- Oats: Replace rolled oats with quick oats for a softer, more delicate crumb—note they may bake faster, so watch closely.
- Nuts & Dried Fruit: Swap almonds with walnuts or dried apricots with dried cranberries—each brings a unique flavor and texture twist.
- Spices: Add a pinch of nutmeg or cardamom for extra warmth—be cautious, as these can overpower if too much is added.
- Binding Agents: For a denser bar, mix in a tablespoon of nut butter or mashed banana—these will add moisture and a different flavor note.
- Salt: Reduce or omit if using salted butter—salt balances sweetness, so adjust according to your taste.
Equipment & Tools
- 20×20 cm (8×8 inch) baking dish: To shape and bake the bars evenly.
- Mixing bowls: To combine dry and wet ingredients separately.
- Saucepan: To melt butter and warm honey or syrup.
- Spatula: To stir ingredients and press mixture into the dish.
- Parchment paper (optional): For easy removal and less sticking.
Step-by-step guide to cinnamon oat bars
- Preheat your oven to 180°C (350°F). Grease a 20×20 cm (8×8 inch) baking dish with butter or line with parchment paper for easy removal.
- In a large mixing bowl, combine 1 ½ cups (150g) rolled oats, ½ teaspoon salt, and 1 teaspoon ground cinnamon. Mix well to evenly distribute.
- In a small saucepan over medium heat, melt 1/4 cup (60ml) butter. Once melted, stir in 1/3 cup (113g) honey or maple syrup and 1 teaspoon vanilla extract. Warm until just bubbling and fragrant, about 2 minutes.
- Pour the warm wet mixture over the dry ingredients. Stir with a spatula until all oats are coated and the mixture is sticky but manageable. If using nuts or dried fruit, fold them in now.
- Transfer the mixture to your prepared baking dish. Press down firmly with the back of a spatula or your fingers to create an even, compact layer. This helps the bars hold together later.
- Bake in the preheated oven for 20-25 minutes. The edges should turn golden and the top will look slightly caramelized. Your kitchen will fill with warm cinnamon and toasty oats aroma.
- Remove from oven and let the bars cool in the dish for at least 15 minutes. They will firm up as they cool, making slicing easier.
- Once cooled, lift the bars out of the dish using parchment (if lined), or cut directly in the dish. Slice into squares or rectangles as preferred.
- Let the bars rest for another 10 minutes before serving. This resting time helps set their structure, avoiding crumble at first bite.
- Plate and enjoy, or store in an airtight container for up to 5 days. For longer storage, freeze for up to a month, then thaw at room temp for 10 minutes before eating.
Let the bars cool completely in the dish before slicing. Rest for at least 15 minutes to allow structure to set. Serve warm or at room temperature, stored in an airtight container for up to 5 days.
How to Know It’s Done
- Golden edges and caramelized top after baking.
- Bars feel firm but not hard when pressed lightly.
- Aromatic cinnamon and toasted oats waft from the oven.

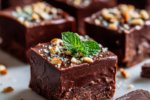
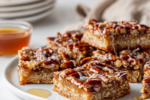
Cinnamon Oat Bars
Ingredients
Equipment
Method
- Preheat your oven to 180°C (350°F) and prepare your baking dish by lining it with parchment paper or lightly greasing it.
- In a mixing bowl, combine the oats, salt, and cinnamon. Stir well to evenly distribute the spices and salt, creating a fragrant dry mixture.
- In a small saucepan over medium heat, melt the butter until it’s bubbling softly and smells nutty. Stir in the honey or maple syrup and vanilla extract, warming everything together for about 2 minutes until the mixture is smooth and fragrant.
- Pour the warm liquid over the dry ingredients. Use a spatula to fold and stir until the oats are evenly coated and the mixture is sticky and holds together when pressed.
- If you’re adding nuts or dried fruit, gently fold them into the mixture now for bursts of flavor and texture.
- Transfer the mixture into your prepared baking dish. Press down firmly with the back of a spatula or your fingers to create an even, compact layer—this helps the bars hold together after baking.
- Bake in the preheated oven for 20–25 minutes, or until the edges turn a golden brown and the top looks slightly caramelized. The kitchen will fill with warm cinnamon and toasted oats aroma.
- Remove the dish from the oven and let it cool in the pan for at least 15 minutes. During this time, the bars will set and become easier to cut.
- Once cooled, lift the bars out of the dish using the parchment paper or cut directly in the pan. Slice into squares or rectangles as desired.
- Allow the bars to rest for another 10 minutes before serving to ensure they are firm and hold their shape. Enjoy warm or at room temperature, and store leftovers in an airtight container for up to 5 days.
Notes
Tips for perfect cinnamon oat bars
- Use cold butter for a flaky crumb—cold ingredients keep the oats from becoming greasy.
- Toast your oats lightly before mixing—brings out a nutty aroma that deepens flavor.
- Press mixture firmly into the pan—this ensures the bars hold together without crumbling.
- Watch the edges carefully—edges turn golden first, signaling it’s time to check for doneness.
- Let the bars cool completely—this helps set the structure and prevents sticking when slicing.
- For extra chew, soak dried fruit in warm water—avoids clumping and adds juiciness.
- Use parchment paper for easy removal—no sticking, no crumbling, just smooth cutting.
Common mistakes and how to fix them
- FORGOT to check oven temperature → Use an oven thermometer for accuracy.
- DUMPED ingredients too quickly → Mix ingredients gradually to prevent clumping.
- OVER-TORCHED the edges → Cover with foil if edges brown too fast.
- MISSED resting time → Allow bars to cool fully for proper setting.
Quick fixes and pantry swaps
- When mixture is too crumbly, splash in a teaspoon of water and stir gently.
- If bars stick during slicing, patch with a warm damp cloth to soften edges.
- Dumped in too much salt? Rinse the mixture briefly and add a touch more sweetener.
- Over-torched edges? Shield with foil and lower oven temperature for the next batch.
- Splash a few drops of vanilla or cinnamon oil if aroma is dull, for an instant scent boost.
Prep, store, and reheat tips
- Prep the mixture a day ahead, then keep it covered in the fridge; the flavors meld and the oats soak up more moisture, creating a richer bite.
- Store cooled bars in an airtight container at room temperature for up to 5 days; the cinnamon aroma stays vibrant and the texture remains chewy.
- For longer storage, freeze bars wrapped tightly in plastic wrap and then in foil; they’ll keep up to a month, with a slight deepening of cinnamon scent after thawing.
- Reheat slices briefly in the microwave—10 to 15 seconds—until warm and fragrant, with a slightly softer crumb. Check for even heat distribution and avoid overheating to prevent drying out.
Top questions about cinnamon oat bars
1. How do I know when the bars are done baking?
Look for bars that are golden around the edges and smell warm with cinnamon. They should feel firm but slightly pliable when pressed gently.
2. My bars break apart when I cut them. How can I fix this?
If they feel too crumbly, try pressing them down more firmly before baking or adding a tiny splash of water if mixture is dry.
3. How important is fresh cinnamon?
Use fresh cinnamon for a strong, aromatic spice. Old cinnamon can be dull and less flavorful.
4. How should I store leftover bars?
Storing in an airtight container at room temp keeps them chewy and fresh for up to 5 days. Wrap tightly or freeze for longer storage.
5. Can I make these dairy-free?
Substitute coconut oil or vegan butter for butter to keep it dairy-free, but expect a slight coconut flavor.

6. Can I use quick oats instead of rolled oats?
Quick oats will give a softer, more delicate texture; rolled oats provide chewiness and heartiness.
7. Can I add other ingredients like nuts or fruit?
Adding a handful of chopped nuts or dried fruit gives bursts of flavor. Toast nuts beforehand for extra crunch.
8. The mixture is too sticky, what do I do?
If the mixture is too sticky, lightly flour your hands or spatula to press it evenly into the pan.
9. Can I tweak the spices or sweetness?
For a richer flavor, try swapping honey for dark maple syrup or adding a pinch of nutmeg.
10. My edges are over-browning, how do I fix this?
If edges brown too quickly, tent with foil and lower oven temperature slightly for even baking.
These cinnamon oat bars are a quiet reminder that simple ingredients can bring the deepest comfort. The scent of cinnamon, toasted oats, and honey lingering in the kitchen makes every batch feel like a small celebration of home. They’re perfect for those busy mornings or lazy afternoons when you need a familiar, satisfying snack.
Making these bars is a bit of a ritual—measuring, pressing, baking—and each step feels grounding. When you bite into one, that chewy texture and warm spice hit just right, offering a cozy pause in any day.

Hi, I’m Charlotte Hayes, the creator and storyteller behind Lost in the Aroma. If you’ve ever closed your eyes while something simmered on the stove just to take in the scent, then you already understand what this space is about. For me, aroma is memory. It is emotion. It is the first sign that something beautiful is about to be shared. Lost in the Aroma is where I bring together recipes, sensory storytelling, and my lifelong love for food. I am so glad you’re here.


Leave a Reply