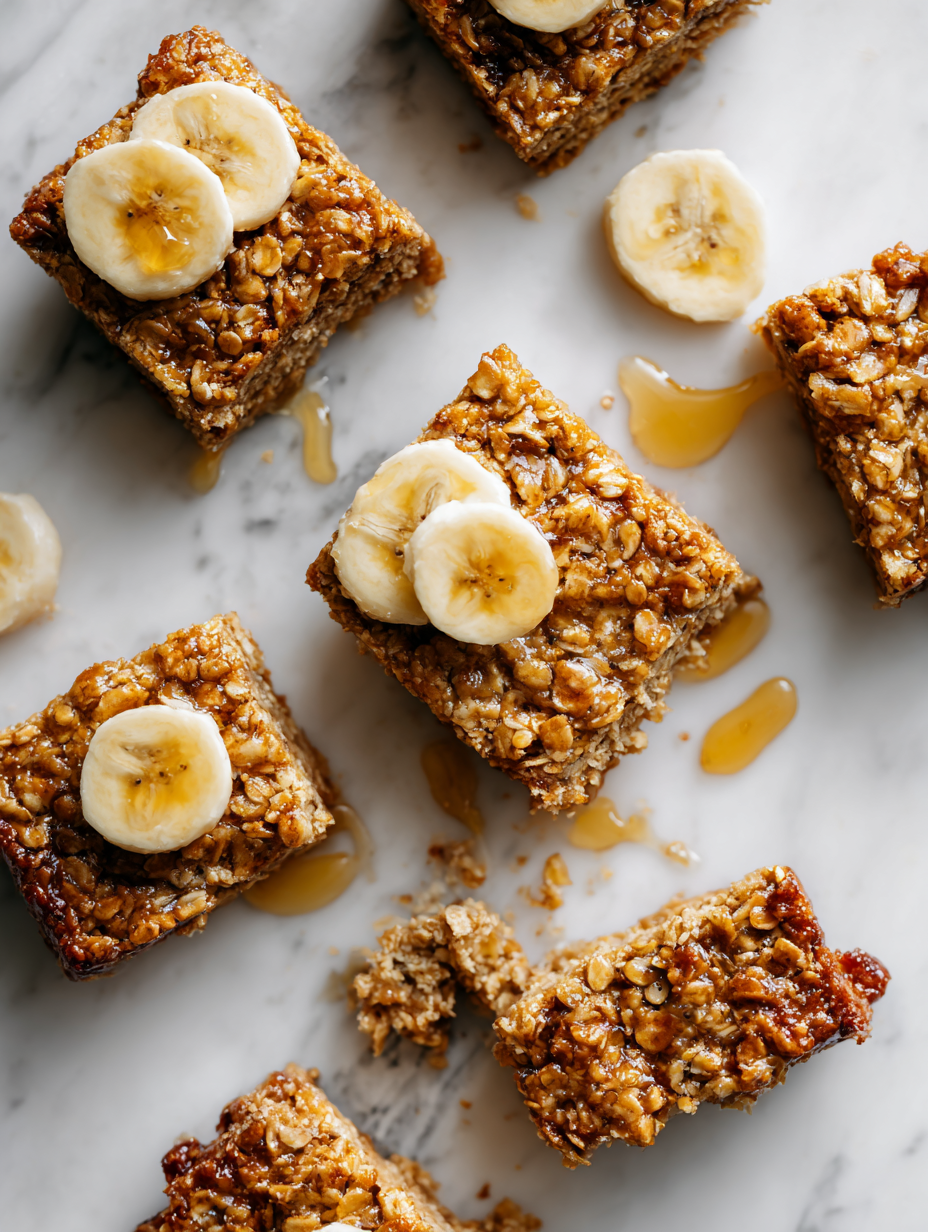
These banana oat bars are my go-to for mornings when I need something quick, nourishing, and familiar. They remind me of lazy weekend breakfasts from childhood, but with a simple twist that makes them perfect for busy weekdays. The smell of ripe bananas baking into oaty goodness just hits differently when you’re rushing out the door.
What I love most is how forgiving and adaptable this recipe is. No fancy ingredients, no fuss—just honest, honest flavors that come together in one baking dish. They’re the kind of treat I stash in the fridge and pull out when hunger strikes, or when I need a little comfort between meetings or on a slow weekend.
Focusing on how these bars serve as a nostalgic, no-fuss breakfast for busy mornings, combining simple ingredients in a way that feels comforting yet practical.
The story behind this recipe
- This recipe was born out of a need to use up bananas that had seen better days, soft and speckled but still sweet enough to save from the compost. I wanted something that could tame the overripe fruit without fussing over fancy ingredients or complicated steps. Baking these bars became a little ritual—an easy way to make breakfast feel a bit more special, even on hectic mornings.
- I remember the first batch I made in my tiny apartment oven, the smell of toasted oats and caramelized banana filling the kitchen. It was quiet, just me and that warm, sticky aroma. Since then, these bars have become a staple—proof that simple ingredients, when treated right, can turn into something unexpectedly comforting and satisfying.
- story_type
Breakdown of Key Ingredients
- Bananas: I like using very ripe bananas, their intense sweetness and soft texture make the bars naturally moist. If yours are less ripe, mash them well and add a touch more sweetener.
- Rolled oats: They give that chewy, hearty bite I crave. Toast them lightly before mixing for a nuttier flavor, or skip to keep it milder—your call.
- Honey or maple syrup: I prefer honey for a richer, floral note, but maple works fine if you want a hint of smokiness. Adjust sweetness based on your bananas’ ripeness.
- Butter or coconut oil: I use melted butter for a richer crumb, but coconut oil adds a subtle tropical aroma. Skip if you want a lighter, oil-free version—just expect a different texture.
- Add-ins (nuts, chocolate chips): I love tossing in toasted walnuts for crunch, or semi-sweet chips for pockets of melty sweetness. Feel free to skip or swap for dried fruit.
- Vanilla extract: Just a splash brightens everything up, making the banana flavor pop. If you don’t have any, a pinch of cinnamon can add warmth instead.
- Salt: A pinch enhances all the sweet and nutty flavors. Don’t skip it, even if you’re reducing sugar—balance is key.
Spotlight on key ingredients
Bananas:
- I rely on super ripe bananas that are deeply speckled; their natural sweetness and oozy texture make these bars irresistibly moist and flavorful. If yours are less ripe, mash them thoroughly and maybe add a touch more sweetener.
- Their soft, jammy consistency during baking releases a fragrant, caramel aroma that anchors the bars with a nostalgic sweetness. Watch for overripe fruit turning brown—perfect for baking, less so for eating fresh.
Rolled oats:
- They lend a hearty chew and a toasty aroma when lightly toasted beforehand. They behave differently depending on freshness, so keep an eye on their texture—stale oats can turn crumbly, fresh ones stay chewy.
- During baking, they soften and expand, creating that familiar, satisfying bite. The toasting process enhances their nutty flavor, which balances the sweetness of the bananas.
Notes for ingredient swaps
- Dairy-Free: Swap butter for coconut oil or a neutral oil. Expect a slightly lighter crumb and a hint of tropical aroma.
- Sweetener: Use agave syrup or brown rice syrup instead of honey or maple. These will add a different sweetness profile, more caramel-like or neutral.
- Oats: For gluten-free options, choose certified gluten-free oats. They taste similar but can be slightly less hearty.
- Bananas: If ripe bananas are scarce, a mashed cooked sweet potato can add moisture and sweetness, though it changes the flavor.
- Add-ins: Swap chocolate chips for dried cranberries or chopped dried apricots for a tangy twist. Nuts can be replaced with seeds like sunflower or pumpkin seeds.
- Flavor Boost: Replace vanilla with a pinch of cinnamon, nutmeg, or ginger to add warmth and complexity.
- Oil: If you want fewer calories, reduce the oil or replace with applesauce—but expect a denser, less crisp bar.
Equipment & Tools
- Mixing bowls: To combine ingredients comfortably.
- Fork: For mashing bananas easily.
- Spatula or spoon: To fold ingredients and spread batter.
- 20×20 cm (8×8 inch) baking dish: To bake the bars evenly.
- Parchment paper: For easy removal and cleanup.
- Toothpick or cake tester: To check doneness.
Step-by-step guide to Banana Oat Bars
- Preheat your oven to 175°C (350°F). Line a 20×20 cm (8×8 inch) baking dish with parchment paper, leaving some overhang for easy removal.
- In a large bowl, mash 3 ripe bananas with a fork until smooth. They should be fragrant and a bit oozy.
- Add 1/3 cup honey or maple syrup, 1/4 cup melted butter or coconut oil, and 1 teaspoon vanilla extract to the bananas. Mix until well combined.
- In a separate bowl, combine 1 1/2 cups rolled oats, 1/2 teaspoon salt, and 1 teaspoon cinnamon if you like warmth. Stir to mix.
- Pour the dry ingredients into the banana mixture. Fold gently until just combined. If using nuts or chocolate chips, fold them in now.
- Transfer the batter to your prepared baking dish. Spread evenly with the back of a spoon or spatula, smoothing the top.
- Bake for 20-25 minutes. The bars should turn golden around the edges and feel firm when pressed lightly. The smell should be sweet and toasty.
- Check for doneness: the edges should be crisp, the top slightly cracked, and a toothpick inserted into the center should come out with moist crumbs. If not, bake a few more minutes.
- Let the bars cool in the pan for at least 15 minutes. Then, lift out using the parchment overhang and transfer to a wire rack. Allow to cool completely before slicing.
Allow the baked bars to cool in the pan for 15 minutes. Then, lift out using the parchment and let them cool completely on a wire rack before slicing into squares. Serve at room temperature or slightly warmed.
How to Know It’s Done
- Edges are golden and slightly crisp.
- Toothpick inserted in the center comes out with moist crumbs.
- Surface is firm and crackly, with a pleasant aroma.
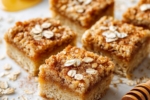
Banana Oat Bars
Ingredients
Equipment
Method
- Preheat your oven to 175°C (350°F). Line an 8×8 inch baking dish with parchment paper, leaving overhang for easy removal.
- In a large bowl, mash the bananas with a fork until smooth and fragrant, with a few small lumps remaining.
- Add honey or maple syrup, melted butter or coconut oil, and vanilla extract to the mashed bananas. Stir until the mixture is well combined and slightly glossy.
- In a separate bowl, combine the rolled oats, salt, and cinnamon if using. Lightly toast the oats in a dry pan for a few minutes until fragrant, then add to the wet mixture.
- Gently fold the dry ingredients into the wet mixture until just combined. If using chocolate chips or nuts, fold them in now.
- Transfer the batter to your prepared baking dish, spreading it out evenly with a spatula. Smooth the top for a uniform appearance.
- Bake for 20-25 minutes, or until the top is golden, edges are crisp, and a toothpick inserted into the center comes out with moist crumbs.
- Remove from the oven and let cool in the pan for at least 15 minutes. The bars will set as they cool and become easier to slice.
- Lift the bars out of the dish using the parchment overhang and transfer to a wire rack. Allow to cool completely before slicing into squares.
- Slice into bars and serve at room temperature or warmed. Enjoy the comforting, chewy texture with a hint of vanilla and caramelized banana aroma.
Pro tips for perfect banana oat bars
- Use ripe bananas for maximum sweetness and moisture, they become jammy during baking.
- Toast oats lightly before mixing to boost their nutty aroma and flavor.
- Mix honey or maple syrup in warm to help it blend smoothly into the batter.
- Keep an eye on baking time; edges should be golden and slightly crisp when done.
- Cool bars completely before slicing for cleaner cuts and better texture.
- For crunch, sprinkle extra nuts or seeds on top before baking.
- Use parchment overhang for easy removal and to keep your bars tidy.
Common mistakes and how to fix them
- FORGOT to check oven temperature → Use an oven thermometer for accuracy.
- DUMPED in too much liquid → Add more oats or bake longer until set.
- OVER-TORCHED edges → Cover with foil halfway through baking.
- MISSED the cooling step → Cool completely for cleaner slicing and better texture.
Quick fixes and pantry swaps
- When bananas are too ripe and oozy, chill them for easier handling.
- Splash a little lemon juice on bananas to prevent browning before mixing.
- Patch soggy bars by baking them a few extra minutes until crisp.
- DUMPED in too much liquid? Add a handful of oats to firm up the batter.
- When oats feel dull, toast them briefly in a dry pan for extra flavor.
Prep, store, and reheat tips
- Prepping the bananas and oats a day ahead saves time; mash bananas until smooth and measure oats the night before.
- Store baked bars in an airtight container at room temperature for up to 3 days; they stay moist but develop a slightly firmer texture.
- For longer storage, freeze bars wrapped tightly in plastic wrap and in a zip-top bag for up to 1 month; thaw at room temperature.
- Reheat individual bars briefly in the microwave (10-15 seconds) until warm and fragrant, with a soft, inviting texture.
Top questions about Banana Oat Bars
1. Can I use less ripe bananas?
Use very ripe bananas with dark spots for maximum sweetness and moisture. Slightly underripe bananas will be less flavorful and may require extra sweetener.
2. Can I substitute honey with another sweetener?
Yes, you can replace honey with maple syrup or agave nectar. The flavor will shift slightly, with maple adding a smoky note.
3. Are gluten-free oats okay to use?
Absolutely. Use gluten-free oats if needed. Keep an eye on texture—gluten-free oats can be a bit different in chewiness.
4. Can I use sweet potato instead of bananas?
Yes. Mashed cooked sweet potato can replace bananas for moisture, but it will give a different flavor and color to the bars.
5. How should I store these bars?
Store baked bars in an airtight container at room temperature for up to 3 days, or freeze for longer storage. Reheat briefly to restore softness.
6. Can I make these ahead of time?
Pre-mash bananas and measure oats the night before to save time. The bars can be baked ahead and kept refrigerated or frozen.
7. What if my bars are too moist or overdone?
If the bars turn out soggy, bake them a few extra minutes until edges are crisp. For over-baked edges, cover with foil during baking.
8. How do I know when they’re done?
Use a toothpick inserted into the center; it should come out with moist crumbs. The edges should be golden and firm, with a sweet aroma.
9. How do I get clean slices?
If the bars stick or crumble, chill them slightly before slicing. For uneven cuts, run your knife under hot water first.
10. What if my bananas are too ripe or brown?
When bananas are too ripe and oozy, chill them for easier handling. Splash lemon juice to prevent browning, and keep an eye on baking time for perfect texture.
These banana oat bars are a quiet reminder that simple ingredients can create something truly satisfying. They’re perfect for busy mornings or when you need a quick, wholesome treat that feels like a small act of kindness. No matter how hectic life gets, a batch of these can make everything a little more manageable.
In the end, it’s about those familiar flavors—banana, oats, a touch of sweetness—that bring a moment of comfort. They’re not fancy, but they’re honest and reliable, like a good friend in the fridge. Sometimes, that’s exactly what you need.

Hi, I’m Charlotte Hayes, the creator and storyteller behind Lost in the Aroma. If you’ve ever closed your eyes while something simmered on the stove just to take in the scent, then you already understand what this space is about. For me, aroma is memory. It is emotion. It is the first sign that something beautiful is about to be shared. Lost in the Aroma is where I bring together recipes, sensory storytelling, and my lifelong love for food. I am so glad you’re here.


Leave a Reply