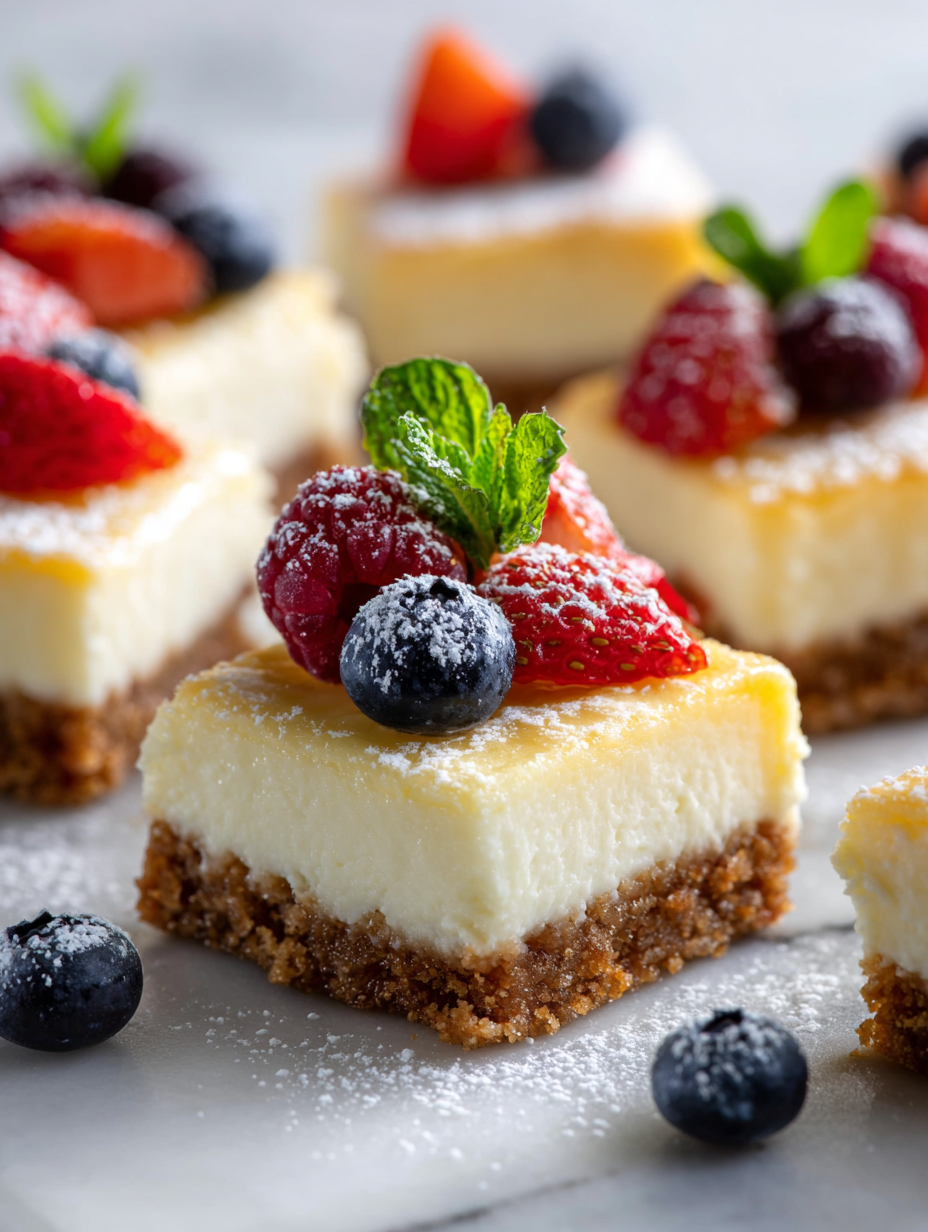
These cheesecake bars are my go-to for mornings that feel too rushed for anything elaborate. I love how they pack that creamy, tangy punch of cheesecake into a portable square, perfect for grabbing on the way out the door. They’re not fancy, but they feel like a little treat that sneaks in some indulgence before the day really starts.
What makes this recipe special is how adaptable it is — you can toss in a handful of berries or a sprinkle of lemon zest if you’re feeling extra. It’s a simple fix that turns a classic dessert into something you can enjoy in a flash, without sacrificing flavor or texture. Plus, they’re just as good cold from the fridge as they are slightly warmed, so they’re a flexible breakfast or snack.
I’ve made these for busy mornings, weekend brunches, and even as a quick brunch gift for friends. The process is straightforward, no-fuss, and forgiving — perfect for mornings when you want something homemade but don’t want to spend ages in the kitchen. It’s a little slice of comfort that feels like a small victory before the chaos of the day begins.
This recipe focuses on adapting classic cheesecake bars for busy mornings, turning them into portable, grab-and-go treats that still feel indulgent but are quick to assemble and perfect for rushed starts.
The story behind this recipe
- Making these cheesecake bars started from a busy weekend when I needed something sweet but quick. I didn’t want to drag out a whole cheesecake, just something small and satisfying that I could toss together fast. They became a staple in my kitchen after that, because honestly, I love how they feel fancy but are so easy to whip up.
- One day, I was craving the tang and creaminess of a proper cheesecake, but with less fuss. I threw together some basic ingredients, baked them till they just set, and was surprised how much they reminded me of the real deal—just more portable and less delicate. Now, they’re my go-to for when I need a little indulgence without the fuss.
- story_type
- paragraph
Ingredient breakdown
- Cream cheese: I like it soft and spreadable, so I leave mine out to soften for a few hours. For a tangier kick, try a slightly aged cream cheese; it adds depth.
- Graham cracker crumbs: I toast mine lightly before mixing to bring out a nutty aroma that makes the crust extra inviting. If you’re out, crushed digestive biscuits work fine, just add a touch of butter.
- Sugar: I prefer a fine granulated sugar that dissolves easily, giving that smooth, sweet backdrop. Use honey or maple syrup if you want a hint of caramel or smokiness.
- Eggs: I use large, room-temp eggs to keep the filling silky and prevent cracking. For a richer texture, a splash of sour cream or full-fat Greek yogurt works wonders.
- Lemon zest: I love zest brightening up the cheesecake, releasing that fresh citrus aroma. Skip it if you want a more neutral profile, or swap for orange zest for a sweeter note.
- Butter: I melt and mix it into the crust for that rich, buttery flavor and sturdy texture. For a vegan version, coconut oil gives a subtle tropical hint but keeps the crust firm.
- Vanilla extract: I always add a splash for warmth and depth, but you can substitute with vanilla bean paste or a dash of bourbon for a richer aroma.
Spotlight on key ingredients
Cream cheese:
- I like it soft and spreadable, so I leave mine out to soften for a few hours. For a tangier kick, try a slightly aged cream cheese; it adds depth.
- Graham cracker crumbs: I toast mine lightly before mixing to bring out a nutty aroma that makes the crust extra inviting. If you’re out, crushed digestive biscuits work fine, just add a touch of butter.
Lemon zest and Butter:
- Lemon zest: I love zest brightening up the cheesecake, releasing that fresh citrus aroma. Skip it if you want a more neutral profile, or swap for orange zest for a sweeter note.
- Butter: I melt and mix it into the crust for that rich, buttery flavor and sturdy texture. For a vegan version, coconut oil gives a subtle tropical hint but keeps the crust firm.
Notes for ingredient swaps
- Dairy-Free: Swap cream cheese for a vegan cream cheese alternative. Expect a slightly lighter, less tangy flavor, but still creamy.
- Gluten-Free: Use gluten-free graham cracker crumbs or crushed gluten-free cookies. The texture might be a tad denser, but still delicious.
- Sweetener: Replace sugar with honey or maple syrup for a richer, more complex sweetness. Adjust the liquid content slightly if needed.
- Lemon Zest: Omit for a subtler citrus aroma, or swap with orange zest for a sweeter, more fragrant note.
- Butter: Use coconut oil or vegan butter to keep the crust rich and flaky. Flavor will shift to a tropical note, but still tasty.
- Eggs: For an egg-free version, try applesauce or flaxseed meal. The filling will be slightly denser, but still satisfying.
- Crust Base: Substitute crushed Oreos (with cream) for graham crackers for a chocolate twist. Expect a richer, more decadent crust.
Equipment & Tools
- 9-inch square baking pan: Holds the crust and filling for baking.
- Parchment paper: Eases removal and prevents sticking.
- Mixing bowls: Combine crust and filling ingredients.
- Electric mixer or whisk: Cream cheese and eggs smoothly.
- Spatula: Spread filling evenly.
- Cooling rack: Cool bars uniformly after baking.
- Sharp knife: Cut into neat squares.
Step-by-step guide to cheesecake bars
- Preheat your oven to 180°C (350°F). Line a 9-inch (23cm) square baking pan with parchment paper, leaving some overhang for easy removal.
- Make the crust: In a bowl, combine 1 ½ cups (150g) graham cracker crumbs with ¼ cup (50g) sugar and ½ cup (115g) melted butter. Mix until sandy and cohesive.
- Press the crust mixture evenly into the prepared pan. Use the bottom of a glass to pack it down firmly. Bake for 10 minutes, until lightly golden. Cool slightly on a rack.
- Prepare the filling: In a large bowl, beat 16 oz (450g) softened cream cheese with ½ cup (100g) sugar until smooth. Add 2 large eggs, one at a time, mixing well after each.
- Stir in 1 teaspoon vanilla extract and the zest of 1 lemon for brightness. Mix until just combined. Do not overmix to avoid cracks.
- Pour the filling over the cooled crust, spreading evenly. Tap the pan gently on the counter to release air bubbles.
- Bake for 25-30 minutes at 180°C (350°F). The edges should be set, but the center still slightly jiggly. A toothpick inserted near the center should come out with moist crumbs.
- Let the cheesecake bars cool in the pan on a wire rack for at least 1 hour. Then refrigerate for at least 4 hours or overnight to fully set.
- Once chilled, lift the bars out using the parchment paper overhang. Cut into squares with a sharp knife, wiping the blade between cuts for clean edges.
- Serve directly from the fridge or at room temperature. For best texture, enjoy within 3 days, kept covered.
Cool completely in the pan, then refrigerate for at least 4 hours or overnight. Use parchment overhang to lift out and cut into squares. Serve chilled or at room temperature.
How to Know It’s Done
- Crust is golden and crisp when baked.
- Filling is slightly jiggly but not liquid in the center after baking.
- Bars are set and hold shape when sliced.
Cheesecake Bars
Ingredients
Equipment
Method
- Line your baking pan with parchment paper, leaving some overhang for easy removal.
- Combine the graham cracker crumbs, sugar, and melted butter in a bowl, mixing until the crumbs are evenly coated and the mixture looks like wet sand.
- Press this mixture firmly into the bottom of the prepared pan, using the back of a spoon or a glass to compact it evenly. Bake at 180°C (350°F) for 10 minutes until lightly golden, then let it cool slightly.
- In a large bowl, beat the softened cream cheese with an electric mixer until smooth and fluffy, about 2-3 minutes.
- Add the sugar for the filling and continue beating until fully incorporated and creamy.
- One at a time, beat in the eggs, mixing just until each is combined before adding the next, ensuring a smooth, lump-free batter.
- Stir in the vanilla extract and lemon zest, mixing gently until evenly distributed, filling the batter with a bright aroma.
- Pour the cream cheese filling over the cooled crust, spreading it out evenly with a spatula. Gently tap the pan on the counter to release any air bubbles.
- Bake at 180°C (350°F) for 25-30 minutes. The edges should be set and slightly golden, while the center remains slightly jiggly.
- Allow the cheesecake to cool in the pan on a wire rack for about an hour, then refrigerate for at least 4 hours or overnight to fully set and develop flavor.
- Once chilled, lift the bars out using the parchment overhang and cut into neat squares with a sharp knife, wiping the blade between cuts for clean slices.
- Serve the cheesecake bars chilled, either straight from the fridge or at room temperature, and enjoy their creamy, tangy goodness.
Notes
Tips and tricks for perfect bars
- crust: Use a fork to press the crust mixture evenly into the pan for a sturdy base.
- Sensory cue: Bake the crust until it turns golden and fragrant—this ensures a crunchy texture.
- Avoid cracks: Mix the filling just until smooth; overmixing can cause fissures during baking.
- Jiggle test: The cheesecake should still jiggle slightly in the center when done; it will set as it cools.
- Prevent sticking: Line your pan with parchment and leave a small overhang for easy removal.
- Cooling is key: Chill the bars in the fridge for at least 4 hours to achieve clean, neat slices.
- Quick fix: If edges crack, gently re-smooth with a hot knife or serve with a drizzle of fruit compote.
Common mistakes and how to fix them
- FORGOT to check crust color → bake until golden and fragrant.
- DUMPED filling without mixing well → ensure smooth, lump-free batter.
- OVER-TORCHED the edges → cover with foil if edges darken too fast.
- MISSED the chill time → refrigerate at least 4 hours for firm bars.
Quick fixes and pantry swaps
- When edges crack, shield with foil and return to oven for even baking.
- Splash some lemon juice on a burnt crust to mask overtones.
- Patch a cracked cheesecake with a thin layer of whipped cream or fruit glaze.
- Dumped filling too runny? Chill briefly or add a spoonful of cornstarch before baking.
- If bars are too crumbly, brush the crust with a bit of melted butter and press again.
Make-Ahead and Storage Tips
- Prep the crust and filling ingredients the night before to save time in the morning. The aroma of toasted graham crackers and softened cream cheese makes the kitchen feel cozy.
- Store unbaked crust in an airtight container at room temperature for up to 24 hours; the butter solidifies, but still presses into a firm crust.
- Refrigerate baked cheesecake bars in an airtight container for up to 3 days. The texture becomes creamier and flavors mellow over time.
- Reheat individual slices in the microwave at 50% power for about 10-15 seconds, until slightly warm and fragrant, with a silky, smooth texture.
- Freeze leftovers wrapped tightly in plastic wrap and foil for up to 1 month. Thaw in the fridge overnight for a cool, creamy treat or warm briefly for a softer bite.
Common questions about cheesecake bars
1. How do I know when cheesecake bars are done?
You want the filling to be smooth and creamy, but not runny. It should jiggle slightly in the center when baked.
2. Can I use cold cream cheese?
Use room-temperature cream cheese and eggs for a smooth batter. Cold ingredients cause lumps and cracks.
3. How long should I chill the cheesecake bars?
Refrigerate the bars for at least 4 hours, ideally overnight. This helps them set and intensifies the flavor.
4. What if the edges over-brown?
If the edges brown too quickly, cover loosely with foil to prevent burning while the center finishes baking.
5. How do I get perfect slices?
Use a sharp knife dipped in hot water to get clean, neat slices. Wipe the blade between cuts.
6. Can I change the crust ingredients?
You can swap graham cracker crumbs with crushed digestive biscuits or cookies for a different flavor and texture.
7. Can I make these sweeter or less sweet?
Yes, you can replace sugar with honey or maple syrup, but reduce other liquids slightly to maintain texture.
8. What can I add for more flavor?
Adding lemon zest brightens the flavor and adds a fresh citrus aroma. Orange zest works well for a different twist.
9. How long do cheesecake bars last?
Leftovers can be stored in the fridge up to 3 days, wrapped tightly. They taste best chilled and slightly firm.
10. How do I reheat leftover cheesecake bars?
Warm a slice in the microwave for about 10 seconds until just soft and fragrant. Serve immediately for best texture.
These cheesecake bars might seem simple, but they hold a quiet magic—rich, tangy, and perfectly portable. They’re a little reminder that sometimes, quick treats can carry a lot of comfort. Making them feels like a small act of kindness in a busy day.
Whenever I have a batch in the fridge, I find myself reaching for one when I need a moment of indulgence or a sweet gift for someone. They’re honest, unpretentious, and just a bit special—like a secret shared over a slice.

Hi, I’m Charlotte Hayes, the creator and storyteller behind Lost in the Aroma. If you’ve ever closed your eyes while something simmered on the stove just to take in the scent, then you already understand what this space is about. For me, aroma is memory. It is emotion. It is the first sign that something beautiful is about to be shared. Lost in the Aroma is where I bring together recipes, sensory storytelling, and my lifelong love for food. I am so glad you’re here.


Leave a Reply