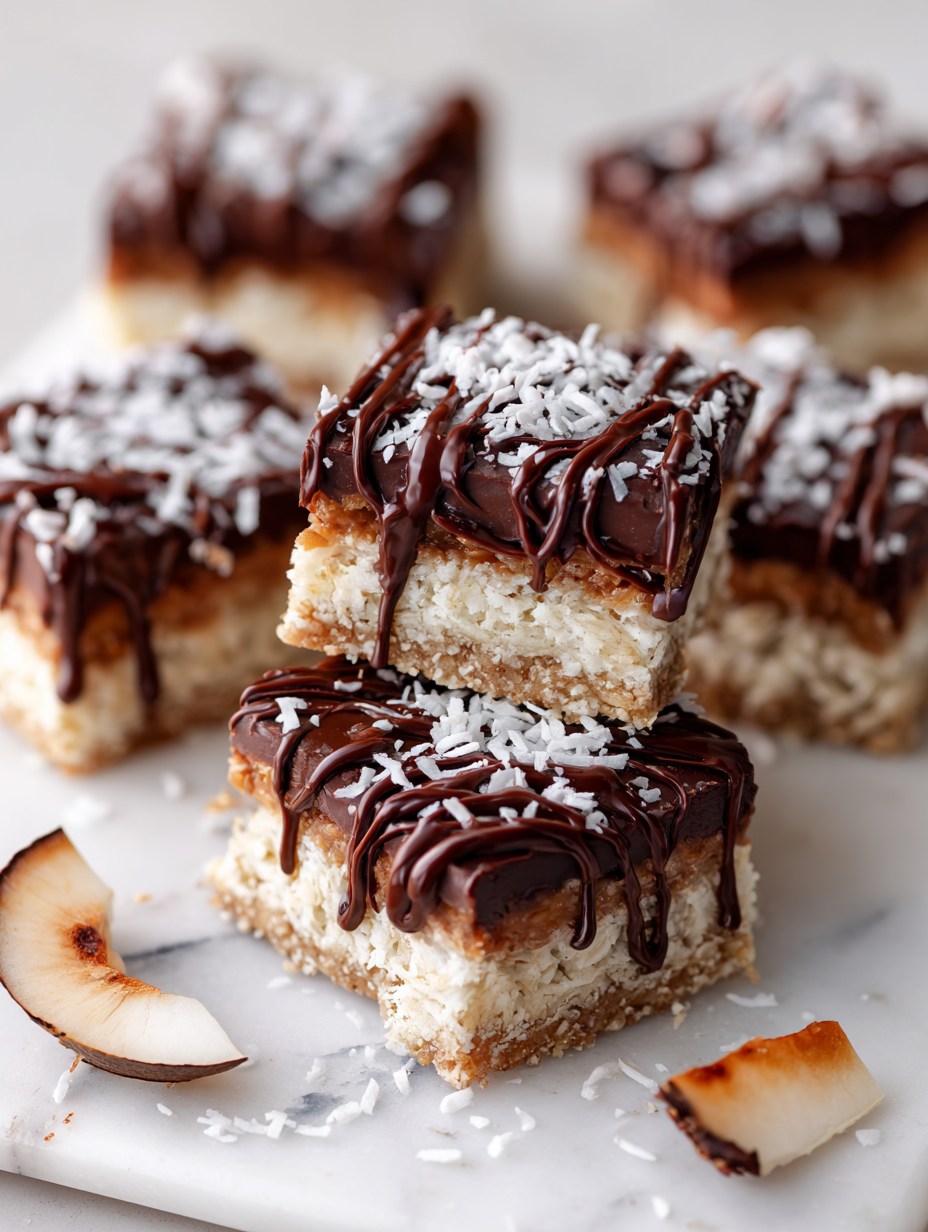
These Chocolate Coconut Bars take me back to afternoons spent in grandma’s kitchen, where the smell of toasted coconut and melting chocolate filled the air. But I like to think of them as a grown-up upgrade—rich, a little salty, with that bold coconut bite that surprises you every time.
They’re not just nostalgic; they’re a practical treat for when you want something sweet without overdoing it. No fancy ingredients, just good kitchen instinct and a handful of pantry staples. Perfect for a quick fix or a chill weekend baking session.
Biting into one feels like a little rebellion—crunchy edges, gooey chocolate, and that fresh coconut aroma—totally addictive, and honestly, pretty easy to pull together. It’s the kind of recipe that makes you smile, even if you’re just baking for yourself.
Focusing on the nostalgic joy of childhood treats, but elevating them with bold, unexpected flavor contrasts that surprise the palate.
The story behind this recipe
- This recipe was born out of a late-night craving and a messy pantry. I didn’t have everything I needed, but I knew those familiar flavors—coconut, chocolate, a hint of salt—always hit the spot after a long day. It’s funny how a simple mix of ingredients can take you back and bring a little comfort.
- One afternoon, I was experimenting, trying to recreate that nostalgic snack I loved as a kid but with a grown-up twist—more depth, less sweetness. The moment I got that perfect chewy, crunchy bite with a glossy chocolate top, I knew it was a keeper.
- Now, I make these whenever I need a quick, honest treat. They’re good for sharing, but honestly, I keep a batch tucked away just for myself. They remind me that sometimes, the simplest recipes are the most satisfying.
Key ingredients breakdown
- Coconut: I love using toasted, flaky coconut for that smoky, nutty aroma that makes the bars feel like a tropical escape. Feel free to swap it for unsweetened shredded if you prefer a milder flavor, but don’t skip the toasting—it’s what gives the bars their depth.
- Chocolate: I go for a good quality dark or semi-sweet chocolate, melting smoothly and giving that glossy, inviting top. If you want a dairy-free version, dark cocoa or vegan chocolate chips work, but the rich melt and sheen might be slightly different.
- Sweetened Condensed Milk: It binds everything together with a creamy sweetness I can’t do without. If you’re in a pinch, maple syrup or honey can work—just add a touch more salt to balance it out and keep that luscious texture.
- Butter: I prefer unsalted butter for control over salt levels, adding richness and helping everything meld. For a dairy-free option, coconut oil provides a similar melt-in-your-mouth quality, though the flavor shifts subtly towards coconut.
- Salt: Just a pinch enhances the chocolate and coconut. If you’re using salted butter, cut back slightly. A small sprinkle of sea salt on top before chilling makes a surprising difference—crystals shimmer and add that satisfying crunch.
- Vanilla Extract: I always add a splash to deepen the flavor. Skip it if you want a more straightforward coconut-chocolate profile, but honestly, it rounds out the sweetness and aroma beautifully.
- Optional Add-ins: Dried fruits or chopped nuts can add texture and surprise, but I prefer keeping it simple—sometimes less is more, especially when the flavors are bold enough already.
Spotlight on key ingredients
Chocolate:
- Coconut: I love using toasted, flaky coconut for that smoky, nutty aroma that makes the bars feel like a tropical escape. Feel free to swap it for unsweetened shredded if you prefer a milder flavor, but don’t skip the toasting—it’s what gives the bars their depth.
- I go for a good quality dark or semi-sweet chocolate, melting smoothly and giving that glossy, inviting top. If you want a dairy-free version, dark cocoa or vegan chocolate chips work, but the rich melt and sheen might be slightly different.
Sweetened Condensed Milk & Butter:
- Sweetened Condensed Milk: It binds everything together with a creamy sweetness I can’t do without. If you’re in a pinch, maple syrup or honey can work—just add a touch more salt to balance it out and keep that luscious texture.
- Butter: I prefer unsalted butter for control over salt levels, adding richness and helping everything meld. For a dairy-free option, coconut oil provides a similar melt-in-your-mouth quality, though the flavor shifts subtly towards coconut.
Notes for ingredient swaps
- Coconut: I prefer toasted, flaky coconut for that smoky aroma. Swap with unsweetened shredded if you want milder, but skip the toasting for less depth.
- Chocolate: A good quality semi-sweet or dark chocolate makes all the difference. For dairy-free, try vegan chocolate chips or cacao butter with a sweetener, but expect a slightly different sheen.
- Sweetened Condensed Milk: If you want a dairy-free version, coconut milk condensed with sugar works, though it may alter the creaminess and sweetness slightly.
- Butter: Use coconut oil for a dairy-free, subtly coconut-flavored alternative that melts just as smoothly. Note: it may add more coconut aroma.
- Salt: Fine sea salt enhances flavors, but if using salted butter, cut back a little. A sprinkle of flaky sea salt on top before chilling adds crunch and contrast.
- Vanilla Extract: Skip if you prefer a straightforward coconut and chocolate flavor, but it really boosts aroma and rounds the sweetness.
- Add-ins: Dried fruits or chopped nuts can be included for texture, but I usually stick to simple ingredients for that classic, bold flavor.
Equipment & Tools
- 8×8 inch pan: To shape and chill the bars
- Saucepan: To melt the chocolate smoothly
- Spatula: To mix, spread, and press ingredients
- Parchment paper: For easy removal and cleanup
Step-by-step guide to Chocolate Coconut Bars
- Gather your equipment: an 8×8 inch pan, a saucepan, a spatula, and parchment paper. Line the pan with parchment for easy removal.
- Toast the coconut: spread 1 cup of shredded coconut on a baking sheet. Toast at 180°C (350°F) for 5-7 minutes, stirring halfway until golden and fragrant. Set aside.
- Melt the chocolate: in a saucepan over low heat or in a microwave in 30-second bursts, melt 1 cup of chocolate, stirring until smooth. Be careful not to overheat or burn.
- Combine the base: in a mixing bowl, mix 1/2 cup of melted butter, 1 can (14 oz) of sweetened condensed milk, 1 teaspoon vanilla, and a pinch of salt. Add the toasted coconut, and stir until evenly coated.
- Press into the pan: transfer the coconut mixture into the prepared pan. Use the back of a spatula or your fingers to press it down firmly and evenly. Chill in the fridge for 20-30 minutes until set.
- Add the chocolate topping: pour the melted chocolate over the chilled coconut base. Use a spatula to spread it into an even layer. Refrigerate for another 30 minutes to firm up the chocolate.
- Finish and cut: once fully set, lift the block out of the pan using the parchment. Cut into bars or squares with a sharp knife. For clean edges, wipe the knife with warm water between cuts.
- Rest and serve: let the bars sit at room temperature for 5 minutes before serving for the best texture. Store leftovers in an airtight container in the fridge for up to a week.
Chill the assembled bars until firm, then cut into squares. Let sit at room temperature for 5 minutes before serving for optimal texture.
How to Know It’s Done
- Golden toasted coconut with a smoky aroma.
- Smooth, shiny melted chocolate with no streaks.
- Bars hold their shape without crumbling when cut.
Chocolate Coconut Bars
Ingredients
Equipment
Method
- Line your 8×8 inch pan with parchment paper, leaving some overhang for easy removal.
- Spread the shredded coconut evenly on a baking sheet and toast in a preheated oven at 180°C (350°F) for 5-7 minutes, stirring halfway until golden and fragrant. Keep an eye on it to prevent burning.
- While the coconut cools, melt the chocolate in a saucepan over low heat, stirring constantly until smooth and glossy. Alternatively, melt in short bursts in the microwave, stirring between each.
- In a mixing bowl, combine the melted butter, sweetened condensed milk, vanilla extract, and a pinch of salt. Stir until well blended and creamy.
- Add the toasted coconut to the mixture and fold everything together until the coconut is evenly coated and the mixture feels sticky but manageable.
- Transfer the coconut mixture into your prepared pan. Use the back of a spatula or your fingers to press it down firmly and create an even layer. Chill in the fridge for 20-30 minutes until set.
- Once the coconut layer is firm, pour the melted chocolate over the top. Spread it evenly with a spatula to cover the entire surface.
- Return the pan to the fridge and chill for another 30 minutes until the chocolate is set and shiny.
- Once fully chilled and set, lift the bars out of the pan using the parchment overhang. Use a sharp knife dipped in warm water to cut into squares or bars for clean, precise edges.
- Let the bars sit at room temperature for 5 minutes before serving to soften the chocolate slightly for the perfect bite. Enjoy the crunchy, chewy, and chocolatey goodness!
Pro tips for perfect bars
- Use low heat when melting chocolate to prevent scorching and maintain glossy texture.
- Toast coconut until just golden to boost aroma without risking bitterness or burnt flavor.
- Chill the coconut mixture until just firm—over-chilling can make it hard to press evenly.
- Wipe your knife with warm water between cuts for clean, precise edges that don’t crack or crumble.
- When pouring chocolate, tilt the pan gently to spread evenly and avoid thick, uneven layers.
- Add a pinch of salt on top before chilling to enhance flavor contrast and add a subtle crunch.
- Let the bars sit at room temperature for 5 minutes before serving—this softens the chocolate slightly for better bite.
Common mistakes and how to fix them
- FORGOT to check chocolate temperature → Melts unevenly, let it cool slightly before pouring.
- DUMPED coconut too early → Wait until mixture is firm before adding coconut to avoid sogginess.
- OVER-TORCHED chocolate → Remove from heat immediately to prevent bitter, burnt flavor.
- MISSED toasting coconut → Toast until golden and fragrant for depth, don’t skip this step.
Quick fixes and pantry swaps
- If chocolate seizes, splash in a little warm cream to rescue smoothness.
- When coconut is soggy, patch with a quick toasting session before mixing.
- Over-torched chocolate? Shield it with a fresh layer and lower heat next time.
- Dumped coconut? Add a pinch of salt and a quick re-chill to rebind the mixture.
- When bars crack while cutting, wipe knife with warm water for clean slices.
Prep, store, and reheat tips
- Prepare the coconut mixture and press into the pan a day ahead; it firms up nicely in the fridge and makes assembly quicker.
- Store the assembled, uncoated bars in an airtight container in the fridge for up to a week; the flavors meld and intensify over time.
- Refrigerated bars develop a firm, chewy texture. For a softer bite, let sit at room temperature for 5 minutes before serving.
- The chocolate topping can be melted and poured over chilled bars just before serving; it sets quickly, giving a glossy finish and crisp snap.
Top questions about Chocolate Coconut Bars
1. Can I make these bars dairy-free?
Yes, using dairy-free chocolate chips works well and gives a similar glossy finish and rich flavor.
2. How long do these bars last?
To keep them fresh, store in an airtight container in the fridge for up to a week. They might soften slightly but stay delicious.
3. Can I customize the ingredients?
Absolutely, you can add chopped nuts or dried fruits into the coconut mixture for extra texture and flavor.
4. How do I cut the bars neatly?
Use a sharp knife dipped in warm water to get clean, crisp cuts without cracking the chocolate topping.
5. My chocolate topping isn’t shiny—what went wrong?
If the chocolate isn’t glossy, it may have cooled too quickly. Rewarm gently or re-melt it for a shiny top.
6. Can I use different types of coconut?
Yes, you can swap shredded coconut with coconut flakes, but toast them well for the best flavor and texture.
7. My mixture is too sticky or dry, what should I do?
If the mixture feels too dry, add a splash more condensed milk. If too sticky, chill it a bit longer before pressing.
8. What kind of chocolate should I use?
Using high-quality chocolate makes a noticeable difference in flavor and sheen. Look for good melting chocolate or good-quality chips.
9. Can I freeze the bars?
Yes, these bars can be frozen for up to a month. Wrap tightly to prevent freezer burn and thaw at room temperature.
10. Can I prepare these ahead of time?
Yes, you can prepare the coconut base a day in advance; just keep it covered in the fridge and add the chocolate topping before serving.
Baking these bars is more than just a simple project; it’s about capturing that moment of nostalgia and elevating it with a touch of grown-up flavor. The smell of toasted coconut and melting chocolate filling the kitchen feels like a little celebration, even on quiet weekdays.
They’re honest, straightforward treats that remind me why I started baking in the first place—simplicity, comfort, and a bit of that messy, imperfect joy of creating something delicious with my own hands. No matter how many times I make them, they still manage to surprise me with that perfect crunch and gooey chocolate layer.

Hi, I’m Charlotte Hayes, the creator and storyteller behind Lost in the Aroma. If you’ve ever closed your eyes while something simmered on the stove just to take in the scent, then you already understand what this space is about. For me, aroma is memory. It is emotion. It is the first sign that something beautiful is about to be shared. Lost in the Aroma is where I bring together recipes, sensory storytelling, and my lifelong love for food. I am so glad you’re here.


Leave a Reply