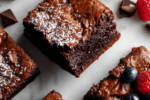
Making these chocolate fudge bars is like pressing a little pause button on life. Each step, from melting the chocolate to spreading that glossy layer in the pan, feels like a quiet act of love. It’s not about perfection—more about the messy, honest process that makes the whole thing feel personal and real.
Growing up, these bars were always around during lazy weekend afternoons or family gatherings. There’s something about the way the rich, fudgy aroma fills the kitchen, making everyone slow down and smile without even saying a word. Baking them now, I’m reconnecting with those simple, unpolished moments of joy.
This recipe isn’t about fancy techniques or perfect squares. It’s about embracing the imperfect, the sticky, the slightly cracked edges that remind us these treats are made with heart—and a little bit of chaos. Sometimes, that’s exactly what makes them memorable.
Focusing on the nostalgic, almost ritualistic aspect of making these bars as a way to reconnect with childhood memories, emphasizing the imperfect but heartfelt process that makes baking meaningful and personal.
The story behind this recipe
- This recipe was born out of a lazy Sunday afternoon, when I dug through my grandmother’s battered recipe box. I found an old, stained index card with scribbled notes and a vague memory of how these bars used to be the ultimate treat during childhood. Making them again felt like a quiet act of reclaiming a piece of my past, messy and imperfect as it was.
- There’s something about melting chocolate with butter, watching it turn glossy and dark, that sparks memories of my mother’s kitchen. We’d stand there, spoon in hand, tasting as I learned the balance between sweet and bitter, the way a pinch of salt can make chocolate sing. These bars aren’t about finesse—they’re about feeling connected to those unpolished, honest moments.
- Every crack and uneven edge on these fudge bars echoes the chaos of real life. It’s in those flaws that I find the most charm, the reminder that love in baking isn’t about perfection, but about the stories we infuse into each batch. That’s what makes these bars worth the messy effort.
Ingredient breakdown
- Unsweetened cocoa powder: I love the deep, rich aroma it brings—aim for a smooth, non-alkalized variety to keep the fudge glossy. Swap with dark cocoa if you want a slightly less intense chocolate hit.
- Butter: Creamy and rich, it gives the fudge that velvety texture. Salted butter adds a subtle contrast, but if you prefer pure sweetness, go for unsalted and add a pinch of salt yourself.
- Dark chocolate: I prefer a good-quality bar, melting smoothly and adding a luxurious, slightly bitter complexity. You can use semi-sweet chips if you’re in a rush, but it won’t have that melt-in-your-mouth richness.
- Sweetened condensed milk: It’s what binds everything together with its sticky, luscious sweetness. For a dairy-free version, coconut milk + sugar can work, but expect a different, more tropical flavor.
- Vanilla extract: Just a splash heightens the chocolate flavor and adds a warm note. Almond extract can be an interesting swap if you want a nutty twist, but use sparingly.
- Salt: A pinch enhances all the flavors and cuts through the richness. Sea salt flakes sprinkled on top after baking give a nice crunch and burst of saltiness.
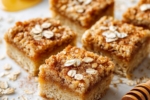
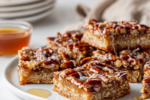
- Optional add-ins (nuts, dried fruit): I like a handful of toasted walnuts for crunch, but roasted, chopped hazelnuts or even a few dried cranberries work well. Keep it personal, keep it fun.
Spotlight on key ingredients
Dark chocolate:
- I love its melt-in-your-mouth richness, especially when it’s velvety and slightly bitter. Aim for a high-quality bar, as it makes all the difference in flavor and texture.
- Sweetened condensed milk: It’s the sticky glue that keeps everything together. Its rich, milky sweetness is essential—skip it, and the fudge loses its lusciousness.
Sweetened condensed milk:
- Butter: Creates that smooth, velvety mouthfeel and helps the fudge set perfectly. Salted butter adds a subtle contrast—unsalted works if you prefer control over salt levels.
- Cocoa powder: Adds depth and a deep chocolate aroma, especially if you use Dutch-processed for a smoother, less tangy result.
Notes for ingredient swaps
- Dairy-Free: Swap butter with coconut oil or a nut-based butter. Keeps it rich but adds a subtle coconut or nutty note.
- Vegan Chocolate: Use plant-based dark chocolate and coconut condensed milk. Expect a slightly different, more tropical flavor.
- Sweetener: Substitute honey or maple syrup for condensed milk, but reduce other sugars to maintain sweetness and avoid thinning.
- Nuts & Add-ins: Use toasted pumpkin seeds or dried cherries instead of traditional nuts for a different crunch and burst of flavor.
- Cocoa Powder: Dutch-processed cocoa gives a smoother, less acidic taste. Natural cocoa powder amps up the bright, tangy chocolate notes.
- Salt: Flaked sea salt on top enhances sweetness and adds a pleasing crunch, but regular table salt works fine if you prefer subtlety.
- Chocolate Type: Mix dark and milk chocolates for a mellower, creamier fudge. White chocolate can also be used for a sweeter, different look.
Equipment & Tools
- Baking pan: Holds the fudge during baking and cooling.
- Parchment paper: Prevents sticking and facilitates easy removal.
- Saucepan: Melts the chocolate and butter gently.
- Mixing bowls: Combine ingredients thoroughly.
- Rubber spatula: Scrapes the bowl and spreads the mixture evenly.
- Knife: Cuts the cooled fudge into squares.
Step-by-step guide to fudge bars
- Gather all equipment: 20 cm (8 inch) square baking pan, heatproof spatula, parchment paper, saucepan, mixing bowls, and a rubber spatula. Prepping everything ensures a smooth process.
- Line the pan with parchment, leaving overhang for easy removal. This keeps the fudge from sticking and makes slicing simpler.
- In a saucepan over very low heat (about 50°C/122°F), melt 100g (7 tablespoons) butter and 200g (1 cup) dark chocolate, stirring constantly. Watch for a glossy, smooth mixture—about 5 minutes.
- Once melted, remove from heat. Stir in 1 can (397g) sweetened condensed milk, 1 teaspoon vanilla extract, and 25g (3 tablespoons) unsweetened cocoa powder until fully combined. It should smell rich and chocolatey.
- Pour the mixture into the prepared pan. Use a spatula to spread evenly, smoothing the top. Tap the pan gently on the counter to settle the mixture and remove air bubbles.
- Bake at 180°C (350°F) for 15 minutes. The edges should look set but still slightly soft in the center. This prevents overbaking and keeps the fudge fudgy.
- Remove from oven. Let cool in the pan for 20 minutes. Then, transfer to a wire rack and cool completely at room temperature, about 1 hour. For best results, refrigerate for at least 2 hours or overnight.
- Once cooled, lift the fudge out using the parchment overhang. Cut into squares with a sharp knife, wiping the blade clean between cuts for neat edges.
- Finish by sprinkling flaky sea salt or chopped nuts on top if desired. Serve at room temperature for the best texture and flavor.
Cool the fudge completely in the pan, then chill in the fridge for at least 2 hours before slicing. Serve at room temperature for rich, gooey bites or chilled for a firmer texture.
How to Know It’s Done
- Chocolate mixture is glossy and smooth before pouring.
- Edges are slightly firm but center remains soft after baking.
- Fudge feels firm but yields slightly when pressed, indicating proper set.

Chocolate Fudge Bars
Ingredients
Equipment
Method
- Line your baking pan with parchment paper, leaving overhang for easy removal. This keeps the fudge from sticking and makes slicing a breeze.
- In a saucepan over very low heat, melt the butter and dark chocolate together, stirring gently. Keep the heat low to prevent seizing; you’ll see a glossy, smooth mixture develop after about 5 minutes.
- Once melted, remove the saucepan from the heat. Stir in the sweetened condensed milk, vanilla extract, and cocoa powder until everything is fully combined and the mixture is velvety and fragrant.
- Pour the chocolate mixture into the prepared pan. Use a spatula to spread it evenly across the surface, smoothing out the top and tapping the pan gently on the counter to settle the mixture and eliminate air bubbles.
- Bake the fudge in a preheated oven at 180°C (350°F) for about 15 minutes. The edges should look set but the center remains slightly soft, ensuring a fudgy texture.
- Remove the pan from the oven and let it cool in the pan for 20 minutes. Then, transfer it to a wire rack and allow it to cool completely at room temperature for about an hour. For even better results, chill in the fridge for at least 2 hours or overnight.
- Once cooled and set, lift the fudge out of the pan using the parchment overhang. Use a sharp knife to cut into squares, wiping the blade clean between cuts for neat edges.
- If desired, sprinkle flaky sea salt or chopped nuts on top of the fudge squares while they’re still slightly warm or right after removing from the fridge to add a burst of flavor and texture.
- Serve the fudge at room temperature for a rich, gooey experience, or keep it chilled for a firmer bite. Enjoy these nostalgic, homemade chocolate treats!
Pro tips for perfect fudge bars
- Bolded tip: Use high-quality chocolate for a rich, melt-in-your-mouth texture that truly shines.
- Bolded tip: Melt chocolate and butter slowly over low heat to prevent seizing and ensure a glossy finish.
- Bolded tip: Tap the pan on the counter after pouring to settle the mixture and eliminate air bubbles.
- Bolded tip: Chill the fudge thoroughly—at least 2 hours—so it slices cleanly without crumbling.
- Bolded tip: Wipe your knife clean between cuts for sharp, neat edges that look as good as they taste.
- Bolded tip: Sprinkle flaky sea salt or chopped nuts on top immediately after removing from the fridge to enhance flavor and texture.
- Bolded tip: For an extra fudgy texture, don’t overbake—edges should be just set, center still slightly soft.
Common mistakes and how to fix them
- FORGOT to preheat the oven → Always preheat to ensure even baking.
- DUMPED ingredients all at once → Mix gradually for a smooth, glossy fudge texture.
- OVER-TORCHED the chocolate → Melt on low heat, stir constantly, remove before it seizes.
- FAILED to cool fully in fridge → Chill at least 2 hours for clean slicing and firm texture.
Quick fixes and pantry swaps
- If mixture seizes, splash in a tiny bit of hot water to loosen it.
- When bars crack while cutting, chill longer for cleaner slices.
- Splash a bit of warm milk if fudge is too thick to spread.
- Patch burnt chocolate by removing the pan from heat immediately.
- Shield fudge with foil if edges brown too quickly during baking.
Prep, store, and reheat tips
- Prepare the fudge mixture and pour into the pan up to 24 hours in advance; keep covered in the fridge to maintain freshness and prevent drying out.
- Store the fully cooled bars in an airtight container at room temperature for up to 3 days; the chocolate will develop a richer, more intense aroma.
- For longer storage, wrap the bars tightly in plastic wrap and freeze for up to 1 month; they may develop a slight icy texture upon thawing.
- Reheat slices gently in the microwave at 20-second intervals until just warm and gooey, with a glossy sheen returning to the chocolate surface.
Top questions about fudge bars
1. Can I use chocolate chips instead of bars?
Use high-quality dark chocolate for the best melt and flavor. Cheaper chocolates can seize or become grainy.
2. Are chocolate chips okay for melting?
Yes, but chips may contain stabilizers that affect melting. Look for good-quality semi-sweet chips for smoother results.
3. How long should I chill the fudge?
Refrigerate the bars for at least 2 hours, or overnight, for firm slices. Longer chilling makes them easier to cut cleanly.
4. Can I make these dairy-free?
Yes, you can swap coconut milk for condensed milk for a dairy-free version, but the texture and sweetness will differ.
5. How do I get clean cuts?
Use a sharp knife wiped clean between cuts for neat squares. Slightly warming the blade helps slices separate easily.
6. What if my chocolate seizes?
If the mixture looks grainy or seizes, remove from heat immediately and add a splash of hot water or milk to loosen.
7. Can I add toppings?
For extra flavor, sprinkle flaky sea salt or chopped nuts on top while the fudge is still warm or just out of the fridge.
8. How should I store fudge bars?
Store leftovers in an airtight container at room temperature for up to 3 days, or freeze for longer storage.
9. How do I adjust the texture?
For a softer, creamier fudge, slightly underbake. For a firmer texture, bake a bit longer but watch carefully.
10. Why does my fudge crack when cutting?
If the fudge cracks when cutting, chill it longer. If it’s too soft, give it extra time in the fridge.
These fudge bars carry a nostalgic weight, reminding me of lazy weekends and simple joys. Baking them feels like pressing pause and reconnecting with those unpolished, heartfelt moments from childhood.
Sharing a slice now, I see the same familiar smile—messy edges, gooey center—and realize that sometimes, imperfection is what makes something truly memorable. No matter how many times I make them, they still taste like a little piece of home.

Hi, I’m Charlotte Hayes, the creator and storyteller behind Lost in the Aroma. If you’ve ever closed your eyes while something simmered on the stove just to take in the scent, then you already understand what this space is about. For me, aroma is memory. It is emotion. It is the first sign that something beautiful is about to be shared. Lost in the Aroma is where I bring together recipes, sensory storytelling, and my lifelong love for food. I am so glad you’re here.


Leave a Reply