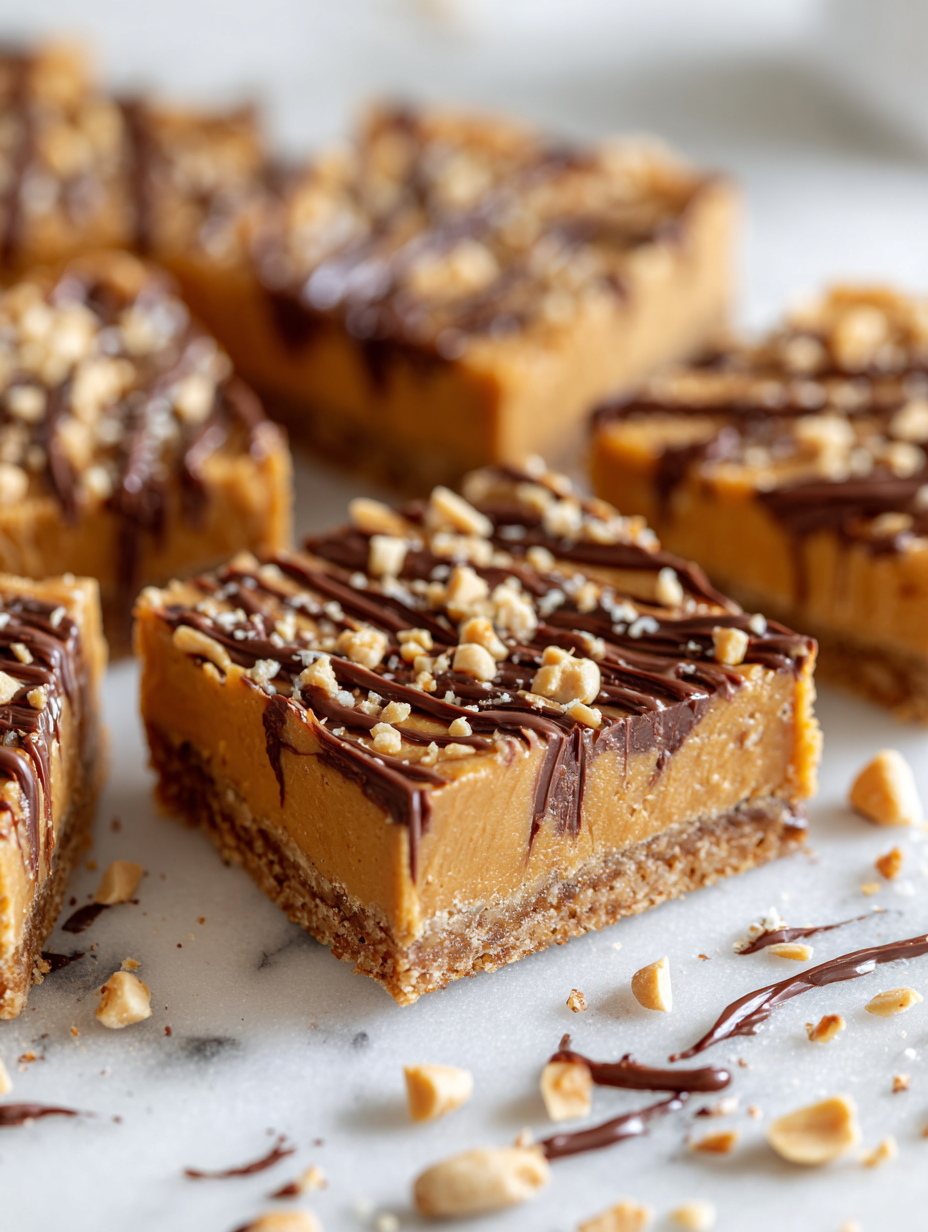
Peanut butter bars hold a nostalgic place in my kitchen. It’s that perfect blend of salty, sweet, and chewy that instantly transports me back to childhood afternoons. But over the years, I’ve realized these bars are more than just a quick treat—they’re surprisingly adaptable, a blank canvas for adding unexpected flavors or textures that fit any mood or occasion.
What I love most is how forgiving this recipe can be. Whether I toss in a handful of chopped nuts, sprinkle a little sea salt on top, or swirl in dark chocolate, each variation feels like a personal touch. These bars aren’t just comfort food; they’re a little DIY project that always turns out satisfying, no matter the day’s chaos.
Focusing on the nostalgic comfort of childhood, this recipe explores how simple peanut butter bars can be a surprisingly versatile treat, perfect for customizing with unexpected ingredients like sea salt, dark chocolate, or even a splash of bourbon, making it a playful, adult twist on a classic.
The story behind this recipe
- Making these peanut butter bars always takes me back to my grandmother’s kitchen. She had a way of mixing simple ingredients into something that felt like a warm hug. I remember sneaking a taste of the peanut butter filling while she wasn’t looking, the salty-sweet smell filling the air and making me forget about everything else.
- This recipe is a patchwork of those childhood memories, but I’ve tweaked it over the years to keep it flexible. Sometimes I add a sprinkle of flaky sea salt on top or swirl in dark chocolate for a richer bite. It’s a recipe that invites improvisation, a little chaos, and a lot of comfort.
- heading: ‘The story behind this recipe’
Ingredient breakdown: key components
- Creamy peanut butter: I prefer the natural, unsweetened kind; it gives a richer, more authentic peanut flavor that really stands out in the bars. If you want a sweeter touch, add a teaspoon of honey or maple syrup.
- Unsalted butter: I always melt it gently until it’s just shimmering; it helps the mixture come together smoothly. For a dairy-free version, coconut oil adds a subtle tropical aroma and keeps things moist.
- Powdered sugar: I sift it well to avoid lumps; it provides sweetness without making the bars overly sticky. For a less sweet version, reduce the sugar slightly or try coconut sugar for a caramel note.
- Graham cracker crumbs: I crush them finely for a smooth texture that binds everything together. If you don’t have graham crackers, digestive biscuits work well, just crush them into a fine powder.
- Chocolate chips: I use semi-sweet for balance, but dark chocolate chips add a deep, smoky flavor that contrasts beautifully with the peanut butter. For an extra crunch, sprinkle some chopped nuts on top before chilling.
- Sea salt: I sprinkle just a pinch on the top before chilling; it elevates the overall flavor and balances the sweetness. For a caramelized twist, try flaky sea salt or smoked salt.
- Optional mix-ins: Chopped nuts, dried fruit, or even a drizzle of caramel can turn these simple bars into a more complex treat. Just fold them in with the peanut butter mixture or sprinkle on top before setting.
Spotlight on key ingredients
Peanut Butter:
- Creamy peanut butter: I prefer the natural, unsweetened kind; it gives a richer, more authentic peanut flavor that really stands out in the bars. If you want a sweeter touch, add a teaspoon of honey or maple syrup.
- Unsalted butter: I always melt it gently until it’s just shimmering; it helps the mixture come together smoothly. For a dairy-free version, coconut oil adds a subtle tropical aroma and keeps things moist.
- Chocolate chips: I use semi-sweet for balance, but dark chocolate chips add a deep, smoky flavor that contrasts beautifully with the peanut butter. For an extra crunch, sprinkle some chopped nuts on top before chilling.
Sweet and salty components:
- Graham cracker crumbs: I crush them finely for a smooth texture that binds everything together. If you don’t have graham crackers, digestive biscuits work well, just crush them into a fine powder.
- Powdered sugar: I sift it well to avoid lumps; it provides sweetness without making the bars overly sticky. For a less sweet version, reduce the sugar slightly or try coconut sugar for a caramel note.
- Sea salt: I sprinkle just a pinch on the top before chilling; it elevates the overall flavor and balances the sweetness. For a caramelized twist, try flaky sea salt or smoked salt.
Notes for ingredient swaps
- Dairy-Free: Swap butter for coconut oil or vegan margarine. Expect a slightly different richness and a subtle tropical aroma.
- Sweetener Options: Use honey, maple syrup, or agave instead of powdered sugar. These will add moisture and a different depth of sweetness.
- Peanut Butter Type: Natural, unsweetened peanut butter gives a richer, earthier flavor. Creamy or chunky works, but chunky adds texture.
- Chocolate: Dark chocolate chips bring a smoky, intense cocoa flavor. Milk chocolate is milder and sweeter, while white chocolate adds creaminess.
- Cracker Base: Digestive biscuits can replace graham crackers for a slightly different crumb texture—just crush finely for best results.
- Salt: Flaky sea salt or smoked salt can elevate the flavor profile, adding complexity and a hint of smokiness or crunch.
- Add-ins: Chopped nuts, dried fruits, or crispy rice can be mixed in or sprinkled on top. Adjust quantities based on your preferred crunch or sweetness.
Equipment & Tools
- 9×9 inch (23×23 cm) pan: To hold and shape the bars during chilling and setting.
- Parchment paper: For easy removal and clean edges.
- Microwave-safe bowl: To melt butter and chocolate evenly.
- Spatula: To spread and smooth layers for an even finish.
- Measuring cups and spoons: To ensure accurate ingredient portions.
- Sharp knife: To cut into neat squares or rectangles.
Step-by-step guide to peanut butter bars
- Gather all your ingredients and equipment. Line a 9×9 inch (23×23 cm) pan with parchment paper—this makes lifting the bars out easier later.
- In a microwave-safe bowl, melt 1/2 cup (115 g) unsalted butter on low power, about 30 seconds, until just shimmering. Let it cool slightly.
- In a large mixing bowl, combine 1 cup (250 g) creamy peanut butter and the melted butter. Stir until smooth and glossy—smells nutty and inviting.
- Gradually sift in 1 1/2 cups (180 g) powdered sugar, mixing well after each addition. The mixture should become thick but still pliable.
- Add 1 1/2 cups (150 g) graham cracker crumbs to the peanut butter mixture. Fold in gently until evenly combined. It should hold together when pressed; if too crumbly, stir in a teaspoon of milk or cream.
- Press the mixture firmly into your prepared pan. Use the back of a spatula or your fingers to create an even, compact layer. Chill for 20-30 minutes until set but still pliable.
- Meanwhile, melt 1/2 cup (90 g) semi-sweet chocolate chips in a small bowl in 20-second bursts, stirring between, until smooth and shiny. Be careful not to overheat—smells rich and melts smoothly.
- Spread the melted chocolate evenly over the chilled peanut butter layer. Use a spatula to smooth the top. For a prettier finish, sprinkle a pinch of sea salt or chopped nuts now.
- Return the pan to the fridge and chill for another 30-45 minutes until the chocolate is firm and the bars are set. They should feel firm but not brittle when gently pressed.
- Lift the entire slab out of the pan using the edges of the parchment paper. Place on a cutting board and cut into squares or rectangles—about 12 to 16 pieces, depending on size.
Let the bars rest in the fridge for at least 30 minutes before cutting. Use a sharp knife, warming it slightly if needed, for clean slices. Serve directly from the fridge for the best chewiness and flavor contrast.
How to Know It’s Done
- Chocolate layer is shiny and firm, not sticky or dull.
- Bars hold their shape when cut, not crumbly or breaking apart.
- Peanut butter layer is evenly pressed and slightly tacky but not greasy.
Classic Peanut Butter Bars
Ingredients
Equipment
Method
- Line your 9×9 inch pan with parchment paper, leaving some overhang for easy removal.
- In a microwave-safe bowl, melt the butter in short bursts, about 30 seconds each, stirring until smooth and just shimmering.
- In a large mixing bowl, combine the peanut butter with the melted butter and stir until silky and fragrant.
- Sift the powdered sugar to avoid lumps, then gradually add it to the peanut butter mixture, stirring well after each addition until smooth and thick.
- Fold in the finely crushed graham cracker crumbs until the mixture is cohesive and easy to press—if it feels crumbly, stir in a teaspoon of milk or cream.
- Press the peanut butter mixture firmly into the prepared pan, spreading evenly with the back of a spatula to create a smooth, compact layer.
- Place the pan in the fridge and chill for about 20-30 minutes until the layer is firm but still pliable.
- Meanwhile, melt the chocolate chips in a microwave-safe bowl with short bursts, stirring until shiny and smooth.
- Spread the melted chocolate evenly over the chilled peanut butter layer, smoothing the top with a spatula.
- Sprinkle a tiny pinch of sea salt on top, if desired, then return the pan to the fridge and chill for another 30-45 minutes until the chocolate is set and the bars are firm.
- Once set, lift the entire slab out of the pan using the parchment overhang, place on a cutting board, and cut into 16 squares with a sharp, warmed knife for clean edges.
- Serve the bars chilled for the best chewy, chocolatey experience. Enjoy these nostalgic, customizable treats!
Notes
Pro tips for perfect peanut butter bars
- Use room temperature ingredients to ensure smooth, even mixing and prevent clumping.
- Chill the peanut butter mixture slightly before pressing to avoid sticking and make handling easier.
- Melt chocolate in short bursts and stir frequently; it prevents scorching and keeps the shiny finish.
- Press the mixture firmly into the pan to eliminate air pockets and ensure even setting.
- Slightly warm your knife before cutting for clean, precise edges without crumbling.
- Add a pinch of sea salt on top before chilling—balances sweetness and enhances flavor complexity.
Common mistakes and how to fix them
- FORGOT to evenly distribute chocolate → gently tap pan for smooth topping.
- DUMPED in too much salt → use a pinch for balanced flavor.
- OVER-TORCHED chocolate → melt in short bursts, stir often, and remove early.
- MISSED chilling time → ensure bars are fully set for clean cuts.
Quick fixes and pantry swaps
- When chocolate shimmers but won’t melt → splash a tiny bit of cream for smoother melting.
- If the peanut butter mixture is crumbly → gently warm it to loosen before pressing.
- DUMPED in too much salt → rinse with water and start fresh if overly salty.
- Over-torched chocolate → immediately stir in a teaspoon of vegetable oil to restore shine.
- When bars crack excessively → slightly warm your knife for cleaner cuts and smoother edges.
Prep, store, and reheat tips
- Prep the base mixture ahead: press into the pan and refrigerate for up to 24 hours. The flavors meld, and it firms up, making assembly easier.
- Store the assembled bars in an airtight container in the fridge for up to 5 days. The chocolate may develop a slight bloom, but flavor stays rich.
- Freeze the bars for up to 1 month, wrapped tightly in plastic wrap and then foil. Thaw in the fridge for a few hours before serving.
- Reheat leftovers briefly in the microwave (10-15 seconds) to soften the chocolate and peanut butter, releasing a warm, nutty aroma. Watch for melting or burning.
Top questions about peanut butter bars
1. How do I know when the bars are set?
Look for a firm but slightly pliable texture; it should hold together when pressed without crumbling. A gentle jiggle indicates it’s ready to cut.
2. Can I use different peanut butter?
Use natural, unsweetened peanut butter for a richer, more authentic flavor. If you prefer sweeter, go for peanut butter with added sugar.
3. Should I refrigerate the bars after making?
Chill the bars in the fridge for at least 30 minutes after topping with chocolate. This helps the chocolate set smoothly and prevents melting when serving.
4. Can I freeze peanut butter bars?
Yes, you can freeze these bars. Wrap them tightly in plastic wrap and store for up to a month. Thaw in the fridge before slicing.
5. How much salt should I add?
Adjust the amount of sea salt sprinkled on top according to your taste. A pinch enhances flavor without overpowering the peanut butter.
6. How do I melt chocolate properly?
Melt chocolate in short bursts in the microwave, stirring often. This prevents scorching and keeps it shiny and smooth.
7. How do I get a smooth, even layer?
Press the mixture firmly into the pan to avoid air pockets. Use the back of a spatula or your fingers for a compact, even layer.
8. How do I cut the bars neatly?
Use a sharp knife warmed slightly with hot water for clean cuts. Wipe the blade dry before slicing to avoid sticking.
9. Can I substitute graham crackers?
You can swap graham cracker crumbs for digestive biscuits. Crush them finely for a similar crumb texture that binds well.
10. Can I make these dairy-free?
For a dairy-free version, replace butter with coconut oil or vegan margarine. Expect a slightly different aroma and texture, but still delicious.
These peanut butter bars are more than just a sweet snack; they’re a snapshot of childhood comfort, with a bit of grown-up depth thanks to the chocolate and sea salt. Whenever I make them, the aroma of warm peanut butter and melting chocolate fills the kitchen, pulling me into a moment of simple joy.
They’re perfect for when I need a quick treat or want to impress without fuss. Plus, the flexibility of add-ins and toppings means I can customize them to match whatever mood or season I’m in, making each batch feel uniquely mine.

Hi, I’m Charlotte Hayes, the creator and storyteller behind Lost in the Aroma. If you’ve ever closed your eyes while something simmered on the stove just to take in the scent, then you already understand what this space is about. For me, aroma is memory. It is emotion. It is the first sign that something beautiful is about to be shared. Lost in the Aroma is where I bring together recipes, sensory storytelling, and my lifelong love for food. I am so glad you’re here.


Leave a Reply