Peanut butter cookies are a staple in my kitchen, but I’ve always been obsessed with how the pinch of salt makes them come alive. It’s that tiny contrast—sweet, salty, creamy—that turns a simple cookie into something memorable. I’m not talking about sugary overload, but just enough to make each bite feel balanced and complex.
Over the years, I’ve tinkered with different peanut butters and sugar ratios, but what truly elevates these cookies is knowing when to pull them from the oven. That moment when they’re just set but still soft in the middle—it’s like a little victory every time. This recipe is my honest attempt to capture that magic, with a focus on the overlooked art of balancing sweetness and salt.
Focusing on the overlooked art of balancing sweetness and salt in peanut butter cookies to elevate their nostalgic charm.
The story behind this recipe
- Growing up, my grandma’s peanut butter cookies were the smell of Sunday afternoons—warm, slightly salty, with that unmistakable peanut aroma filling the kitchen. She never used fancy ingredients, just good peanut butter and a pinch of salt, but somehow, they felt like a secret recipe for happiness. I’ve always loved how simple ingredients can create something so comforting, so familiar.
- Over the years, I’ve played around with different peanut butters—chunky, smooth, honey-roasted—and each time I learned a little more about balancing their oils and flavors. What really makes these cookies special isn’t just the peanut butter, but how a tiny sprinkle of sea salt can transform the whole batch from sweet to nuanced. These cookies remind me that sometimes, the simplest things hold the most depth.
- heading: The story behind this recipe
Ingredient breakdown
- Creamy peanut butter: I prefer a smooth variety with a little oil; it gives the cookies a rich, melt-in-your-mouth texture. Skip natural peanut butters that separate, or stir them well first.
- Granulated sugar: I like a mix of white and brown sugar for depth—brown adds a hint of caramel that makes each bite more interesting. Adjust sweetness based on your taste.
- Eggs: They bind everything together, but if you’re out, a flaxseed egg works—just expect a slightly denser cookie with a nutty undertone.
- Flour: I use all-purpose, but you can swap half for whole wheat for a nuttier flavor and more texture. Don’t overmix; just until combined to keep the cookies tender.
- Salt: A pinch of flaky sea salt on top before baking makes a world of difference—brings out the peanut flavor and balances sweetness. Don’t skip this.
- Baking soda: It helps with rise and a bit of chewiness. If you forget it, the cookies might be flatter and more brittle, so add a tiny pinch if needed.
- Optional add-ins: Chopped peanuts or chocolate chips—use sparingly. They add texture and surprise bursts of flavor, but keep the dough balanced so the peanut butter shines.
Spotlight on key ingredients
Peanut Butter:
- Creamy peanut butter: I prefer a smooth variety with a little oil; it gives the cookies a rich, melt-in-your-mouth texture. Skip natural peanut butters that separate, or stir them well first.
- Granulated sugar: I like a mix of white and brown sugar for depth—brown adds a hint of caramel that makes each bite more interesting. Adjust sweetness based on your taste.
- Salt: A pinch of flaky sea salt on top before baking makes a world of difference—brings out the peanut flavor and balances sweetness. Don’t skip this.
Flour & Eggs:
- Baking soda: It helps with rise and a bit of chewiness. If you forget it, the cookies might be flatter and more brittle, so add a tiny pinch if needed.
- Flour: I use all-purpose, but you can swap half for whole wheat for a nuttier flavor and more texture. Don’t overmix; just until combined to keep the cookies tender.
- Eggs: They bind everything together, but if you’re out, a flaxseed egg works—just expect a slightly denser cookie with a nutty undertone.
Notes for ingredient swaps
- NUT FREE: Use sunflower seed butter instead of peanut butter. It adds a nutty flavor without the nuts.
- SUGAR: Swap white sugar for coconut sugar for a caramel note, but expect a darker cookie and slightly denser texture.
- EGG FREE: Replace with a flaxseed egg (1 tablespoon flaxseed meal + 3 tablespoons water) for a plant-based version, slightly denser.
- FLOUR: Use almond flour for a gluten-free, nuttier cookie. It makes the texture more tender and moist.
- OIL: Substitute a small amount of coconut oil for peanut butter for a different richness and aroma. Keeps them moist.
- SALT: Use kosher or sea salt flakes for a more pronounced salty crunch that enhances the peanut flavor.
- ADDITIONS: Mix in chocolate chips, chopped peanuts, or oats for texture. Keep proportions balanced to avoid sogginess.
Equipment & Tools
- Mixing bowls: Combine ingredients smoothly and efficiently.
- Spatula: Fold dry ingredients into wet without overmixing.
- Baking sheet: Provide a flat surface for baking cookies evenly.
- Parchment paper: Prevent sticking and easy cleanup.
- Measuring spoons and cups: Accurately portion ingredients for consistent results.
- Wire cooling rack: Cool cookies evenly and prevent sogginess.
Step-by-step guide to peanut butter cookies
- Equip your mixing bowls, spatula, baking sheet, and parchment paper. Preheat oven to 180°C (350°F).
- In a large bowl, combine 1 cup creamy peanut butter and 1 cup sugar. Mix until smooth and slightly fluffy, about 2 minutes.
- Add 1 large egg and 1 teaspoon vanilla extract. Stir until fully incorporated. The mixture should be glossy and cohesive.
- In a separate bowl, whisk together 1 1/4 cups all-purpose flour, 1/2 teaspoon baking soda, and a pinch of salt. Whisk well.
- Gradually add the dry ingredients to the wet, folding gently until just combined. Don’t overmix; stop when the flour disappears.
- Scoop dough with a tablespoon or small ice cream scoop. Roll into balls about 1.5 inches diameter. Place on parchment-lined baking sheet, spacing 2 inches apart.
- Flatten each ball slightly with a fork, creating a crisscross pattern. Sprinkle a tiny pinch of flaky sea salt on top of each cookie.
- Bake in the preheated oven for 10-12 minutes. The edges should be golden, and the centers still soft but set.
- Check for doneness by gently jiggling a cookie—if it jiggles slightly but holds shape, it’s ready. The edges should be crisp.
- Remove from oven and let cookies rest on the baking sheet for 5 minutes. They will firm up as they cool. Use a spatula to transfer to a wire rack.
- Allow cookies to cool completely, about 15 minutes, before serving. They should be chewy in the center with a slight crunch on the edges.
Let cookies cool on the rack for 15 minutes. Serve once they reach room temperature, their flavor deepens, and texture firms up for perfect biting.
How to Know It’s Done
- Edges are golden and firm when baked.
- Cookie centers are soft but hold shape after resting.
- A gentle jiggle tests for perfect doneness—just a slight wiggle.
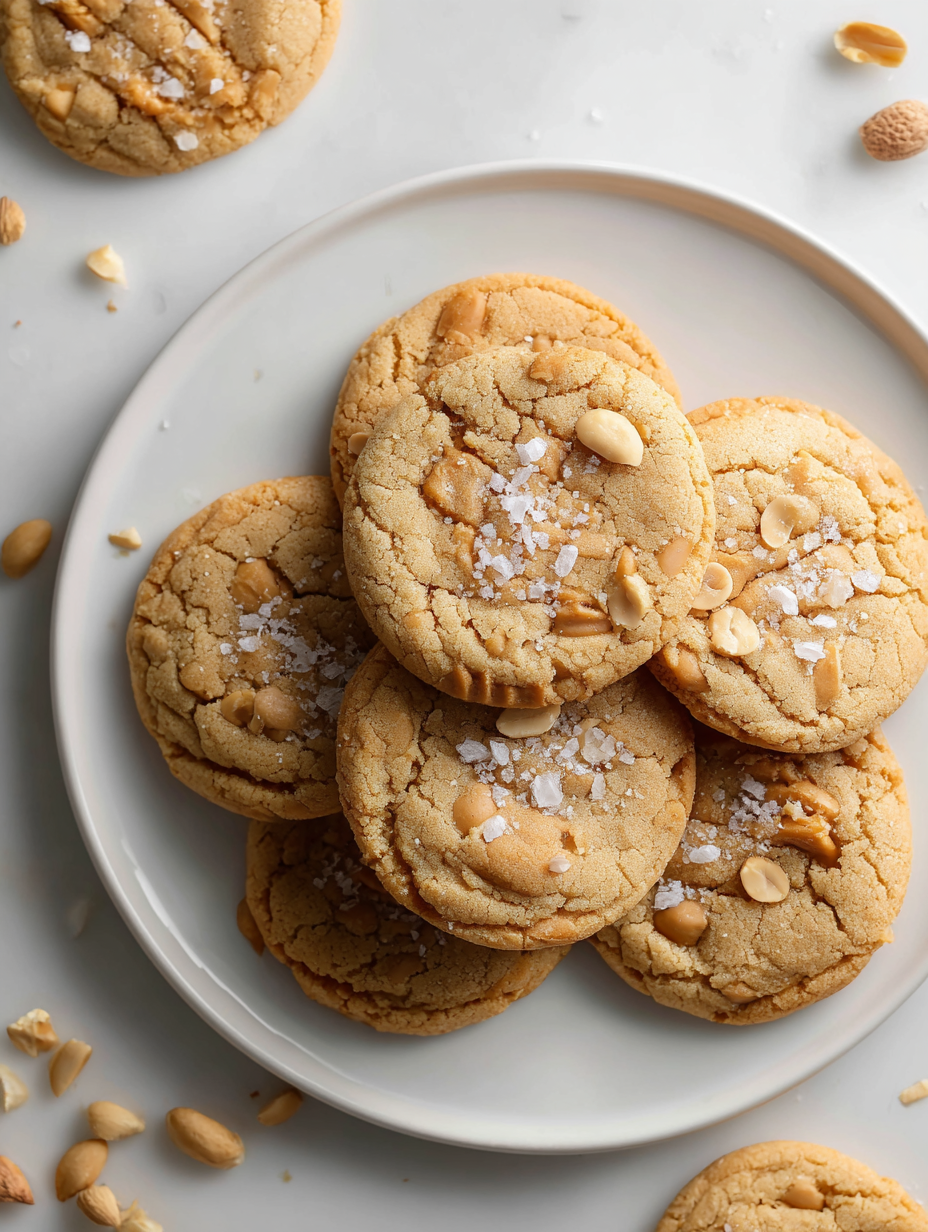
Perfect Salted Peanut Butter Cookies
Ingredients
Equipment
Method
- Preheat your oven to 180°C (350°F) and line a baking sheet with parchment paper. Gather your mixing bowls and spatula—you’ll need them soon.
- In a large bowl, combine the creamy peanut butter and granulated sugar. Mix with a spatula until the mixture is smooth, slightly fluffy, and fragrant—about 2 minutes. You should see it turn a light, creamy color and smell warm and nutty.
- Add the large egg to the bowl and stir until fully incorporated. The mixture will become glossy and cohesive, with a rich aroma filling the air.
- In a separate bowl, whisk together the all-purpose flour, baking soda, and a pinch of flaky sea salt. Whisk until evenly combined and the dry ingredients look uniform.
- Gradually add the dry mixture to the wet ingredients, folding gently with your spatula. Mix just until the flour disappears, being careful not to overmix—this keeps the cookies tender and chewy.
- Using a tablespoon or small ice cream scoop, portion out the dough and roll into balls about 1.5 inches in diameter. Place them on the prepared baking sheet, spacing each about 2 inches apart to allow for spreading.
- Gently flatten each dough ball with a fork, pressing down to create a classic crisscross pattern. Sprinkle a tiny pinch of flaky sea salt on top of each cookie to enhance the peanut flavor and add a pleasant crunch.
- Bake in the preheated oven for 10-12 minutes, until the edges turn golden brown, and the centers are just set but still soft. The smell of warm peanut and salt will fill your kitchen.
- Once baked, remove the cookies from the oven and let them rest on the baking sheet for about 5 minutes. They will firm up slightly as they cool, making them easier to transfer.
- Use a spatula to transfer the cookies to a wire cooling rack. Allow them to cool completely for about 15 minutes; this helps the texture set and enhances flavor.
- Enjoy these delightful cookies once they’re at room temperature—chewy in the center with a crisp, salted edge, perfect for sharing or savoring all on your own!
Notes
Pro tips for perfect cookies
- Bolded tip: Chill the dough for 30 minutes before baking. This helps prevent spreading and enhances flavor.
- Bolded tip: Use a fork to flatten cookies; the classic crisscross creates even baking and texture.
- Bolded tip: Slightly underbake—edges should be golden and centers soft; they firm up as they cool.
- Bolded tip: For extra chewiness, add a splash of milk to the dough if it feels too stiff.
- Bolded tip: Sprinkle flaky sea salt immediately before baking to amplify peanut flavor contrast.
- Bolded tip: Rotate baking sheet halfway through baking for even color and texture.
- Bolded tip: Store cookies in an airtight container at room temp for up to 3 days for best chewiness.
Common mistakes and how to fix them
- FORGOT to measure ingredients precisely? Use a scale for accuracy, especially with peanut butter.
- DUMPED excess flour? Lighten the dough with a splash of milk or water to prevent dryness.
- OVER-TORCHED cookies? Reduce baking time or oven temperature slightly, watch for golden edges.
- MISSED the salt sprinkle? Add flaky sea salt on top before baking for flavor contrast.
Quick fixes and pantry swaps
- When cookies spread too much, chill dough for 20 minutes before baking.
- If cookies are too soft, increase baking time by 2 minutes for firmness.
- Splash a few drops of milk if dough feels crumbly and won’t hold together.
- Patch over cracks with a tiny ball of dough to keep cookies uniform.
- Shield burning edges by rotating sheet halfway through baking to shimmer evenly.
Prep, store, and reheat tips
- Dough can be prepared up to 24 hours in advance; just cover tightly and refrigerate, the flavors deepen overnight.
- Cookies keep well in an airtight container at room temperature for up to 3 days, maintaining chewy centers and crisp edges.
- Store baked cookies in the fridge for longer shelf life—up to a week—but bring them to room temp for best texture and aroma.
- Reheat cookies briefly in a 150°C (300°F) oven for 5 minutes to revive their softness and enhance the peanut aroma. Watch for slight shimmer and smell of warm nuts.
- For freezing, layer cookies between parchment sheets in an airtight container for up to 3 months. Thaw at room temp for a fresh, fragrant snack.
Top questions about peanut butter cookies
1. Can I use natural peanut butter?
Look for a peanut butter that is smooth and slightly oily; natural varieties that separate can be tricky. Stir well before measuring for consistency.
2. What if I only have chunky peanut butter?
Yes, but stir it thoroughly until smooth and consider adding a little extra sugar or oil to compensate for the separation.
3. Can I add chocolate chips or nuts?
Creamy peanut butter gives a melt-in-your-mouth texture, but chunky adds crunch. Both work, just adjust mix-ins accordingly.
4. How many chocolate chips should I add?
Yes, fold them into the dough gently—too many will make cookies dense or cause spreading. Keep additions small for balance.
5. How do I know when the cookies are done?
Bake until edges are golden and centers are just set but still soft. They’ll firm up as they cool, giving that perfect chew.
6. My cookies spread too much—what now?
If cookies spread too much, chill the dough for 30 minutes. For a thicker cookie, add a little extra flour in the dry mix.
7. How should I store leftover cookies?
Store cookies in an airtight container at room temperature for up to 3 days. For longer, freeze them wrapped tightly in plastic.
8. Can I reheat these cookies?
Reheat in a 150°C (300°F) oven for 5 minutes to bring back softness and aroma. They’ll smell warm and inviting.
9. Should I add salt?
Use flaky sea salt on top before baking for a burst of salty contrast that enhances the peanut flavor.
10. Is chilling the dough necessary?
Chill the dough for at least 30 minutes before baking to prevent spreading and intensify flavor.
Making these peanut butter cookies isn’t just about satisfying a craving; it’s about capturing a moment of simplicity and balance in the kitchen. The aroma of roasted peanuts and a hint of sea salt reminds me why I fell for baking in the first place.
In the end, it’s these little details—a pinch of salt, a gentle press—that turn a humble cookie into something worth sharing. Every batch is a small reminder that good things are often rooted in honest, straightforward ingredients.

Hi, I’m Charlotte Hayes, the creator and storyteller behind Lost in the Aroma. If you’ve ever closed your eyes while something simmered on the stove just to take in the scent, then you already understand what this space is about. For me, aroma is memory. It is emotion. It is the first sign that something beautiful is about to be shared. Lost in the Aroma is where I bring together recipes, sensory storytelling, and my lifelong love for food. I am so glad you’re here.


Leave a Reply