These peanut butter muffins are a little piece of childhood comfort, wrapped up in a warm, nutty bite. I love how the smell of melting butter and roasted peanuts fills the kitchen, instantly bringing back lazy weekend mornings. It’s funny how a simple swap—like replacing sugar with honey or using chunky peanut butter—can turn a basic muffin into a nostalgic treat that feels both familiar and fresh.
What makes this recipe special to me is how forgiving it is. It’s not about perfection but about capturing that cozy, slightly chaotic feeling of mornings when everyone’s rushing but still craving something good. The muffins come together quickly, and the aroma alone makes the whole house smell like a Sunday morning—rich, warm, and just a little bit messy, in the best way.
Focusing on the nostalgic comfort of childhood mornings, this recipe transforms simple peanut butter into muffins that evoke memories of Saturday breakfasts and lazy weekends, making a familiar flavor feel new and comforting.
Nostalgic mornings in every bite
- Baking these muffins always takes me back to slow Saturday mornings with my family, the smell of peanut butter filling the house.
- I love how this recipe turned out to be a perfect chaos of textures—crisp edges with a gooey center—that somehow feels just right.
- Sharing these muffins with my kids after a long week makes me feel like I’ve captured a tiny piece of childhood sweetness again.
- There’s a quiet pride in seeing how quickly these disappear at brunch—simple, honest comfort in every bite.
Nostalgic mornings in every bite
- This recipe was born out of a lazy Sunday morning experiment, aiming to use up a jar of chunky peanut butter that seemed a little lonely in the fridge. I wanted something quick, comforting, and a little different from the usual sweet muffins. The first batch had a slightly rough, rustic charm that made me realize how much I love the idea of turning everyday ingredients into something unexpectedly satisfying.
- Baking these reminds me of childhood mornings—those slow, messy weekends where breakfast was more about the smell of roasted peanuts and butter than perfection. It’s funny how a simple tweak, like adding a dash of cinnamon or swapping honey for sugar, can totally shift the mood of the muffin. They’re a reminder that good food doesn’t need to be fancy—just honest and a little bit nostalgic.
- heading
- story_type
Historical & Cultural Tidbits
- These muffins originated from my childhood kitchen, where peanut butter was a staple for quick snacks and breakfast treats.
- The idea to turn peanut butter into muffins came from wanting a portable, satisfying snack that packed comfort in every bite.
- Historically, peanut butter has been a beloved ingredient in American baking since the early 20th century, often associated with nostalgic home-style recipes.
- Using chunky peanut butter in this recipe adds unexpected crunch, reminiscent of old-fashioned, hearty baked goods.
Ingredient breakdown: key components
- Peanut Butter: I use creamy, rich peanut butter for a smooth texture that melds well into the batter—if you prefer more crunch, try chunky. The aroma of roasted peanuts in the oven is irresistible.
- Flour: I stick with all-purpose flour for a reliable rise; for a slightly denser muffin, swap half with whole wheat flour, which adds a nutty depth and a bit more chew.
- Sweetener: Honey adds a mellow sweetness and keeps the muffins moist. If you want a less sweet muffin, reduce it slightly or replace with maple syrup for a subtle smoky note.
- Eggs: They help bind everything together and add richness. For a vegan version, try mashed banana or applesauce, but expect a softer crumb and different flavor.
- Baking Powder: I rely on baking powder for lift, ensuring a light crumb. If your muffins turn out dense, double-check your freshness—old powder loses its power.
- Butter: Melted butter gives a nice richness and helps create crisp edges. For a dairy-free option, coconut oil works well, with a faint coconut aroma that pairs nicely with peanut butter.
- Optional Extras: A sprinkle of sea salt on top before baking enhances the peanut flavor. You could also fold in chocolate chips or chopped peanuts for added texture.
Spotlight on key ingredients
Peanut Butter:
- I use creamy, rich peanut butter for a smooth texture that melds well into the batter—if you prefer more crunch, try chunky. The aroma of roasted peanuts in the oven is irresistible.
- Flour: I stick with all-purpose flour for a reliable rise; for a slightly denser muffin, swap half with whole wheat flour, which adds a nutty depth and a bit more chew.
- Sweetener: Honey adds a mellow sweetness and keeps the muffins moist. If you want a less sweet muffin, reduce it slightly or replace with maple syrup for a subtle smoky note.
Additional Key Components:
- Eggs: They help bind everything together and add richness. For a vegan version, try mashed banana or applesauce, but expect a softer crumb and different flavor.
- Baking Powder: I rely on baking powder for lift, ensuring a light crumb. If your muffins turn out dense, double-check your freshness—old powder loses its power.
- Butter: Melted butter gives a nice richness and helps create crisp edges. For a dairy-free option, coconut oil works well, with a faint coconut aroma that pairs nicely with peanut butter.
Notes for ingredient swaps
- Dairy-Free: Swap regular butter for coconut oil or vegan margarine. Expect a slightly different richness and aroma, but still deliciously moist.
- Sweetener: Use maple syrup or agave nectar instead of honey. These alternatives add a nuanced sweetness and a touch of caramel flavor.
- Flour: Whole wheat or spelt flour can replace all-purpose for a nuttier, denser muffin. Keep in mind it might be a tad more crumbly.
- Peanut Butter: Almond or cashew butter can stand in for peanut butter. They bring a slightly different nutty flavor and creaminess.
- Eggs: For vegan options, try flaxseed or chia seed mixed with water — they add a mild nutty flavor and help bind the batter.
- Add-Ins: Chopped nuts or chocolate chips can be swapped or omitted. Chopped dried fruit like cranberries adds a chewy burst of tartness.
- Sweetener (if reducing): Reduce honey or syrup slightly to prevent overly moist batter, especially if using denser flours.
Equipment & Tools
- Muffin tin: Holds the batter and shapes the muffins.
- Mixing bowls: Combine ingredients separately for better texture control.
- Whisk or spatula: Mix wet and dry ingredients smoothly.
- Measuring cups and spoons: Ensure accurate ingredient portions.
- Cooling rack: Allow muffins to cool evenly and maintain crisp edges.
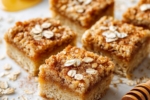
Step-by-step guide to peanut butter muffins
- Preheat your oven to 180°C (350°F). Grease or line a 12-cup muffin tin with paper liners. Have your ingredients measured and ready—mise en place makes everything smoother.
- In a large bowl, whisk together 1 1/2 cups all-purpose flour, 1 teaspoon baking powder, and a pinch of salt. Set aside.
- In another bowl, mix 1/2 cup melted butter, 1/2 cup honey, and 2 large eggs until well combined. The mixture should be smooth and slightly glossy, with a faint sweet aroma.
- Add 1 cup chunky or creamy peanut butter to the wet ingredients. Stir until fully incorporated—don’t overmix, just enough to blend.
- Gently fold the dry ingredients into the wet mixture—do this in parts, about 3 additions. Mix until just combined; the batter will be thick and slightly lumpy.
- Spoon the batter into the prepared muffin tin, filling each cup about 3/4 full. For an extra touch, sprinkle a tiny pinch of sea salt or chopped peanuts on top before baking.
- Bake for 20–25 minutes. The muffins are done when the tops turn golden, and a toothpick inserted into the center comes out clean or with moist crumbs.
- Remove from the oven and let cool in the tin for 5 minutes. Then transfer to a wire rack to cool completely—this prevents sogginess and helps develop a slight crisp edge.
- Once cooled, serve warm or at room temperature. These muffins are best enjoyed within 2 days, but can be stored in an airtight container for up to 3 days or frozen for longer storage.
- For reheating, microwave for 15–20 seconds until warm and fragrant—watch out for the gooey center if they’re extra fresh.
Let the muffins rest for 5 minutes in the tin, then transfer to a wire rack to cool completely. Serve warm or at room temperature, optionally topped with a smear of butter or a drizzle of honey for extra indulgence.
How to Know It’s Done
- Golden tops with slightly cracked surface.
- Toothpick inserted in center comes out moist but not wet.
- Smell of roasted peanuts and baked butter fills the kitchen.

Peanut Butter Muffins
Ingredients
Equipment
Method
- Preheat your oven to 180°C (350°F) and line a muffin tin with paper liners or grease it well. Gather all your ingredients so everything is ready to go.
- In a large mixing bowl, whisk together the flour, baking powder, and salt until evenly combined. This creates a light, airy base for your muffins.
- In a separate bowl, stir the melted butter and honey together until smooth. Then, add the eggs one at a time, whisking well after each addition until the mixture is glossy and slightly thickened.
- Fold the peanut butter into the wet mixture, mixing gently until fully incorporated. The batter will become thick and slightly sticky, with a rich peanut aroma filling the air.
- Gradually add the dry ingredients to the wet mixture, folding gently with a spatula until just combined. Do not overmix; a few lumps are fine and help keep the muffins tender.
- Spoon the batter into the prepared muffin tin, filling each cup about 3/4 full. Optionally, sprinkle a tiny pinch of sea salt or chopped peanuts on top for extra flavor and texture.
- Bake in the oven for 20–25 minutes, or until the tops turn golden brown and a toothpick inserted in the center comes out with moist crumbs. The muffins will smell warm and nutty as they bake.
- Remove the muffins from the oven and let them cool in the tin for about 5 minutes. Then, transfer them to a wire rack to cool completely, which helps develop a slight crisp on the edges.
- Once cooled, serve these muffins warm or at room temperature. They taste best within a couple of days but can be stored in an airtight container or frozen for longer enjoyment.
Pro tips for perfect peanut butter muffins
- Bolded mini-head: Use room temperature eggs for better emulsion and fluffier muffins.
- Bolded mini-head: Gently fold wet and dry ingredients—overmixing can make muffins dense and tough.
- Bolded mini-head: For extra moist muffins, add a tablespoon of yogurt or sour cream to the batter.
- Bolded mini-head: Top with a sprinkle of coarse sea salt before baking to enhance the peanut flavor.
- Bolded mini-head: Check for doneness by gently pressing the top—should be firm but springy—avoid overbaking to keep them moist.
- Bolded mini-head: For a richer crust, brush the muffins with melted butter halfway through baking.
- Bolded mini-head: Let the muffins cool for at least 5 minutes in the tin to prevent breaking and to set the crumb.
Common mistakes and how to fix them
- FORGOT to check oven temperature → Use an oven thermometer for accuracy.
- DUMPED in too much flour → Measure carefully to avoid dry muffins.
- OVER-TORCHED the tops → Cover with foil if they brown too quickly.
- UNDER-MIXED the batter → Fold gently to keep muffins light and fluffy.
Quick fixes and pantry swaps
- If batter is too thick, splash in a tablespoon of milk to loosen it.
- When muffins turn dark too quickly, shield with foil and lower oven temp slightly.
- Splash a little hot water on a stuck muffin to loosen it from the liner.
- Patch a cracked muffin by gently pressing the edges back together and baking a minute longer.
- Shield over-browned tops with foil to prevent burning while inside remains moist.
Prep, store, and reheat tips
- Prepare the dry ingredients (flour, baking powder, salt) a day ahead and store in an airtight container to save time and keep them fresh.
- Mix the wet ingredients (butter, honey, eggs, peanut butter) up to 24 hours in advance, then refrigerate in a sealed jar or container; bring to room temperature before baking for best results.
- Baked muffins can be stored in an airtight container at room temperature for up to 2 days, with the edges still slightly crisp and the centers moist.
- For longer storage, freeze muffins individually wrapped in plastic wrap and placed in a zip-top bag; they keep well for up to 3 months.
- Reheat muffins in the microwave for 15–20 seconds until warm. The smell of roasted peanut and butter should re-emerge, and the texture will be soft and inviting.
Top questions about peanut butter muffins
1. Can I use chunky peanut butter?
Use smooth peanut butter for a creamier texture, but chunky adds delightful crunch in every bite.
2. Can I substitute honey?
Yes, replacing honey with maple syrup or agave works well, but expect a slightly different sweetness and aroma.
3. Should eggs be cold or room temperature?
Ensure eggs are at room temperature for better mixing and fluffier muffins; cold eggs can make batter lumpy.
4. How do I know when muffins are done?
Bake until the tops are golden and a toothpick inserted in the center comes out with moist crumbs, about 20-25 minutes.
5. How should I store leftover muffins?
Store muffins in an airtight container at room temp for 2 days or freeze for up to 3 months, wrapped tightly.
6. How do I reheat muffins?
Reheat in the microwave for 15-20 seconds to restore warmth and softness, with a fragrant peanut aroma re-emerging.
7. Can I use different types of flour?
Use all-purpose flour for reliable rise; whole wheat adds nuttiness but makes muffins denser and more crumbly.
8. Can I make these vegan?
For vegan muffins, substitute eggs with mashed banana or applesauce, which may slightly alter texture and flavor.
9. Should I add salt on top?
Sprinkle a pinch of sea salt on top before baking to enhance the peanut butter flavor and add a savory note.
10. How long should they cool?
Allow muffins to cool for 5 minutes in the tin, then transfer to a wire rack to prevent sogginess and develop a slight crust.
These peanut butter muffins are more than just a snack; they’re a little reminder of lazy mornings and simple comforts. Baking them fills the house with a warm, nutty scent that lingers long after you’ve taken the last bite. It’s funny how something so familiar can still surprise you with a touch of nostalgia and that perfect, slightly chewy crumb.
Whenever I make these, I feel a quiet pride in turning basic ingredients into something that feels both hearty and indulgent. They’re ideal for a quick breakfast or an easy treat that doesn’t ask for perfection—just honest, homemade goodness that makes the morning a little brighter.

Hi, I’m Charlotte Hayes, the creator and storyteller behind Lost in the Aroma. If you’ve ever closed your eyes while something simmered on the stove just to take in the scent, then you already understand what this space is about. For me, aroma is memory. It is emotion. It is the first sign that something beautiful is about to be shared. Lost in the Aroma is where I bring together recipes, sensory storytelling, and my lifelong love for food. I am so glad you’re here.


Leave a Reply